5
Mounting Instructions
Heater Location Instructions:
Arrange units so their discharge air streams:
A. Are subjected to minimum interference from col-
umns, machinery and partitions.
B. Wipe exposed walls without blowing directly at
them.
C. Are directed away from room occupants in comfort
heating.
D. Are directed along the windward side when installed
in a building exposed to a prevailing wind.
Locate thermostat on interior partition walls or posts
away from cold drafts, internal heat sources and away
from heater discharge air streams.
Small rooms can be heated by one unit heater. Where
two walls are exposed, the heater should be mounted
as shown in Figure A.
Large rooms require multi-unit installations. Number
and capacity of units will be determined by volume of
building and square feet of floor area to be heated. Ar-
range units to provide perimeter air circulation where
each unit supports the air stream from another.
EXPOSED
EXPOSED
EXPOSED
EXPOSED
EXPOSE
D
EX
POS
ED
Figure A
Minimum Clearances
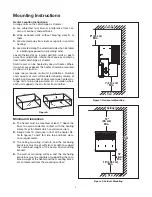
A. The heater must be mounted at least 7’ above the
floor to avoid accidental contact with the heating
elements or fan blade which could cause injury.
B. Keep at least 5’ clearance in front of the heater. Re-
fer to figures 1 and 2 for side, top and back clear-
ance requirements.
C. The ceiling mounting structure and the anchoring
provisions must be of sufficient strength to support
the combined weight of the heater and mounting
bracket.
D. The wall or mounting surface, and the anchoring
provisions must be capable of supporting the com-
bined weight of the heater and the mounting brack-
ets cantilevered from the mounting surface.
Wall
Ceiling
Floor
Wall
Ceiling
10' (305 cm)
Min.
Floor
18"
(46 cm)
Min.
9" (23 cm)
Min.
12"
(30 cm)
Min.
7’ (214 cm)
Min.
Figure 1: Horizontal Mounting
Wall
Ceiling
Floor
Wall
Ceiling
10' (305 cm)
Min.
Floor
18"
(46 cm)
Min.
9" (23 cm)
Min.
12"
(30 cm)
Min.
7’ (214 cm)
Min.
Figure 2: Vertical Mounting


