18
Step7:
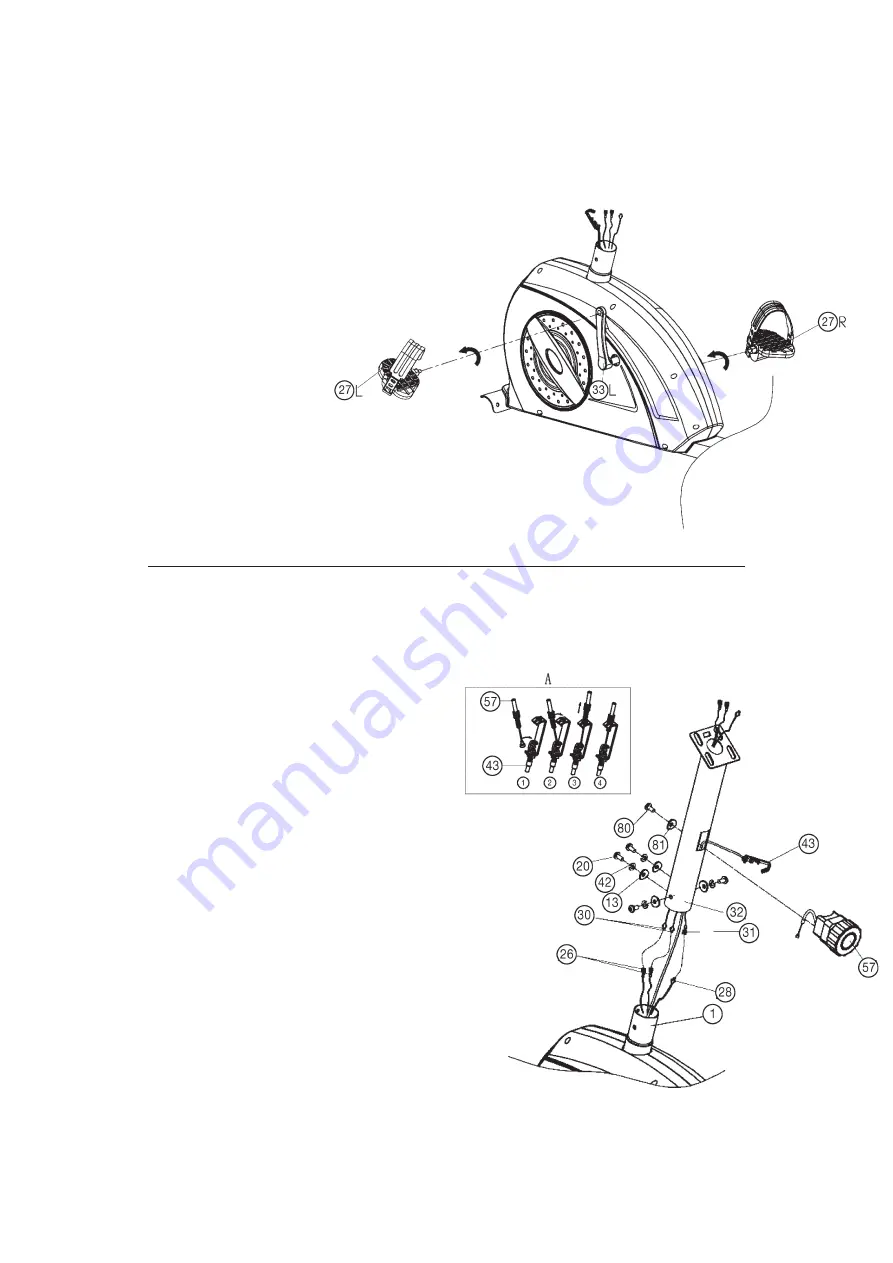
Attach the computer holder (32) at main frame (1).
1. Place the computer holder (32) against the main frame (1) and connect
the plug for the computer cable (31) with the matching plug for the
motor cable (28). Connect the plugs of pulse connection cables 3 (30)
with the matching plug of pulse connection cables 2 (26) too. When
the cable connections have been made, push the cable (43) from the
bottom through the computer holder (32) and pull out of the opening
at the upper end of the tube.
2. Push the computer holder (32) onto the locator provided for it at
the main frame (1). Ensure that the cable connections made are not
squashed. Screw the computer holder (32) onto the main frame (1) in
straight direction with screws (20), spring washers (42) and washers
(13).
3. Connect the cable of tension control (57) to the bracket of lower section
cable tension (43) (See figure [1]-[4]) Before this step of the installation,
it is advisable to adjust the resistance setting to the position, at which
the cable extends furthest from the sheath. Put the lowest part of cable
(57) into the small hook of lower tension cable (43) (figure 1+2). Pull it
(figure 3) until the small hook get in higher position (figure A3) and then
insert the cable (57) onto the bracket (43) (figure 4).
4. When the connection has been made, insert the resistance adjusting
unit (57) into the opening of the computer support (32) and secure with
screw (80) and washer (81).
Step 6:
Attach the pedal (27L+27R) at pedal crank (33L+33R).
1. Screw the right pedal (27R) into the locator in the right-hand side (as
seen in operation) for the pedal crank (33R) (Warning! the screw direction
is clockwise).
2. Screw the left pedal (27L) into the locator in the left-hand side (as seen
in operation) for the pedal crank (33L) (Warning! the screw direction is
anti-clockwise).
3. Then mount the pedal straps left and right on the associated pedals
(27). (The pedals are signed with “L” for Left and “R” for Right.)
Summary of Contents for 1212
Page 3: ...3 Deutsch ...
Page 4: ...4 ...


