background image

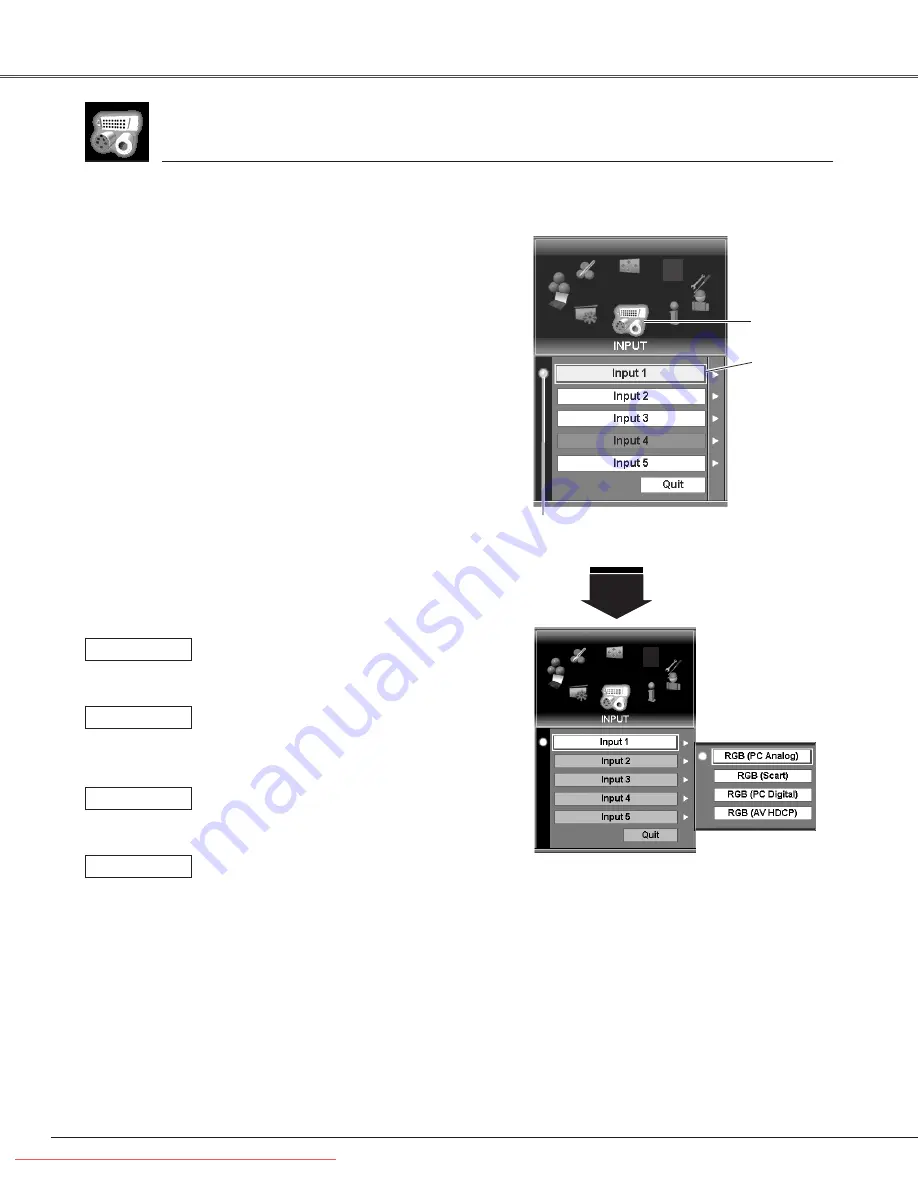
Input 

Press the MENU button to display the On-Screen Menu.
Spin Menu icons with the Point buttons (

7

and 

8

) or the

Control pad and press the SELECT button when the INPUT
icon comes right in front.

1

Move the yellow frame pointer with the Point buttons (

e

and 

d

) or the Control pad to a input which you want to

select.

2

Input 1

Move a pointer to Input 1 and press the SELECT button.

When the input source is analog coming from a
computer through the Input 1 (ANALOG IN)
terminal, select RGB (PC Analog). 

RGB (PC Analog)

When the input source is digital coming from a
computer through the Input 1 (DVI) terminal,
select RGB (PC Digital).

RGB (PC Digital)

RGB (Scart) 

When the input source compatible with HDCP
is coming from video equipment through the
Input 1 (DVI) terminal, select RGB (AV HDCP). 

RGB (AV HDCP)

Note:

HDCP (High-bandwidth Digital Content Protection) is a system for protecting digital
entertainment content delivered by DVI (Digital Visual Interface) from being copied.
The specification of HDCP is decided and controlled by Digital Content Protection,
LLC. Should the specification be changed, this projector may not display the digital
content protected by HDCP.

When the input source is coming from video
equipment connected to the Input 1 (ANALOG
IN) terminal with a Scart-VGA Cable, select RGB
(Scart). 

selects computer and video input sources.  

Input 1

Input Menu

Move the pointer to
RGB(PC Analog), RGB
(Scart), RGB(PC Digital),
or RGB(AV HDCP) and
press the SELECT button.

Source Select Menu

Input icon

Move the pointer
(yellow frame) to
an input that you
want to select and
press the SELECT
button.

The item being selected.

36

Press the SELECT button to access Source Select Menu for
the input selected.  
Select a source from the Source Select Menu and press the
SELECT button.

3

Input

Downloaded From projector-manual.com Christie Manuals

Summary of Contents for Christie LX66A

Page 1: ... Projection lens is optional User s Manual 103 005001 LX66A Downloaded From projector manual com Christie Manuals ...

Page 2: ...you to customize the starting or interval display for your presentation with its image capturing function p50 My Menu Selection My Menu function allows you to select menu items to be displayed on screen You can hide menus not in frequent use and make your own menu display p49 Customized Screen Setting Fine aspect setting menu is prepared in the projector You can adjust screen scale and position ex...

Page 3: ...tter Function 29 Input Selection 30 Auto PC Adjustment 30 Information 30 Keystone Adjustment 31 Screen Selection 31 Picture Freeze Function 31 P Timer Function 31 D Zoom Function 32 How to Operate On Screen Menu 33 Menu Icons and Their Features 35 Input 36 Input 36 System 38 System 38 PC System Selection 38 Video or S Video Signal Selection 39 Component Signal Selection 39 Computer Adjustment 40 P...

Page 4: ... be built into a compartment or similarly enclosed the minimum distances must be maintained Do not cover the ventilation slot on the projector Heat build up can reduce the service life of your projector and can also be dangerous If the projector is not to be used for an extended time unplug the projector from the power outlet CAUTION Not for use in a computer room as defined in the Standard for th...

Page 5: ...arts that could result in a fire or electric shock Never spill liquid of any kind on the projector Do not install the projector near the ventilation duct of air conditioning equipment This projector should be operated only from the type of power source indicated on the marking label If you are not sure of the type of power supplied consult your authorized dealer or local power company Do not overl...

Page 6: ...ling fans are provided to cool down the projector The fan s running speed is changed according to the temperature inside the projector Air Intake Vent Exhaust Vent Hot air exhaust Do not tilt the projector more than 20 degrees from side to side In upward projection do not tilt the projector over 20 degrees right and left Do not put the projector on either side to project an image 20 20 In downward...

Page 7: ...F THE OPTICAL COMPONENTS INSIDE THE PROJECTOR Retract the projector s adjustable feet and replace the lens cover to protect the lens surface when moving the projector Disconnect all the cables from the projector before moving the projector Moving the projector with the cables connected may cause damage to the projector or result in serious injury Do not hold the terminal cover when lifting or movi...

Page 8: ...tions If such changes or modifications should be made you could be required to stop operation of the equipment CAUTION This is a Class A equipment This equipment can cause interference in residential areas in this case the operator can be asked to take adequate countermeasures The AC Power Cord supplied with this projector meets the requirement for use in the country you purchased it AC Power Cord...

Page 9: ... exhausted from the exhaust vent Do not put heat sensitive objects near this side CAUTION This projector is equipped with cooling fans for protection from overheating Pay attention to following to ensure proper ventilation and avoid a possible risk of fire and malfunction Do not cover vent slots Keep projector sides clear of any objects Obstructions may block cooling air r Parts Name Preparation P...

Page 10: ...links green in the Power Management mode or when the projector is shutdown due to a power failure p65 67 Indicators r LAMP indicator Lights red when the projector is in the stand by mode Turns a dim lighting when the projector is turned on p65 67 e WARNING FILTER indicator Lights orange when the projector s filter is clogged with dust p61 66 u LAMP 2 REPLACE indicator Turns orange when the life of...

Page 11: ... On Screen Menu p33 34 o POWER ON OFF button Turns the projector on or off p27 28 i SHUTTER button Closes and opens up the built in shutter p29 q LENS SHIFT button Activates the Lens shift function p29 0 1 2 0 SELECT button Executes the item selected Expand compress the image in the Digital zoom mode p32 33 1 FOCUS button Adjusts focus of the image p29 2 ZOOM button Adjusts zoom of the image p29 P...

Page 12: ...ment to these jacks with a video cable BNC type p24 G B R H V and V Connect RGB output signal from a computer with a computer cable 5 BNC type to these jacks p22 w ANALOG OUT This terminal can be used for analog signal output incoming through the ANALOG IN terminal INPUT 1 Connect this terminal to the other monitor with a VGA cable p22 q INPUT 1 terminals DIGITAL DVI D HDCP compatible Connect digi...

Page 13: ...ts signal from SERIAL PORT IN When controling more than two projectors from a computer connect the other projector to this terminal with a serial cross cable commercially available e R C JACK Connect the remote control to this jack with the wired remote cable not supplied to use the remote control as wired p25 r USB Connect a USB mouse commercially available to control On Screen Menu p25 Preparati...

Page 14: ...f p27 28 e LENS SHIFT button Activates the LENS SHIFT function p29 i FOCUS buttons Adjust focus of the image p29 t WIRED REMOTE JACK Connect the Wired Remote Cable not provided to this jack Battery installation is required regardless of it is used as wired or wireless p16 25 0 SELECT button Executes the item selected t y D ZOOM button Activates the D Zoom function p32 q SHUTTER button Closes the b...

Page 15: ...ime to initialize the Remote Control ID and CH p16 u P TIMER button Operates P Timer function p31 MENU CANCEL INFO AUTO PC SCREEN FREEZE P TIMER SOUND REMOTE VOL MUTE CH ID INPUT 4 INPUT 1 INPUT 2 INPUT 3 INPUT 5 REMOTE RESET ON ALL OFF LENS SHIFT KEYSTONE SHUTTER D ZOOM ZOOM FOCUS ON OFF q e 0 1 t y o 3 i r u 4 w 2 e and r buttons are unusable t CH button Switches Remote Control Channel CH p16 y ...

Page 16: ... do it to the projector as well Refer to Remote Control in Setting menu on page 51 Should you be lost at which CH and ID are currently set initialize the Channel and ID once and set them again Hold down the CH button and press the SELECT button The Remote Control Channel switches sequentially for one pressing the SELECT button See Table1 on next page Press and hold the CH and ID buttons and slide ...

Page 17: ...ELECT button Table1 Remote Control Channel Frequency Table2 Remote Control ID Preparation Caution about Radio Wave The remote control operates in 2 4 GHz band the same frequency band used for industrial scientific and medical equipment such as pacemaker as well as amateur radio stations Before operating the remote control make sure no electromagnetic interference occurs and pay attention to the fo...

Page 18: ...amage lens cabinet or mechanical parts This projector is designed to project on a flat surface Projector should be perpendicular to the projection screen Otherwise the projected image may be distorted Keystone function allows you to correct image distortions but it should be considered that the keystone correction may lower the image resolution p31 Do not expose the projection screen to direct sun...

Page 19: ... each foot Adjust the four feet to obtain best position of the projected image and make the projector stable The projection angle is adjustable up to 3 65 degrees upward and downward respectively by rotating front and back feet The projector can project image vertically and horizontally in the range of 360 degrees For proper installation refer to Setup In Proper Directions on page 6 Projection ang...

Page 20: ...his equipment and must be easily accessible Main On Off switch AC power socket CAUTION For safety unplug the AC power cord when the projector is not in use When this projector is connected to an outlet with the AC power cord and the Main On Off switch is on it is in stand by mode and consumes a little electric power To the POWER CORD CONNECTOR on the projector Projector side AC Outlet side Ground ...

Page 21: ...ering or using the Optional Interface Boards contact your sales dealer and tell the Model no of your desired board p73 and Option Control No shown in the Information menu p30 and 59 Note When installing or removing the interface board disconnect the AC power cord from the AC outlet before doing it Remove and replace the front cover by following the procedure below To remove the front cover push th...

Page 22: ... supplied with this projector q Monitor Output DIGITAL DVI D q Monitor Input SERIAL PORT IN Note Unplug the power cords of both the projector and external equipment from the AC outlet before connecting the cables w Monitor Output ANALOG OUT ANALOG IN SERIAL PORT OUT R G B H V V Monitor Output e PC Serial Port Other Projector SERIAL PORT IN r r Downloaded From projector manual com Christie Manuals ...

Page 23: ...o Cable w S Video Cable e DVI D Cable Cables are not supplied with the projector Note Unplug the power cords of both the projector and external equipment from the AC outlet before connecting the cables VIDEO w q S Video Output e DIGITAL DVI D Digital Output HDCP compatible Video Output S VIDEO Downloaded From projector manual com Christie Manuals ...

Page 24: ...s are not supplied with the projector Note Unplug the power cords of both the projector and external equipment from the AC outlet before connecting the cables RGB Scart 21 pin Output w q Component Video Output Y Pb Cb Pr Cr Component Video Output Y Pb Cb Pr Cr ANALOG IN Y Cb Pb Cr Pr Y Cb Pb Cr Pr e Installation Downloaded From projector manual com Christie Manuals ...

Page 25: ...tor or the remote control Remove the wired remote cable from both of the projector and the remote control when using it as wireless Wireless Remote Control Operation Projector Top Control Operation Mouse Operation Connect the R C JACK on the projector and the remote control with the wired remote cable when operating the remote control as wired Connect the USB terminal on the projector and a USB mo...

Page 26: ... and ID 16 17 Menu 33 35 Select Point buttons Cancel Pad Pad Pad Pad 26 Basic Operation Basic Operation and Reference Buttons For detail operations other than those on this page follow the respective menu operations described later LENS SHIFT MENU CANCEL SELECT ZOOM FOCUS SHUTTER INPUT INFORMATION AUTO PC ADJ POWER P Top Control Remote Control These buttons are used on the menu operations These bu...

Page 27: ...the projector PJ PIN code Input Dialog Box Enter a PJ PIN code Select a number by using the Point buttons e d 7 and 8 or Control pad and fix the number with the SELECT button The number will change to If you fixed a wrong number move the yellow frame pointer to C or Ent once then enter the correct number Repeat this step to complete entering a four digit number When the four digit number is fixed ...

Page 28: ...NING OR BEFORE POWER INDICATOR LIGHTS RED OTHERWISE IT WILL RESULT IN SHORTENING LAMP LIFE Note The projector cannot be turned on for about 90 seconds after turned off You can turn it on again after the READY indicator lights green When the On start function is on this projector is turned on automatically by connecting the AC power cord to an AC outlet See page 52 for the On start function Do not ...

Page 29: ... indicator on the projector s top lights blue when the shutter is closed p10 When the Shutter level is High contrast in the Setting menu the shutter opens up 80 p53 The projector will shut down automatically when the set time on Shutter management has passed p54 MENU CANCEL INFO AUTO PC SCREEN FREEZE P TIMER SOUND REMOTE VOL MUTE CH ID LENS SHIFT KEYSTONE SHUTTER D ZOOM ZOOM FOCUS ON OFF SHUTTER b...

Page 30: ...Press the INFORMATION button on the top control or the INFO button on the remote control to display Information window on the screen To hide the Information window press the INFORMATION INFO button again Use this menu to check the projector s operating condition when you face troubles in operation Refer to the Information menu on page 59 Note Fine sync Total dots and Picture Position of some compu...

Page 31: ...control Refer to the Screen menu on page 47 for details of each screen setting Keystone function is provided to correct image distortions Press the KEYSTONE button on the remote control and correct vertical and horizontal distortions with the Point buttons e d 7 and 8 or the Control pad The Keystone adjustment can be memorized p48 Custom The arrows are white when there is no correction The arrows ...

Page 32: ...om Press the D ZOOM button on the remote control twice and then compress the image size with the SELECT button Note To exit the D Zoom mode try the followings To return to the normal screen change Input or change the screen size To exit the panning mode press any button except the D ZOOM button the SELECT button and the CH and ID buttons D Zoom Function Downloaded From projector manual com Christi...

Page 33: ...ed setting with your fingertip operation on the Control pad 4 Remote Control Operation Mouse Operation Point to the desired Menu icon and click to display the submenu or click 7 8 or 77 88 on the Control bar to spin Menu icons Click SELECT when the desired Menu icon is right in front Click an item to show the item data to adjust or the dialog box to select a setting Click your mouse to display the...

Page 34: ...nu On Screen Menu Mouse cursor When clicking 77 or 88 on the control bar menu icons rotate fast When clicking 7 or 8 menu icons rotate one by one by every clicking When the desired Menu icon comes right in front click SELECT or press the SELECT button on the top control or remote control The item being selected Quit To exit this menu Navigate through items with the Point buttons e d 7 and 8 Contro...

Page 35: ... the projection method Ceiling and Rear and activates keystone and digital zoom functions SETTING sets up operating environment for various features of the projector PC ADJ adjusts several features precisely for the projector to conform to your computer s signal format and project optimum image SPECIAL sets up operating environment of the projector and serves to the projector s maintenance INFORMA...

Page 36: ...idth Digital Content Protection is a system for protecting digital entertainment content delivered by DVI Digital Visual Interface from being copied The specification of HDCP is decided and controlled by Digital Content Protection LLC Should the specification be changed this projector may not display the digital content protected by HDCP When the input source is coming from video equipment connect...

Page 37: ...ter to Input 2 and press the SELECT button Y Pb Cb Pr Cr When the input source is component coming from video equipment connected to the Input 2 Y Pb Cb Pr Cr terminal select Y Pb Cb Pr Cr Move the pointer to RGB Video or Y Pb Cb Pr Cr and press the SELECT button Source Select Menu Move the pointer to Video Y Pb Cb Pr Cr or S Video and press the SELECT button Source Select Menu Note Input 4 and In...

Page 38: ...l input from computer Check the connection of your computer and the projector See Troubleshooting on page 68 Note The projector may display one of the following messages User preset system manually adjusted in PC Adjust menu Adjustment data can be stored in Mode 1 50 p41 42 Mode 1 SVGA 1 and Mode 1 are examples selects system of the connected computer and video source 38 PC Systems provided in the...

Page 39: ...mance If the projector cannot reproduce proper video image it is necessary to select a specific component video signal format from among 480i 575i 480p 575p 720p 1035i 1080i 50 and 1080i 60 Auto COMPONENT VIDEO SIGNAL FORMAT Component Signal Selection The projector automatically detects incoming video system and adjusts itself to optimize its performance When Video System is PAL M or PAL N select ...

Page 40: ...erated in Digital Signal input on DVI terminal and 480i 575i 480p 575p 720p HDTV 1035i HDTV 1080i 50 HDTV or 1080i 60 HDTV is selected on the System menu p39 1 2 Move the yellow frame pointer to Auto PC adj and then press the SELECT button twice This Auto PC Adjustment can be also executed by pressing the AUTO PC ADJ button on the top control or the AUTO PC button on the remote control unit p15 30...

Page 41: ...in one horizontal period Adjust number to match your PC image with the Point buttons e and d or the Control pad Total dots Press the SELECT button to show H Freq and V Freq of the connected computer Current mode Adjusts clamp level Phase and Width When the image has dark bars try this adjustment Clamp Adjusts the resolution at the Display area dialog box Horizontal Adjusts the horizontal area disp...

Page 42: ...ition Computer Adjustment To store the adjustment data or clear the stored data move the yellow frame pointer to Mode and then press the SELECT button Store To store the adjustment data select Store and press the SELECT button to display Mode dialog box Move the yellow frame pointer to any of Mode 1 to 50 in which you want to store and then press the SELECT button Free To clear the adjustment data...

Page 43: ... Cinema Real and Image 1 10 Press the MENU button to display On Screen Menu Spin Menu icons with the Point buttons 7 and 8 or the Control pad and press the SELECT button when the IMAGE icon comes right in front Move the yellow frame pointer with the Point buttons e and d or the Control pad to an image level which you want to select and then press the SELECT button Image Menu AV For PC Input For AV...

Page 44: ...IMAGE ADJ icon comes right in front Move the yellow frame pointer with the Point buttons e and d or the Control pad to an item which you want to adjust Press the SELECT button to display an adjustment dialog box Adjust value with the Point buttons e and d or the Control pad 3 IMAGE ADJ icon Note Color and Tint cannot be displayed when PC input source is selected Tint cannot be adjusted when the vi...

Page 45: ... turned off automatically Then the READY indicator will go out but the WARNING TEMP indicator keeps blinking red When the temperature inside the projector returns to normal the READY indicator lights green and then the projector can be turned on If the WARNING TEMP indicator still keeps blinking after the projector is turned on check the followings Note Even after the temperature inside the projec...

Page 46: ... turned off automatically Then the READY indicator will go out but the WARNING TEMP indicator keeps blinking red When the temperature inside the projector returns to normal the READY indicator lights green and then the projector can be turned on If the WARNING TEMP indicator still keeps blinking after the projector is turned on check the followings Note Even after the temperature inside the projec...

Page 47: ... automatically Then the READY indicator will go out but the WARNING TEMP indicator keeps blinking red When the temperature inside the projector returns to normal the READY indicator lights green and then the projector can be turned on If the WARNING TEMP indicator still keeps blinking after the projector is turned on check the followings Note Even after the temperature inside the projector returns...

Page 48: ... turned off automatically Then the READY indicator will go out but the WARNING TEMP indicator keeps blinking red When the temperature inside the projector returns to normal the READY indicator lights green and then the projector can be turned on If the WARNING TEMP indicator still keeps blinking after the projector is turned on check the followings Note Even after the temperature inside the projec...

Page 49: ... automatically Then the READY indicator will go out but the WARNING TEMP indicator keeps blinking red When the temperature inside the projector returns to normal the READY indicator lights green and then the projector can be turned on If the WARNING TEMP indicator still keeps blinking after the projector is turned on check the followings Note Even after the temperature inside the projector returns...

Page 50: ... turned off automatically Then the READY indicator will go out but the WARNING TEMP indicator keeps blinking red When the temperature inside the projector returns to normal the READY indicator lights green and then the projector can be turned on If the WARNING TEMP indicator still keeps blinking after the projector is turned on check the followings Note Even after the temperature inside the projec...

Page 51: ... turned off automatically Then the READY indicator will go out but the WARNING TEMP indicator keeps blinking red When the temperature inside the projector returns to normal the READY indicator lights green and then the projector can be turned on If the WARNING TEMP indicator still keeps blinking after the projector is turned on check the followings Note Even after the temperature inside the projec...

Page 52: ... turned off automatically Then the READY indicator will go out but the WARNING TEMP indicator keeps blinking red When the temperature inside the projector returns to normal the READY indicator lights green and then the projector can be turned on If the WARNING TEMP indicator still keeps blinking after the projector is turned on check the followings Note Even after the temperature inside the projec...

Page 53: ...eeps blinking red When the temperature inside the projector returns to normal the READY indicator lights green and then the projector can be turned on If the WARNING TEMP indicator still keeps blinking after the projector is turned on check the followings Note Even after the temperature inside the projector returns to normal the WARNING TEMP indicator continues to blink and does not go out until t...

Page 54: ...eeps blinking red When the temperature inside the projector returns to normal the READY indicator lights green and then the projector can be turned on If the WARNING TEMP indicator still keeps blinking after the projector is turned on check the followings Note Even after the temperature inside the projector returns to normal the WARNING TEMP indicator continues to blink and does not go out until t...

Page 55: ...se poor image quality When using under dusty or smoky conditions dust may accumulate on liquid crystal panel lens or optical elements inside it This condition may degrade quality of projected image When above symptoms are noticed contact your authorized dealer or service station for proper cleaning Pull down the tabs on both sides top of the filter cover and open the projector cover Pull out the a...

Page 56: ...crystal panel lens or optical elements inside it This condition may degrade quality of projected image When above symptoms are noticed contact your authorized dealer or service station for proper cleaning Pull down the tabs on both sides top of the filter cover and open the projector cover Pull out the air filter from the projector Replace the new air filter and the filter cover properly onto the ...

Page 57: ... automatically Then the READY indicator will go out but the WARNING TEMP indicator keeps blinking red When the temperature inside the projector returns to normal the READY indicator lights green and then the projector can be turned on If the WARNING TEMP indicator still keeps blinking after the projector is turned on check the followings Note Even after the temperature inside the projector returns...

Page 58: ... turned off automatically Then the READY indicator will go out but the WARNING TEMP indicator keeps blinking red When the temperature inside the projector returns to normal the READY indicator lights green and then the projector can be turned on If the WARNING TEMP indicator still keeps blinking after the projector is turned on check the followings Note Even after the temperature inside the projec...

Page 59: ... poor image quality When using under dusty or smoky conditions dust may accumulate on liquid crystal panel lens or optical elements inside it This condition may degrade quality of projected image When above symptoms are noticed contact your authorized dealer or service station for proper cleaning Pull down the tabs on both sides top of the filter cover and open the projector cover Pull out the air...

Page 60: ...eeps blinking red When the temperature inside the projector returns to normal the READY indicator lights green and then the projector can be turned on If the WARNING TEMP indicator still keeps blinking after the projector is turned on check the followings Note Even after the temperature inside the projector returns to normal the WARNING TEMP indicator continues to blink and does not go out until t...

Page 61: ...ng red When the temperature inside the projector returns to normal the READY indicator lights green and then the projector can be turned on If the WARNING TEMP indicator still keeps blinking after the projector is turned on check the followings Note Even after the temperature inside the projector returns to normal the WARNING TEMP indicator continues to blink and does not go out until the projecto...

Page 62: ...ng red When the temperature inside the projector returns to normal the READY indicator lights green and then the projector can be turned on If the WARNING TEMP indicator still keeps blinking after the projector is turned on check the followings Note Even after the temperature inside the projector returns to normal the WARNING TEMP indicator continues to blink and does not go out until the projecto...

Page 63: ...nce and Cleaning Turn off the projector and disconnect the AC power cord from the AC outlet RECOMMENDATION We recommend avoiding dusty smoky environments when operating a projector Usage in these environments may cause poor image quality When using under dusty or smoky conditions dust may accumulate on liquid crystal panel lens or optical elements inside it This condition may degrade quality of pr...

Page 64: ...stal panel lens or optical elements inside it This condition may degrade quality of projected image When above symptoms are noticed contact your authorized dealer or service station for proper cleaning Pull down the tabs on both sides top of the filter cover and open the projector cover Pull out the air filter from the projector Replace the new air filter and the filter cover properly onto the pro...

Page 65: ...crystal panel lens or optical elements inside it This condition may degrade quality of projected image When above symptoms are noticed contact your authorized dealer or service station for proper cleaning Pull down the tabs on both sides top of the filter cover and open the projector cover Pull out the air filter from the projector Replace the new air filter and the filter cover properly onto the ...

Page 66: ...nce and Cleaning Turn off the projector and disconnect the AC power cord from the AC outlet RECOMMENDATION We recommend avoiding dusty smoky environments when operating a projector Usage in these environments may cause poor image quality When using under dusty or smoky conditions dust may accumulate on liquid crystal panel lens or optical elements inside it This condition may degrade quality of pr...

Page 67: ...nce and Cleaning Turn off the projector and disconnect the AC power cord from the AC outlet RECOMMENDATION We recommend avoiding dusty smoky environments when operating a projector Usage in these environments may cause poor image quality When using under dusty or smoky conditions dust may accumulate on liquid crystal panel lens or optical elements inside it This condition may degrade quality of pr...

Page 68: ...crystal panel lens or optical elements inside it This condition may degrade quality of projected image When above symptoms are noticed contact your authorized dealer or service station for proper cleaning Pull down the tabs on both sides top of the filter cover and open the projector cover Pull out the air filter from the projector Replace the new air filter and the filter cover properly onto the ...

Page 69: ...crystal panel lens or optical elements inside it This condition may degrade quality of projected image When above symptoms are noticed contact your authorized dealer or service station for proper cleaning Pull down the tabs on both sides top of the filter cover and open the projector cover Pull out the air filter from the projector Replace the new air filter and the filter cover properly onto the ...

Page 70: ...crystal panel lens or optical elements inside it This condition may degrade quality of projected image When above symptoms are noticed contact your authorized dealer or service station for proper cleaning Pull down the tabs on both sides top of the filter cover and open the projector cover Pull out the air filter from the projector Replace the new air filter and the filter cover properly onto the ...

Page 71: ...nce and Cleaning Turn off the projector and disconnect the AC power cord from the AC outlet RECOMMENDATION We recommend avoiding dusty smoky environments when operating a projector Usage in these environments may cause poor image quality When using under dusty or smoky conditions dust may accumulate on liquid crystal panel lens or optical elements inside it This condition may degrade quality of pr...

Page 72: ...crystal panel lens or optical elements inside it This condition may degrade quality of projected image When above symptoms are noticed contact your authorized dealer or service station for proper cleaning Pull down the tabs on both sides top of the filter cover and open the projector cover Pull out the air filter from the projector Replace the new air filter and the filter cover properly onto the ...

Page 73: ...are noticed contact your authorized dealer or service station for proper cleaning Pull down the tabs on both sides top of the filter cover and open the projector cover Pull out the air filter from the projector Replace the new air filter and the filter cover properly onto the projector Reset the Filter time See Filter in the Special menu on page 57 Filter cover CAUTION Do not operate a projector w...

Page 74: ...crystal panel lens or optical elements inside it This condition may degrade quality of projected image When above symptoms are noticed contact your authorized dealer or service station for proper cleaning Pull down the tabs on both sides top of the filter cover and open the projector cover Pull out the air filter from the projector Replace the new air filter and the filter cover properly onto the ...

Page 75: ...nce and Cleaning Turn off the projector and disconnect the AC power cord from the AC outlet RECOMMENDATION We recommend avoiding dusty smoky environments when operating a projector Usage in these environments may cause poor image quality When using under dusty or smoky conditions dust may accumulate on liquid crystal panel lens or optical elements inside it This condition may degrade quality of pr...

Page 76: ...nce and Cleaning Turn off the projector and disconnect the AC power cord from the AC outlet RECOMMENDATION We recommend avoiding dusty smoky environments when operating a projector Usage in these environments may cause poor image quality When using under dusty or smoky conditions dust may accumulate on liquid crystal panel lens or optical elements inside it This condition may degrade quality of pr...

Page 77: ...crystal panel lens or optical elements inside it This condition may degrade quality of projected image When above symptoms are noticed contact your authorized dealer or service station for proper cleaning Pull down the tabs on both sides top of the filter cover and open the projector cover Pull out the air filter from the projector Replace the new air filter and the filter cover properly onto the ...

Page 78: ...perly onto the projector Reset the Filter time See Filter in the Special menu on page 57 Filter cover CAUTION Do not operate a projector with Air Filter removed Dust may accumulate on LCD Panel and Mirror degrading picture quality Do not put small parts into Air Intake Vents It may result in malfunction of a projector Air Filter Replacement Air filter Air filters prevent dust from accumulating on ...

Page 79: ...crystal panel lens or optical elements inside it This condition may degrade quality of projected image When above symptoms are noticed contact your authorized dealer or service station for proper cleaning Pull down the tabs on both sides top of the filter cover and open the projector cover Pull out the air filter from the projector Replace the new air filter and the filter cover properly onto the ...

Page 80: ...crystal panel lens or optical elements inside it This condition may degrade quality of projected image When above symptoms are noticed contact your authorized dealer or service station for proper cleaning Pull down the tabs on both sides top of the filter cover and open the projector cover Pull out the air filter from the projector Replace the new air filter and the filter cover properly onto the ...

Page 81: ...nce and Cleaning Turn off the projector and disconnect the AC power cord from the AC outlet RECOMMENDATION We recommend avoiding dusty smoky environments when operating a projector Usage in these environments may cause poor image quality When using under dusty or smoky conditions dust may accumulate on liquid crystal panel lens or optical elements inside it This condition may degrade quality of pr...

Page 82: ...NY OF LAMPS IS REMOVED IT MAY RESULT IN MALFUNCTIONS FIRE HAZARD OR OTHER ACCIDENTS Top Control CAUTION Reset the Lamp time NOTES ON LAMP REPLACEMENT Lamp 1 Lamp 2 Downloaded From projector manual com Christie Manuals 63 Maintenance and Cleaning IF A LAMP EXPLODES THE FOLLOWING SAFETY PRECAUTIONS SHOULD BE TAKEN ORDER REPLACEMENT LAMP Model No of your projector 103 005001 Replacement Lamp Type No ...

Page 83: ...NY OF LAMPS IS REMOVED IT MAY RESULT IN MALFUNCTIONS FIRE HAZARD OR OTHER ACCIDENTS Top Control CAUTION Reset the Lamp time NOTES ON LAMP REPLACEMENT Lamp 1 Lamp 2 Downloaded From projector manual com Christie Manuals 63 Maintenance and Cleaning IF A LAMP EXPLODES THE FOLLOWING SAFETY PRECAUTIONS SHOULD BE TAKEN ORDER REPLACEMENT LAMP Model No of your projector 103 005001 Replacement Lamp Type No ...

Page 84: ...ions dust may accumulate on liquid crystal panel lens or optical elements inside it This condition may degrade quality of projected image When above symptoms are noticed contact your authorized dealer or service station for proper cleaning Pull down the tabs on both sides top of the filter cover and open the projector cover Pull out the air filter from the projector Replace the new air filter and ...

Reviews: