


Installation
MV1864P
7
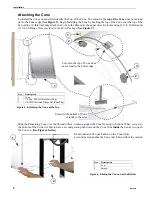
Finish attaching the Cone to the Fan Shroud with (4) 1/4-20 x 7/8 Bolts and Flange Nuts in the (4) remaining holes
pre-drilled in the Cone
(Figure 7 below)
.
Replacing the Doors
Replace the Doors by reversing the steps used to remove them in the
Removing the Doors section
of this manual.
Important:
Re-attach the Door Springs to the 1st Hole in the Doors
(Figure 8)
.
In windy conditions
: If the Fan
Doors do not close when the Fan is off, or if the Doors open before the Fan turns on; increase the Spring tension by
re-attaching the Spring to the second or third hole in the Doors.
3
Key
Description
1
Cone
2
Shroud
3
1/4-20 x 7/8 SS HH Bolt
(Included in Parts Pkg.)
4
1/4-20 HX Serrated Flange Nut
(Included in Parts Pkg.)
Figure 7. Attaching Cone
4
1
2
3rd Hole
2nd Hole
Re-attach Spring to Door
in the 1st Hole
Key
Description
1
Door Spring
2
Door
Figure 8. Re-attaching Door Spring
1
2