

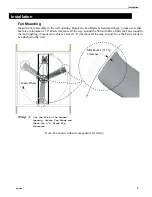


Installation
6
MV1864P
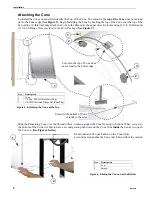
Attaching the Cone
To install the Cone you must first identify the Top of the Cone. The cutout in the
top
of the Cone
does not extend
out to the Cones edge (
See Figure 5)
.
Begin Installing the Cone by hooking the top of the Cone over the top of the
Fan orifice. At this time only attach the Cone to the Shroud at the upper most two holes using (2) 1/4-20 Bolts and
(2) 1/4-20 Flange Nuts
provided in the Parts Package
(
See
Figure 5)
.
Slide the Remaining Cone over the Shroud orifice, working around the Cone from top to bottom. When you get to
the bottom of the Cone it is best to have a second person push down on the Cone from
inside
the Fan as you push
the Cone on.
(See Figure 6 below)
.
Key
Description
1
Cone
2
1/4-20 x .8 SS HH Bolt (Parts Pkg.)
3
1/4-20 HX Serrated Flange Nut (Parts Pkg.)
Figure 5. Attaching the Cone at the Top
Cutout in the bottom of Cone
extends to the edge
1
Cutout in the top of Cone does
not extend to the Cones edge
3
2
3
2
From insided of Fan push down on the Cone while
a second person pushes the Cone onto Shroud from the outside.
Figure 6. Sliding the Cone on at the Bottom
Key
Description
1
Cone
2
Shroud
1
2