Chopin Alveo PC graph Quick Installation And First Test Download Page 3

E. Cooling circuit installation 

F. Electrical connection

H. Communications port power up and set-up

G. Software installation

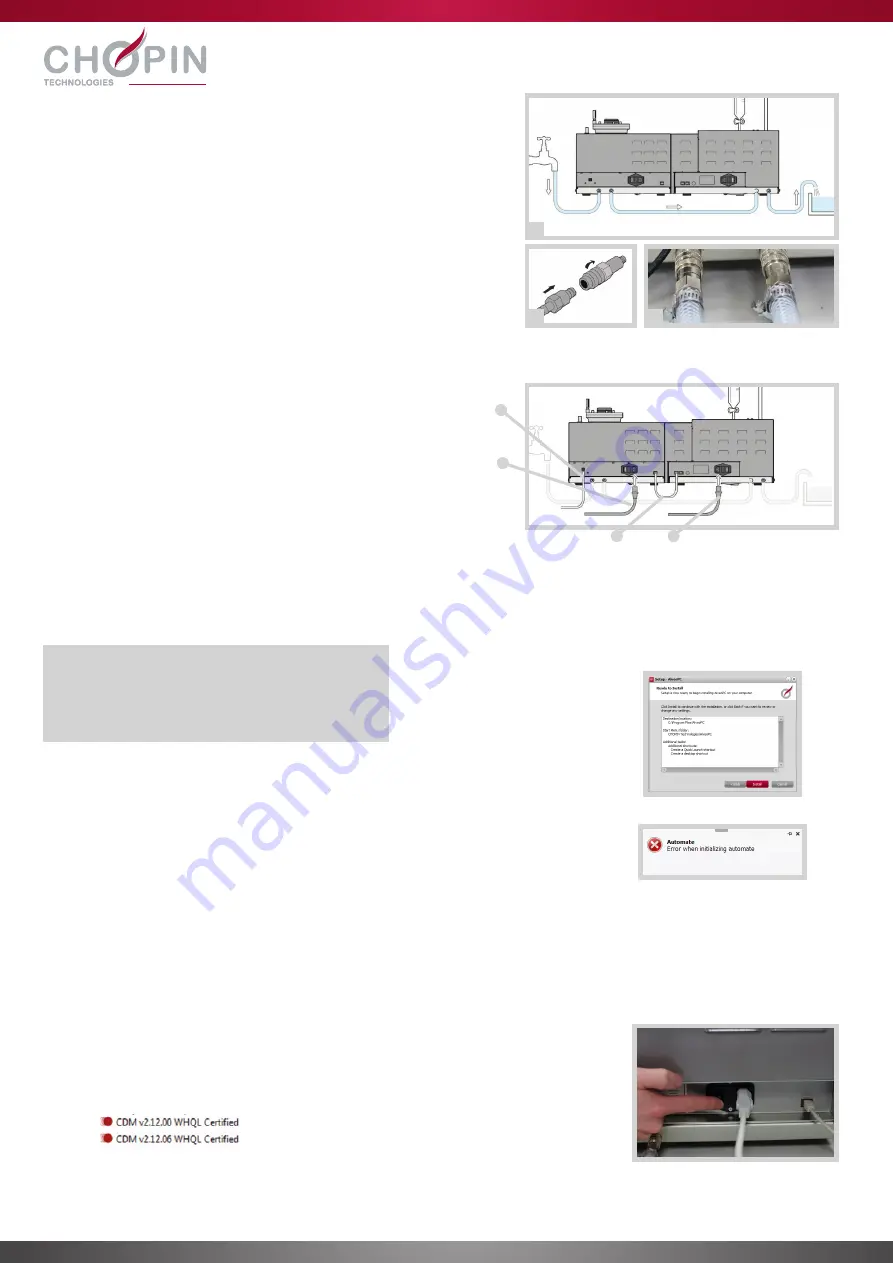
The AlveoPC has to be connected to a tap or a cryostat (water cooler). 

1.

  Connect the hydraulic circuit tips to the Alveograph and the kneader 

by using the included tubing as shown in the adjacent diagram.

2.

  Press the tips by pushing on the retaining ring.

3.

  Make sure it is waterproof between the tips and the reinforced tubing 

using the included hose clamps.

1.

  Connect the power cables (b and d) to the two units. 

2.

  Connect the two units between them using the Ethernet 

cable (c).

3.

  Connect the USB cable (a) between the Alveograph and the PC.

a: USB cable (PC) – b: Power cable (Alveograph)

c: Ethernet cable – d: Power cable (kneader)

1.

  Turn on the kneader and the Alveograph using the ON/OFF buttons situated at the 

back. 

2.

  Wait until the AlveoPC device is correctly installed, this can take a few minutes.

If installing the full driver, click the executable file that you can find on the flash drive.

3.

  Set the latency period of the hard drive, as well as the power and sleep mode settings 

of the computer, as explained in the “TO READ FIRST” file included in the flash drive. 

1.

  Double-click the “install” icon on the included flash drive.

If the Microsoft .NET Framework and SQL server compact components are not installed on 

the PC, they will be automatically installed with the software.

2.

  Click [Accept] and then [Install]

3.

  Wait a little bit. The software will be installed and will launch automatically. 

4.

 Since the communication with the device hasn’t been established, the following 

message will be displayed: Click [OK]

1

2

3

a

b

c

d

Setup required:

− Windows 7, Windows 8, Windows 10  

− Core i5 1.7GHz / 4Go 

− USB port

− Acrobat Reader 

Windows 7, Windows 8, Windows 10
Windows 10

Summary of Contents for Alveo PC graph

Page 1: ...Quick installation and first test Installation rapide et premier test Instalaci n r pida y primera prueba...

Page 2: ...ate by sliding it under the two spring leaves 1 Unscrew the upper plate by using the handle Take it out of its three guides so you can fully release the lower plate 2 Put the level onto the lower plat...

Page 3: ...sing the ON OFF buttons situated at the back 2 Wait until the AlveoPC device is correctly installed this can take a few minutes If installing the full driver click the executable file that you can fin...

Page 4: ...odify and start tests A list gathers all upcoming tests Protocols See protocols Partners Add and modify partners Clients Setting Set up the software language database etc Maintenance Maintain the mach...

Page 5: ...The software will check pressure stays stable for 3 seconds Air flow configuration 60 mm 7 Pressure is displayed on the screen 8 Tighten the needle valve of the micro scale gate to adjust the flow at...

Page 6: ...verse the mixing arm rotation with the key 3 Restart the kneader with the key The batter is extracted in the form of a ribbon 4 Remove the first centimeter of this ribbon and then when the batter reac...

Page 7: ...he plug b 2 Unscrew the upper plate e using the handle c and elevate it until it reaches the level of the three guide bolts d 3 Return the plug and let it rest on the knurled lock nut 4 Oil the fixed...

Page 8: ...guration report I e Elasticity ratio the P200 P P200 pressure at 4 cm from the beginning of the curve W Baking strength of dough surface under curve H L mm mm 125 150 100 75 50 25 0 0 25 50 75 100 P L...

Page 9: ...de ressort 1 D visser la platine sup rieure en utilisant la poign e La sortir de ses trois guides pour d gager enti rement la platine inf rieure 2 Poser le niveau sur la platine inf rieure 3 Mettre l...

Page 10: ...aide des boutons ON OFF situ s a l arri re 2 Attendre que le p riph rique correspondant l AlveoPC soit correctement install cela peut prendre plusieurs minutes En cas d installation incompl te du pil...

Page 11: ...les protocoles Partenaire Cr er et diter des partenaires Clients Configuration Configurer le logiciel langue base de donn es etc Maintenance Entretenir l appareil Panneau de commande p trin 1 Remet z...

Page 12: ...obtenir 92 5 Cliquer sur D marrer l tallonage Le logiciel v rifie que la pression reste bien stable pendant 3 secondes Configuration du d bit d air 60 mm 7 La pression apparait sur l cran 8 Visser le...

Page 13: ...Inverser la rotation du fraseur avec la touche 3 Relancer le p trin avec la touche La p te s extrait alors sous la forme d un ruban 4 Eliminer le premier centim tre de ce ruban puis lorsque la p te at...

Page 14: ...er le tampon b 2 D visser la platine sup rieure e l aide de la poign e c et remonter la jusqu ce qu elle atteigne le niveau des trois goujons de guidage d 3 Retourner le tampon et le faire reposer sur...

Page 15: ...e d lasticit le P200 P P200 pression 4 cm du d but de la courbe W force boulang re de la p te surface sous la courbe H L mm mm 125 150 100 75 50 25 0 0 25 50 75 100 P L l e W K Imprimer un essai 1 S l...

Page 16: ...las dos l minas de extracci n 1 Aflojar la platina superior utilizando el mango Sacarla de sus tres gu as para liberar por completo la platina inferior 2 Colocar el nivel sobre la platina inferior 3...

Page 17: ...o con la ayuda de los botones ON OFF situados en la parte trasera 2 Esperar a que el perif rico correspondiente al AlveoPC se instale correctamente lo que puede llevar unos minutos En caso de instalac...

Page 18: ...los protocolos Cliente Crear y editar colaboradores clientes Configuraci n Configurar el software idioma base de datos etc Mantenimiento Mantenimiento del aparato Panel de control amasadora 1 Reinicia...

Page 19: ...n Inicio de calibraci n El software verifica que la presi n permanece estable durante 3 segundos Configuraci n de caudal de aire 60 mm 7 La presi n aparece en la pantalla 8 Girar el grifo de aguja de...

Page 20: ...taci n de la pala amasadora con la tecla 3 Volver a iniciar la amasadora con la tecla La masa se extraer con forma de cinta 4 Eliminar el primer cent metro de esta cinta y despu s cuando la masa alcan...

Page 21: ...masado 1 Desenroscar la tuerca a y retirar el tap n b 2 Desenroscar la platina superior e con ayuda del mango c y elevarla hasta que alcance el nivel de las tres clavijas de gu a d 3 Voltear el tamp n...

Page 22: ...ndice de elasticidad lE P200 P P200 presi n a 4 cm del comienzo de la curva W fuerza panadera de la masa superficie bajo la curva H L mm mm 125 150 100 75 50 25 0 0 25 50 75 100 P L l e W K Imprimir...

Page 23: ...LVEOPC A B C D AlveoPC CHOPIN Technologies AlveoPC AlveoPC 20 20 C 2 C 65 15 1 2 3 4 1 2 3 90 4 1 2 1 2 USB Alveo Ethernet Alveo USB 10 x5 4 x2 AlveoPC cle usb alveopc indd 2 27 03 2015 10 11 43 1 2 4...

Page 24: ...c Ethernet d 1 ON OFF 2 AlveoPC USB 3 USB A LIRE EN PREMIER USB 1 USB Microsoft NET Framework SQL server compact 2 Accept Install 3 4 OK 1 2 3 a b c d Windows 7 Windows 8 Windows 10 Core i5 1 7 4 USB...

Page 25: ...A B 1 2 1 3 4 2 5 1 1 2 2 3 2 4 5 6 7 8 9 10 1 92 60 2 3 4 5 1 1 1 2 2 3 3 4 4 5 5 2 4 5 6 7 9 8 10 3 A 1 ON OFF 2 1...

Page 26: ...B C 92 60 D E 1 2 3 12C 4 5 92 1 2 3 4 92 5 3 60 7 8 60 9 3 3 10 1 2 3 4 5 6 1 250 0 5 2 25 1000 1 2 2 3 4 5 9 2 3 4 5 18 22 C...

Page 27: ...F G 1 2 3 4 5 1 6 7 8 1 9 6 10 8 11 1 2 3 1 4 5 6 7 8 9 10 6 8 9 1 F 2 3 4 5 6 7 12 6 8 9 25 C 10 11...

Page 28: ...H I 1 2 3 4 F 5 6 7 8 9 F 10 28 1 a b 2 e c d 3 4 f 5 g 6 h 7 k j i 20 8 9 10 11 12 13 4 1 2 3 4 5 6 7 8 9 10 a b c d f e g h i j k...

Page 29: ...5 6 7 8 9 AlveoPC P L P L I e I e 200 P200 4 W H L mm mm 125 150 100 75 50 25 0 0 25 50 75 100 P L l e W K 1 2 Imprimer test 3 Imprimer les param tres personnalis s 4 Imprimer 5 PDF Imprimer 1 2 3 ON...

Page 30: ...Notes Notas e...

Page 31: ...Notes Notas e...

Page 32: ...19955 West 162nd Street Olathe KS 66062 USA info chopininc com CHOPIN BEIJING Trading Company LTD R804 Unit B 1 Building Jia 5 Lianhuachi East Rd Xicheng District Beijing 100038 CHINA info chopinchina...

Reviews: