background image

MSP-CSC11

Installation Instructions

6

Assembly And Installation

Cart Assembly

CAUTION:

Attachment holes may be damaged if a power

drill is used to insert button head cap screws. Screws should
first be inserted and turned BY HAND with the hex key or with
a handheld screwdriver BEFORE using a hex head drill bit
and power drill (optional) to complete the attachment.

1.

Assemble two legs (A and B) to the column assembly (D)
using two 5/16-18 x 4-1/4" button head cap screws (E) and
one end cap (C) per leg. (See Figure 1)

NOTE:

When attaching the legs, make sure the larger holes

are on the outside and the smaller holes on the inside.

Figure 1

CAUTION:

INNER COLUMN IS SHIPPED DISENGAGED

and may pinch hands! Hold both inner and outer posts
(columns) while removing from box.

Display Installation

WARNING:

Exceeding the weight capacity can result in

serious personal injury or damage to equipment!  It is the
installer’s responsibility to make sure the combined weight of
all components located between the MSP-CSC11 up to (and
including) the display does not exceed 75 lbs (34 kg).
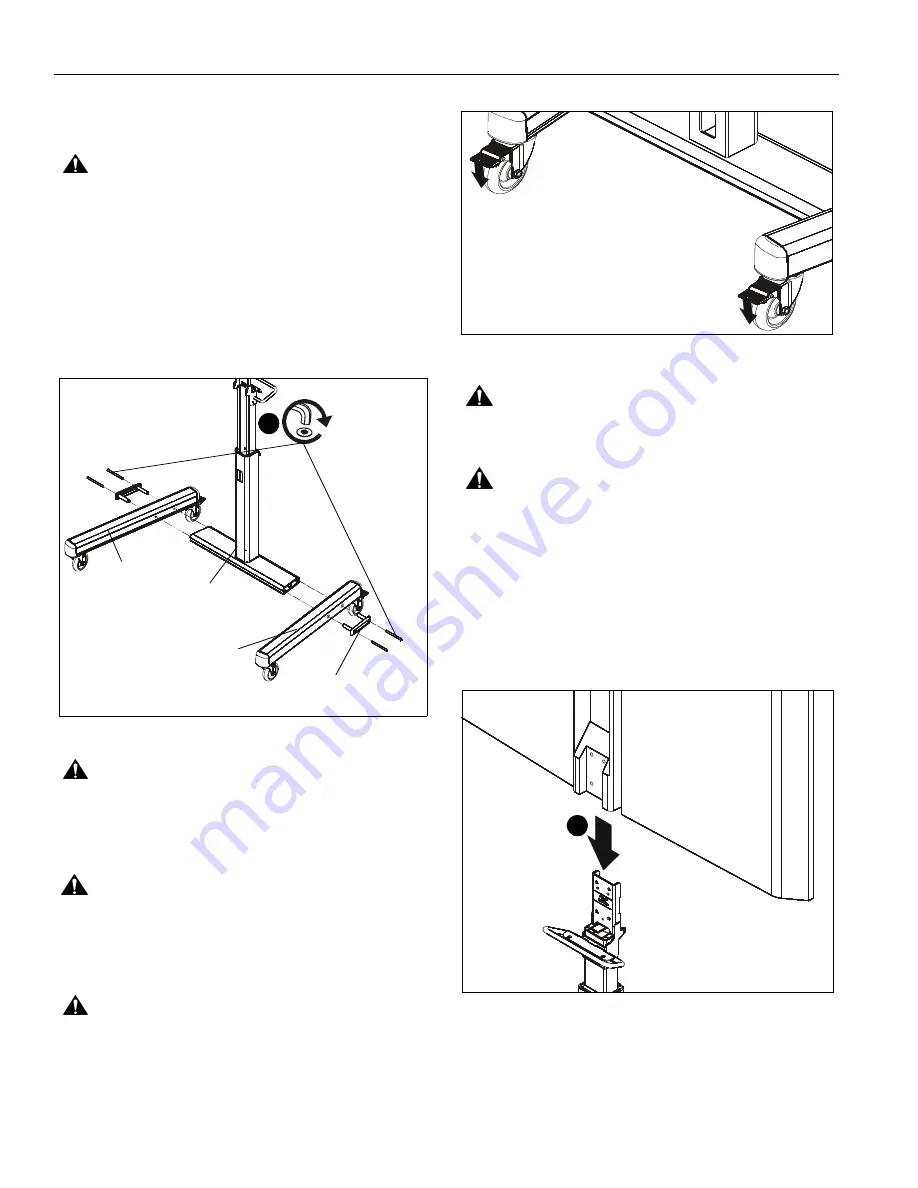
CAUTION:

Before attaching display to cart set the brakes

on the back wheels by pressing down on the tab.  (See
Figure 2)

Figure 2

WARNING:

DISPLAY WEIGHS UP TO 75 LBS! Always

use two people and proper lifting techniques when installing
or positioning display on cart.

WARNING:

The MSP-CSC11 mounting cart has been

designed specifically for Cisco’s MX200 and MX300 flat
panel display. DO NOT attempt to mount any other display to
this mounting cart!

For MX200 Installation

NOTE:

For MX300 Installation, proceed to MX300 Installation

Section.

1.

Carefully slide display onto column assembly (D). (See
Figure 3)

Figure 3

(Front view of cart)

(E) x 4

(C) x 2

(D)

(A) x 1

(B) x 1

1

(rear view of cart)

1

(MX200 install)

Summary of Contents for MSP-CSC11

Page 1: ...ções de Instalação Istruzioni di installazione Installatie instructies Instructions d installation Display Cart with Storage Shelf Spanish Product Description German Product Description Portuguese Product Description Italian Product Description Dutch Product Description French Product Description MSP CSC11 ...

Page 2: ...y It is the installer s responsibility to make sure all components are properly assembled and installed using the instructions provided WARNING Failure to provide adequate structural strength for this component can result in serious personal injury or damage to equipment It is the installer s responsibility to make sure the structure to which this component is attached can support five times the c...

Page 3: ... 9 1979 7 MAX 69 9 1775 5 MIN 73 3 1862 8 MAX 65 3 1658 6 MIN A APPROX CENTER OF MONITOR TO FLOOR MAX MIN 68 5 60 5 34 06 865 2 916 6 36 09 508 0 20 00 366 8 14 44 36 07 916 3 DETAIL A SCALE 1 4 7 1 4X 1 74 MX300 44 1 0 28 2 5 1 57 39 8 MX200 3 15 80 0 MX200 3 75 95 3 MX300 4X 0 10 R0 14 3 6 ...

Page 4: ... Chave de bocas Chiave a punte aperte Steeksleutel Clé à fourche By Hand A mano Von Hand Com a mão A mano Met de hand À la main Hex Head Wrench Llave de cabeza hexagonal Sechskantschlüssel Chave de cabeça sextavada Chiave esagonale Zeskantsleutel Clé à tête hexagonale Pencil Mark Marcar con lápiz Stiftmarkierung Marcar com lápis Segno a matita Potloodmerkteken Marquage au crayon Drill Hole Perfora...

Page 5: ... leg B 1 left leg D 1 column assembly C 2 end cap K 2 M6 x 50mm L 2 M6 x 60mm E 4 5 16 18 x 4 1 4 F 1 storage shelf G 1 pole attachment plate H 4 1 4 20 x 3 4 R 1 M5 U 1 1 8 V 1 storage key T 1 5 32 W 1 3 16 Q 1 10 24 S 1 3 16 M 1 MX300 clip N 1 10 24 x 1 2 J 4 M6 x 40mm P 1 MX300 back cover bracket parts for MX300 installation only use with MX200 only ...

Page 6: ...allation WARNING Exceeding the weight capacity can result in serious personal injury or damage to equipment It is the installer s responsibility to make sure the combined weight of all components located between the MSP CSC11 up to and including the display does not exceed 75 lbs 34 kg CAUTION Before attaching display to cart set the brakes on the back wheels by pressing down on the tab See Figure...

Page 7: ...y D by removing two screws and washers holding back cover bracket to assembly See Figure 5 Figure 5 2 Use screws and washers removed in Step 1 to secure MX300 back cover bracket P to column assembly See Figure 6 Figure 6 3 Use 10 24 x 1 2 Phillips pan machine screw N and 10 24 wing nut Q to secure MX300 clip M to column assembly s interface plate See Figure 7 Figure 7 4 Carefully slide display ont...

Page 8: ...s WARNING Using screws of improper length or diameter may damage display Only use screws provided with mount Figure 10 Storage Shelf Installation 1 Use four 1 4 20 x 3 4 button head cap screws H to secure pole attachment plate G to storage shelf F See Figure 11 NOTE If planning on using the column for cable management be sure to install shelf assembly over the cable management opening on column WA...

Page 9: ... This bracket is located just above the cart handle See Figure 14 2 Install Cisco back cover onto back of display by pushing it into position until it snaps into place See Figure 14 NOTE If back cover does not fit securely in Step 2 adjust height of back cover bracket by following Steps 3 5 below 3 Loosening screws holding back cover bracket to column assembly See Figure 14 4 Adjust back cover bra...

Page 10: ...et the height of the cart so the display does NOT rest on the lower part of the center post See Figure 15 Always set the height so the knob is engaged in a hole in the center post Figure 15 Cart Use and Maintenance CAUTION This cart is intended for use only with the products and maximum weights indicated Use with other products or products heavier than the maximum weights indicated may result in i...

Page 11: ...s MSP CSC11 11 1 Always place cart on level surface 2 Always lock the wheels when the cart is not moving 3 Use cable clips on column to hang cables as needed when moving cart See Figure 17 Figure 17 cable example cable clips 3 ...

Page 12: ...linstraat 14 6003 DK Weert Netherlands P 31 0 495 580 852 F 31 0 495 580 845 Asia Pacific A Office No 1 on 12 F Shatin Galleria 18 24 Shan Mei Street Fotan Shatin Hong Kong P 852 2145 4099 F 852 2145 4477 Chief Manufacturing a products division of Milestone AV Technologies 8800 002242 Rev01 2012 Milestone AV Technologies a Duchossois Group Company www chiefmfg com 10 12 ...

Reviews: