background image

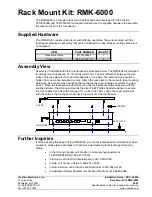
Installation Instructions

 FCASFP / FMSIML / FMSITL

5

INSTALL INTERFACE BRACKETS TO 
DISPLAYS

1.

Raise the latch mechanism on both interface brackets (R 

and S) to the 

OPEN

 position. (See Figure 1)

Figure 1

2.

Place displays face down on a soft, non-abrasive surface.

WARNING:  

IMPROPER INSTALLATION CAN LEAD TO 

DISPLAY FALLING CAUSING SERIOUS PERSONAL 
INJURY OR DAMAGE TO EQUIPMENT! Using screws of 
improper size may damage your display. Properly sized 
screws will easily and completely thread into display 
mounting holes. If spacers are required, be sure to use longer 
screws of the same diameter.

3.

Select screw 

diameter

 by examining hardware (A-L) and 

comparing with mounting holes on display. (See Figure 2)

4.

Select spacers: 

Spacers are 

NOT

 required if mounting holes are 

not recessed and interface brackets (R and S) 

can lay flat against display.

Nesting spacers (M) 

ARE

 required if mounting 

holes are recessed, or if protrusions prevent 

interface brackets (R and S) from laying flat. 

5.

Select screw 

length: 

(See Figure 2)

By hand, insert SHORTEST length screw of 

selected diameter (A, D, G or J) through universal 

washer (N - if required), bracket (R or S), selected 

spacer (M-if required), into display mounting hole. 

Do NOT thread screw into hole at this time.

IMPORTANT ! : 

The M8 screws do 

NOT

 require a 

washer. Use the universal washer (N) ONLY with M4, M5 
and M6 screws.

Proper screw length requires base of screw head 

to protrude above flat washer a 

distance equal to 

or greater than the screw diameter.

 If screw 

length is inadequate, select longer screw. Select 

shortest

 screw which will protrude the required 

distance.

6.

Align the center of the interface brackets (R and S) with 

center of screen. (See Figure 2)

NOTE:  

The diamond-shape hole in the bracket corresponds to 

the center of the mount.

7.

Use selected screws (A-L), universal washers (N-if required) 

and nesting spacers (M-if required), to connect interface 

brackets (R and S) to back of display. (See Figure 2)

Figure 2 

IMPORTANT ! : 

The M8 screws do 

NOT

 require a 

washer. Use the universal washer (N) only with M4, M5 
and M6 screws.

NOTE:  

The nesting spacers (M) may be used separately, or 

put two together in different configurations to create 
different size spacers. (See Figure 3)

Figure 3

1

Latch

mechanism

(R)

(S)

Latch
mechanism
already raised

LATCH CLOSED

LATCH OPEN

(N)

Center of

bracket

(A-L) 

7

6

(MA or MB)

NOTE: Use universal washer (N) ONLY with M4, M5 and

            M6 screws.

(Single)

(Nested)

(Stacked)

  0.375

   [9.5]

  0.563

  [14.3]

  0.750

  [19.1]

Summary of Contents for FCASFP

Page 1: ...O N S FCASFP FMSIML FMSITL Menu Board Interface Kits Spanish Product Description German Product Description Portuguese Product Description Italian Product Description Dutch Product Description French...

Page 2: ...death if you do not follow the instructions CAUTION A CAUTION alerts you to the possibility of damage or destruction of equipment if you do not follow the corresponding instructions IMPORTANT SAFETY...

Page 3: ...les fixations Loosen Fastener Aflojar elemento de fijaci n Befestigungsteil l sen Desapertar fixador Allentare il fissaggio Bevestiging losdraaien Desserrez les fixations Phillips Screwdriver Destorn...

Page 4: ...m C 4 M4x25mm E 4 M5x20mm F 4 M5x25mm G 4 M6x12mm I 4 M6x25mm J 4 M8x12mm K 4 M8x20mm M 4 Nesting spacer N 4 Universal washer Locking Hardware Kit P 2 10 24 x 5 8 Q 2 10 24 R 1 Left interface bracket...

Page 5: ...ed bracket R or S selected spacer M if required into display mounting hole Do NOT thread screw into hole at this time IMPORTANT The M8 screws do NOT require a washer Use the universal washer N ONLY wi...

Page 6: ...s to lock bracket in place See Figure 4 Figure 4 4 Repeat for remaining interface bracket Interface Bracket Adjustment CAUTION ALWAYS keep a small distance between screens when making adjustments Dama...

Page 7: ...lemento de fijaci n Befestigungsteil festziehen Apertar fixador Serrare il fissaggio Bevestiging vastdraaien Serrez les fixations Loosen Fastener Aflojar elemento de fijaci n Befestigungsteil l sen De...

Page 8: ...ON FMSIML PARTS FMSIML 2 3 16 K 1 Left interface bracket J 1 Right interface bracket A 4 M6 x 12mm B 4 M6 x 16mm C 4 M6 x 30mm D 4 1 4 E 4 750x 344x 500 F 4 M8 x 12mm G 4 M8 x 16mm H 4 M8 x 25mm I 2 1...

Page 9: ...e recessed or if protrusions prevent interface brackets J and K from laying flat 4 Select screw length See Figure 6 By hand insert SHORTEST length screw of selected diameter A or F through 1 4 washer...

Page 10: ...e bracket and close into place against mounting rail See Figure 7 4 Fasten latch into place using one 1 4 20 x 1 1 4 socket head screw I See Figure 7 NOTE Socket head screws I must engage through both...

Page 11: ...r Serrare il fissaggio Bevestiging vastdraaien Serrez les fixations Loosen Fastener Aflojar elemento de fijaci n Befestigungsteil l sen Desapertar fixador Allentare il fissaggio Bevestiging losdraaien...

Page 12: ...terface bracket DISPLAY ATTACH HARDWARE BAG A 8 M4x16mm B 6 M4x20mm C 6 M4x25mm D 6 M5x16mm E 6 M5x20mm F 6 M5x25mm G 6 M6x16mm H 6 M6x25mm I 6 M8x20mm J 6 M8x30mm K 4 M8x50mm L 8 75x 323x 25 M 8 75x...

Page 13: ...nt interface brackets Q from laying flat 5 Select screw length See Figure 10 By hand insert SHORTEST length screw of selected diameter A D G or I through universal washer N if required bracket Q selec...

Page 14: ...E adding displays to the mounting rails ensure end caps FMSECAP are in place at BOTH ends of mounting rail following instructions included with the FMSECAP 2 While supporting both sides of display low...

Page 15: ...ated on side of interface bracket See Figure 13 2 Adjust tilt as required See Figure 13 3 The tilt may be locked at 0 10 and 20 using one 10 24 x 2 1 4 Phillips head screw U and one 10 24 lock nut S p...

Page 16: ...894 6918 Europe A Franklinstraat 14 6003 DK Weert Netherlands P 31 0 495 580 852 F 31 0 495 580 845 Asia Pacific A Office No 918 on 9 F Shatin Galleria 18 24 Shan Mei Street Fotan Shatin Hong Kong P...

Reviews: