background image

4

Parts List

A. - Lullaby Zip Frame

B. - Mattress Pad

C. - Bassinet

D. - Changing Pad w/ Removable    

        insert

A.

B.

C.

D.

Summary of Contents for Lullaby Zip

Page 1: ...Lullaby Zip 3 in 1 Bassinet Playard Changing Table Owner s Manual IS0192E_01 2020 Artsana USA INC 03 20 ReadallinstructionsBEFORE assemblyandUSEofproduct KEEPINSTRUCTIONSFOR FUTUREUSE ...

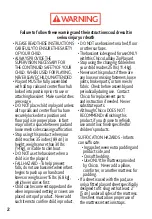
Page 2: ...oversare placedontopofproduct Neveradd suchitemstoconfinechildinproduct DONOTusebassinetonabed floor orothersurfaces ThebassinetisdesignedforuseONLY withthisChiccoLullabyZipPlayard Stopusingthechangingtablewhen yourchildreaches25lbs 11 4kg Neverusethisproductifthereare anylooseormissingfasteners loose joints brokenparts ortornmesh fabric Checkbeforeassemblyand periodicallyduringuse Contact Chiccof...

Page 3: ...ercomesfirst StrangulationHazard Childcanlift changingtableandgetnecktrapped betweenchangingtableandplayard frame Neverleavechangingtableinplace whenchildisintheplayard Stringscancausestrangulation DO NOTplaceitemswithastringaround child sneck hoodstrings pacifier cords etc orattachstringstotoys DONOTsuspendstringsintothe bassinetorplayard DONOTplacetheplayardneara windowwherecordsfromblindsor dra...

Page 4: ...4 Parts List A LullabyZipFrame B MattressPad C Bassinet D ChangingPadw Removable insert A B C D ...

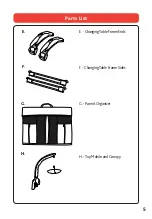
Page 5: ...5 E F G H E ChangingTableFrameEnds F ChangingTableFrameSides G ParentOrganizer H ToyMobileandCanopy Parts List ...

Page 6: ...6 J Parts List I I Toys J CarryBag ...

Page 7: ... ofchildrentoavoidthedangerofsuffocation Failuretofollowthesewarnings andinstructionscouldresultinseriousinjuryordeath Makesuretoprailsand centerfloorhubarelockedandsecurebeforeuse Thisproductrequiresadult assembly Keepfingersclearoftopcornersduringsetup 1 1 RemoveLullabyZipFramefromthe CarryBag ...

Page 8: ...8 Setting Up the Playard 2 2 WiththeLullabyZipFrame standingupright pullthecorners apartasshown Ifneeded pulluponthecenterfloor hubreleasestraptoliftthefloor ...

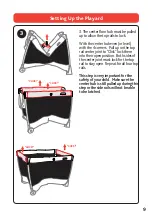
Page 9: ...hubeven orlevel withthe4corners Pulluponthetop railcenterjointto Click lockthem intotheiropenposition Bothsidesof thecenterjointmustlockforthetop railtostayopen Repeatforallfourtop rails Thisstepisveryimportantforthe safetyofyourchild Makesurethe centerhubisstillpulledupduringthis steporthesiderailswillnotbeable tobelatched ...

Page 10: ...10 Setting Up the Playard 4 4 Pushdownonthecenterfloor hubuntilthebottomoftheplayard isflat ForUseasaPlayardcontinueto thenextstep ForUseasaBassinetgotostep9 onpage15 ...

Page 11: ...11 Setting Up the Playard 5 5 InstallMattressPad paddedside up Donotuseplayardwithout MattressPadandmakesuretofold hookandloopstrapunderneath MattressPad ...

Page 12: ...12 Setting Up the Playard 6 6 Locate4MattressPadstrapholes ontheflooroftheplayard Thread the4hookandloopstrapsthrough totheflooroftheplayardasshown ...

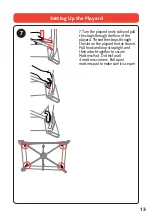
Page 13: ...nitssideandpull thestrapsthroughthefloorofthe playard Threadthestrapsthrough theslotontheplayardfootasshown Pullhookandloopstraptightand thenattachtogethertosecure MattressPad Dothisforall 4mattresscorners Pullupon mattresspadtomakesureitissecure ...

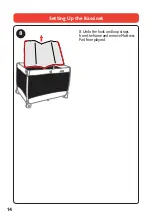
Page 14: ...14 Setting Up the Bassinet 8 8 Undothehookandloopstraps fromtheframeandremoveMattress Padfromplayard ...

Page 15: ...15 Setting Up the Bassinet 9A 9A UnfoldtheBassinetsidesas shown ...

Page 16: ...over theplayardframe Fitthe4corners oftheBassinetoverthe4corner BassinetSupportsontheLullaby playard asshown9C Oncethe Bassinetisrestingonthesupports pushdownonthecenterjointsonthe longsidesoftheBassinet9D This willsecuretheBassinetintoplace PushdownonBassinettobesureitis secure ...

Page 17: ...sinet Do notfullyopentheMattressPad Insert theMattressPadonanangleandslide ittowardsthesideoppositeofyou Adjustthemattresstofittheopposite cornersbeforeinsertingtheend closesttoyou WhentheMattress Padisfullyinsertedonthebottom pushitfirmlyintoplace Thiswill makethesidestautandremoveany slackinthefabric Alwayscheckto makesurethehookandloopstraps arefoldedundertheMattressPad ...

Page 18: ...hedtotheplayardcorner TheBassinethastobe attachedtotheplayardtousetheMobile Themobileisintendedforvisual stimulationandisnotintendedtobegraspedbythechild Alwaysattachthe providedfasteners strings straps clamps etc tightlytomobileandplayard accordingtotheinstructions Checkfrequentlyforlooseordamagedparts Possibleentanglementorstrangulationinjury DONOTaddadditionalstrings orstrapstomobileorplayard R...

Page 19: ...ptingtooperatethe Mobileunit install3 AA batteries UseaPhillipsscrewdrivertounfasten batterycoverandremovethebattery compartment Insertthebatteriesand matchthepolarityindicatedinside batterycompartment 11 Operate Mobile ...

Page 20: ...20 Assembling Toy Mobile 12 Insertthe3canopysupport sectionsintothefabricsleeve as shown 12 ...

Page 21: ...21 Assembling Toy Mobile 13 Pressinonthecenterofthecanopy supporttoflipitintothefabricsleeve 13 ...

Page 22: ...22 Assembling Toy Mobile 14 Inserttheknotattheendofthe ToyMobilecanopystringthroughthe openingatthetopoftheToyMobile Arm asshown Pullonthefabricto securethestring 14 ...

Page 23: ...23 15 SlidetheToystrapthroughthe openingononeofthesidesoftheToy Mobile Foldthehookandloopstrap togethertosecurethetoy Repeatfor theremaining2Toys Assembling Toy Mobile 15 ...

Page 24: ...obilebyslidingthe basedownoveranyoftheplayard cornerswiththeBassinetattached Lineupthepostwithcorresponding Bassinetcornerslotandpushdown untiltheMobilebaseiscompletely seatedaroundthecornerofplayard Assembling Toy Mobile ...

Page 25: ...25 17 ThecurveoftheMobileToybar canbeadjustedasshown Toremove theMobilebasepullouttorelease thebottomedgeoftheMobilebase andpullup 17 Assembling Toy Mobile ...

Page 26: ...enthe lightis ON itwillautomaticallyturnoffin10minutes NATURESOUNDS PresstheNatureSounds tocyclethrough4different soundsofnature TheselectedNatureSoundwillplayfora10minutesthen automaticallyturnoff MUSIC PresstheMusic buttontocyclethrough8differentmelodies Selectastartingmelody all8melodieswillcyclethroughtwice startingwiththe firstmelodyselected ToLockinamelodyandhaveitrepeat10times selecta melod...

Page 27: ...ailoftheplayardas shown Parentorganizercanbeattachedto eitherside Forgreaterconvenience werecommendthesidenearesttothe changingtablelatches 19B Toeasilyaccessthetop compartments unzipthetopofthe ParentOrganizer Foldandtuckthe fabricbehindtheParnetOrganizer as shown 19A 19B ...

Page 28: ...schangingtabletotheplayardframebyattachingtothe playardreceptacles Seeinstructions SUFFOCATIONHAZARD Babieshavesuffocatedwhilesleepingonchanging tables Changingtableisnotdesignedforsafesleep NEVERallowbabytosleeponchangingtable Stopusingthechangingtablewhenyourchildreaches25lbs 11 4kg Alwaysremovethechangingtablewhenyourchildisintheplayard Donotusechangingunitifitisdamagedorbroken ...

Page 29: ...intothegrooveof theChangingTableFrameEnduntilit clicksintoplace Makesurethetabis ontheinsidewhenassembling RepeatfortheotherChangingTable FrameSideasshown DoNOTSnaptheotherendontothe changerframe Movetostep21to installsoftgoodsbeforefinishingthe changerframeassembly Tab CLICK ...

Page 30: ...eChangingTableFrame Sidesintotheopeningsontheback oftheChangingPadandslideup 21B AttachtheChangingTable FrameEndtotheChangingTable FrameSidesasshownmakingsureit clicksintoplace Assembling Changing Table CLICK 21A 21B ...

Page 31: ...tabsalongthe outsideoftheChangingPad Thread thefabrictabsthroughthe correspondingopeningsontheframe andpullthefabrictabsthrough Flattenthefabrictabsouttosecure themintoplace Repeatforboth sides 22 Assembling Changing Table ...

Page 32: ...32 Assembling Changing Table 23 FliptheChangingTablerightside up ArrangetheZipperinsertsothat all4ofthehookandlooptabsare linedupandconnected Thenzip closedbothsectionsoftheZipper Insert 23 ...

Page 33: ...changing tablereceptaclesonthesideofthe playard AssembletheChanging Tablebyliningupthecornersofthe changingtableframewiththecorners oftheplayard Pressdownuntilthe changingtablelatchesintothe playardreceptacles Pullupon ChangingTabletocheckfor attachment Neverusethechanger onanothersurfaceorplayard 24 CLICK ...

Page 34: ...34 Removing Changing Table 25 RemovetheChangingTableby pushinginonthereleasebuttonsand liftingup 25 ...

Page 35: ...35 26 RemovetheBassinet ToyMobile ParentOrganizer ChangingTableand MattressPad Pulluponthecenter floorhubreleasestrapandliftthe centerhubupasfaraspossible Packing Up the Playard 26 ...

Page 36: ... Playard 27 LiftandsqueezetheTopRails centerreleaselock thenpushdown ReleasealloftheTopRaillocksonall 4sides IftheTopRaildoesnotunlock pulluponthecenterhubtorelease thefloorlocks Centerfloorhubmust beevenwithtoprails 27 ...

Page 37: ...37 Packing Up the Playard 28 Pulluponthecenterfloorhub releasestrapandpulltheplayardlegs towardsthecenter 28 ...

Page 38: ...Padintothe CarryBag makingsurethepadded sideofthemattressisfacingup Thenplacethefoldedplayardinto theMattressPadandallother accessoriesontop Usethehook andloopstrapstokeepthe accessoriesfromslidingaround TuckintheChangeroneithersideof theMattressPad ...

Page 39: ...39 Packing Up the Playard 30 PullupthesidesoftheCarryBag andclosethezipper 30 ...

Page 40: ...40 Packing Up the Playard 31 Tokeepinstructionsforfuture use Placethemanualinthestorage sleevelocatedontheundersideofthe MattressPad 31 ...

Page 41: ...gerofpossible leakagefromthebattery AlwaysremovethebatteriesiftheMobilewillnotbeusedforalongperiod Onlyusealkalinebatteriesofthesametypeorequivalenttothetype recommendedforthecorrectfunctionofthisproduct Nevermixnewandoldbatteries ordifferenttypesofbatteries Donotburnordisposeofspentbatteriesintotheenvironment Disposeof spentbatteriesatanappropriatedifferentiatedcollectionpoint Donotshort circuitt...

Page 42: ...queezetorelease Beforetoprailscanbeunlocked thecenter floorhubmustbepulledup Ifneededpulluponthecenterfloorhubreleasestrap ashighasthe4corners FLOORJOINTSDONOTUNLOCK Pulluponthecenterfloorhubreleasestraptounlockfloorjoints FOLDEDPLAYARDDOESNOTFITINTOMATTRESSPAD Pulluponthecenterfloorhubreleasestrapandgatherplayardlegstowardsthe centertomaketheplayardmorecompact Ifnecessary shiftplayardloweronpad o...

Page 43: ...pecleanplasticpartswithasoftdampcloth Alwaysdrythemetal partstopreventtheformationofrustiftheplayardhascomeintocontactwithwater MAINTENANCE Periodicallychecktheplayardforloosescrews wornparts tornmaterialorstitching Replaceorrepairthepartsasneeded UseonlyChiccoreplacementparts Keepthe playardinadryplace Ifplayardbecomeswetopenplayardandallowtodry completely Prolongedexposuretodirectsunlightmaycaus...

Page 44: ...stalledandusedinaccordancewiththe instructions maycauseharmfulinterferencetoradiocommunications However thereisnoguaranteethatinterferencewillnotoccurinaparticular installation Ifthisequipmentdoescauseharmfulinterferencetoradioor televisionreception whichcanbedeterminedbyturningtheequipmentoffand on theuserisencouragedtotrytocorrecttheinterferencebyoneormoreof thefollowingmeasures Reorientorreloca...

Page 45: ...haveanyquestionsorcommentsaboutthisproduct oraremissinganyof thepartspleasedonotreturnthisproducttothestore Contactusinoneofthe followingways 877 424 4226 info usa artsana com 1826WilliamPennWay Lancaster PA17601 www chiccousa com ...

Page 46: ...www chiccousa com ...

Reviews: