background image

17

10

WARNING

Do not place Bassinet on unit if a child is in the playard.  Make sure playard is 

fully assembled.

Setting Up the Bassinet

10. The Mattress Pad is slightly larger 

than the opening of the Bassinet.  Do 

not fully open the Mattress Pad.  Insert 

the Mattress Pad on an angle and slide 

it towards the side opposite of you.  

Adjust the mattress to fit the opposite 

corners before inserting the end 

closest to you.  When the Mattress 

Pad is fully inserted on the bottom 

push it firmly into place.  This will 

make the sides taut and remove any 

slack in the fabric.  Always check to 

make sure the hook and loop straps 

are folded under the Mattress Pad.

Summary of Contents for Lullaby Zip

Page 1: ...Lullaby Zip 3 in 1 Bassinet Playard Changing Table Owner s Manual IS0192E_01 2020 Artsana USA INC 03 20 ReadallinstructionsBEFORE assemblyandUSEofproduct KEEPINSTRUCTIONSFOR FUTUREUSE ...

Page 2: ...oversare placedontopofproduct Neveradd suchitemstoconfinechildinproduct DONOTusebassinetonabed floor orothersurfaces ThebassinetisdesignedforuseONLY withthisChiccoLullabyZipPlayard Stopusingthechangingtablewhen yourchildreaches25lbs 11 4kg Neverusethisproductifthereare anylooseormissingfasteners loose joints brokenparts ortornmesh fabric Checkbeforeassemblyand periodicallyduringuse Contact Chiccof...

Page 3: ...ercomesfirst StrangulationHazard Childcanlift changingtableandgetnecktrapped betweenchangingtableandplayard frame Neverleavechangingtableinplace whenchildisintheplayard Stringscancausestrangulation DO NOTplaceitemswithastringaround child sneck hoodstrings pacifier cords etc orattachstringstotoys DONOTsuspendstringsintothe bassinetorplayard DONOTplacetheplayardneara windowwherecordsfromblindsor dra...

Page 4: ...4 Parts List A LullabyZipFrame B MattressPad C Bassinet D ChangingPadw Removable insert A B C D ...

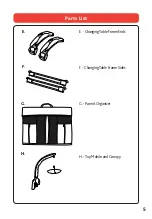
Page 5: ...5 E F G H E ChangingTableFrameEnds F ChangingTableFrameSides G ParentOrganizer H ToyMobileandCanopy Parts List ...

Page 6: ...6 J Parts List I I Toys J CarryBag ...

Page 7: ... ofchildrentoavoidthedangerofsuffocation Failuretofollowthesewarnings andinstructionscouldresultinseriousinjuryordeath Makesuretoprailsand centerfloorhubarelockedandsecurebeforeuse Thisproductrequiresadult assembly Keepfingersclearoftopcornersduringsetup 1 1 RemoveLullabyZipFramefromthe CarryBag ...

Page 8: ...8 Setting Up the Playard 2 2 WiththeLullabyZipFrame standingupright pullthecorners apartasshown Ifneeded pulluponthecenterfloor hubreleasestraptoliftthefloor ...

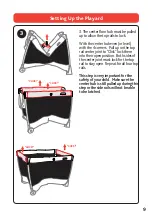
Page 9: ...hubeven orlevel withthe4corners Pulluponthetop railcenterjointto Click lockthem intotheiropenposition Bothsidesof thecenterjointmustlockforthetop railtostayopen Repeatforallfourtop rails Thisstepisveryimportantforthe safetyofyourchild Makesurethe centerhubisstillpulledupduringthis steporthesiderailswillnotbeable tobelatched ...

Page 10: ...10 Setting Up the Playard 4 4 Pushdownonthecenterfloor hubuntilthebottomoftheplayard isflat ForUseasaPlayardcontinueto thenextstep ForUseasaBassinetgotostep9 onpage15 ...

Page 11: ...11 Setting Up the Playard 5 5 InstallMattressPad paddedside up Donotuseplayardwithout MattressPadandmakesuretofold hookandloopstrapunderneath MattressPad ...

Page 12: ...12 Setting Up the Playard 6 6 Locate4MattressPadstrapholes ontheflooroftheplayard Thread the4hookandloopstrapsthrough totheflooroftheplayardasshown ...

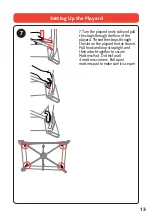
Page 13: ...nitssideandpull thestrapsthroughthefloorofthe playard Threadthestrapsthrough theslotontheplayardfootasshown Pullhookandloopstraptightand thenattachtogethertosecure MattressPad Dothisforall 4mattresscorners Pullupon mattresspadtomakesureitissecure ...

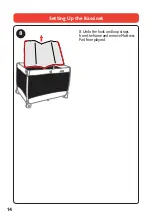
Page 14: ...14 Setting Up the Bassinet 8 8 Undothehookandloopstraps fromtheframeandremoveMattress Padfromplayard ...

Page 15: ...15 Setting Up the Bassinet 9A 9A UnfoldtheBassinetsidesas shown ...

Page 16: ...over theplayardframe Fitthe4corners oftheBassinetoverthe4corner BassinetSupportsontheLullaby playard asshown9C Oncethe Bassinetisrestingonthesupports pushdownonthecenterjointsonthe longsidesoftheBassinet9D This willsecuretheBassinetintoplace PushdownonBassinettobesureitis secure ...

Page 17: ...sinet Do notfullyopentheMattressPad Insert theMattressPadonanangleandslide ittowardsthesideoppositeofyou Adjustthemattresstofittheopposite cornersbeforeinsertingtheend closesttoyou WhentheMattress Padisfullyinsertedonthebottom pushitfirmlyintoplace Thiswill makethesidestautandremoveany slackinthefabric Alwayscheckto makesurethehookandloopstraps arefoldedundertheMattressPad ...

Page 18: ...hedtotheplayardcorner TheBassinethastobe attachedtotheplayardtousetheMobile Themobileisintendedforvisual stimulationandisnotintendedtobegraspedbythechild Alwaysattachthe providedfasteners strings straps clamps etc tightlytomobileandplayard accordingtotheinstructions Checkfrequentlyforlooseordamagedparts Possibleentanglementorstrangulationinjury DONOTaddadditionalstrings orstrapstomobileorplayard R...

Page 19: ...ptingtooperatethe Mobileunit install3 AA batteries UseaPhillipsscrewdrivertounfasten batterycoverandremovethebattery compartment Insertthebatteriesand matchthepolarityindicatedinside batterycompartment 11 Operate Mobile ...

Page 20: ...20 Assembling Toy Mobile 12 Insertthe3canopysupport sectionsintothefabricsleeve as shown 12 ...

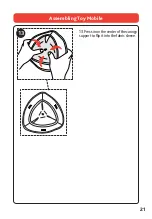
Page 21: ...21 Assembling Toy Mobile 13 Pressinonthecenterofthecanopy supporttoflipitintothefabricsleeve 13 ...

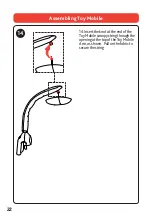
Page 22: ...22 Assembling Toy Mobile 14 Inserttheknotattheendofthe ToyMobilecanopystringthroughthe openingatthetopoftheToyMobile Arm asshown Pullonthefabricto securethestring 14 ...

Page 23: ...23 15 SlidetheToystrapthroughthe openingononeofthesidesoftheToy Mobile Foldthehookandloopstrap togethertosecurethetoy Repeatfor theremaining2Toys Assembling Toy Mobile 15 ...

Page 24: ...obilebyslidingthe basedownoveranyoftheplayard cornerswiththeBassinetattached Lineupthepostwithcorresponding Bassinetcornerslotandpushdown untiltheMobilebaseiscompletely seatedaroundthecornerofplayard Assembling Toy Mobile ...

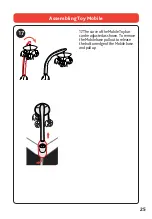
Page 25: ...25 17 ThecurveoftheMobileToybar canbeadjustedasshown Toremove theMobilebasepullouttorelease thebottomedgeoftheMobilebase andpullup 17 Assembling Toy Mobile ...

Page 26: ...enthe lightis ON itwillautomaticallyturnoffin10minutes NATURESOUNDS PresstheNatureSounds tocyclethrough4different soundsofnature TheselectedNatureSoundwillplayfora10minutesthen automaticallyturnoff MUSIC PresstheMusic buttontocyclethrough8differentmelodies Selectastartingmelody all8melodieswillcyclethroughtwice startingwiththe firstmelodyselected ToLockinamelodyandhaveitrepeat10times selecta melod...

Page 27: ...ailoftheplayardas shown Parentorganizercanbeattachedto eitherside Forgreaterconvenience werecommendthesidenearesttothe changingtablelatches 19B Toeasilyaccessthetop compartments unzipthetopofthe ParentOrganizer Foldandtuckthe fabricbehindtheParnetOrganizer as shown 19A 19B ...

Page 28: ...schangingtabletotheplayardframebyattachingtothe playardreceptacles Seeinstructions SUFFOCATIONHAZARD Babieshavesuffocatedwhilesleepingonchanging tables Changingtableisnotdesignedforsafesleep NEVERallowbabytosleeponchangingtable Stopusingthechangingtablewhenyourchildreaches25lbs 11 4kg Alwaysremovethechangingtablewhenyourchildisintheplayard Donotusechangingunitifitisdamagedorbroken ...

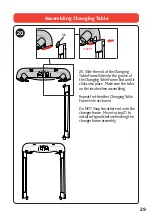
Page 29: ...intothegrooveof theChangingTableFrameEnduntilit clicksintoplace Makesurethetabis ontheinsidewhenassembling RepeatfortheotherChangingTable FrameSideasshown DoNOTSnaptheotherendontothe changerframe Movetostep21to installsoftgoodsbeforefinishingthe changerframeassembly Tab CLICK ...

Page 30: ...eChangingTableFrame Sidesintotheopeningsontheback oftheChangingPadandslideup 21B AttachtheChangingTable FrameEndtotheChangingTable FrameSidesasshownmakingsureit clicksintoplace Assembling Changing Table CLICK 21A 21B ...

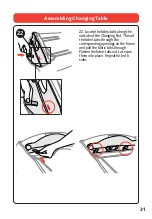
Page 31: ...tabsalongthe outsideoftheChangingPad Thread thefabrictabsthroughthe correspondingopeningsontheframe andpullthefabrictabsthrough Flattenthefabrictabsouttosecure themintoplace Repeatforboth sides 22 Assembling Changing Table ...

Page 32: ...32 Assembling Changing Table 23 FliptheChangingTablerightside up ArrangetheZipperinsertsothat all4ofthehookandlooptabsare linedupandconnected Thenzip closedbothsectionsoftheZipper Insert 23 ...

Page 33: ...changing tablereceptaclesonthesideofthe playard AssembletheChanging Tablebyliningupthecornersofthe changingtableframewiththecorners oftheplayard Pressdownuntilthe changingtablelatchesintothe playardreceptacles Pullupon ChangingTabletocheckfor attachment Neverusethechanger onanothersurfaceorplayard 24 CLICK ...

Page 34: ...34 Removing Changing Table 25 RemovetheChangingTableby pushinginonthereleasebuttonsand liftingup 25 ...

Page 35: ...35 26 RemovetheBassinet ToyMobile ParentOrganizer ChangingTableand MattressPad Pulluponthecenter floorhubreleasestrapandliftthe centerhubupasfaraspossible Packing Up the Playard 26 ...

Page 36: ... Playard 27 LiftandsqueezetheTopRails centerreleaselock thenpushdown ReleasealloftheTopRaillocksonall 4sides IftheTopRaildoesnotunlock pulluponthecenterhubtorelease thefloorlocks Centerfloorhubmust beevenwithtoprails 27 ...

Page 37: ...37 Packing Up the Playard 28 Pulluponthecenterfloorhub releasestrapandpulltheplayardlegs towardsthecenter 28 ...

Page 38: ...Padintothe CarryBag makingsurethepadded sideofthemattressisfacingup Thenplacethefoldedplayardinto theMattressPadandallother accessoriesontop Usethehook andloopstrapstokeepthe accessoriesfromslidingaround TuckintheChangeroneithersideof theMattressPad ...

Page 39: ...39 Packing Up the Playard 30 PullupthesidesoftheCarryBag andclosethezipper 30 ...

Page 40: ...40 Packing Up the Playard 31 Tokeepinstructionsforfuture use Placethemanualinthestorage sleevelocatedontheundersideofthe MattressPad 31 ...

Page 41: ...gerofpossible leakagefromthebattery AlwaysremovethebatteriesiftheMobilewillnotbeusedforalongperiod Onlyusealkalinebatteriesofthesametypeorequivalenttothetype recommendedforthecorrectfunctionofthisproduct Nevermixnewandoldbatteries ordifferenttypesofbatteries Donotburnordisposeofspentbatteriesintotheenvironment Disposeof spentbatteriesatanappropriatedifferentiatedcollectionpoint Donotshort circuitt...

Page 42: ...queezetorelease Beforetoprailscanbeunlocked thecenter floorhubmustbepulledup Ifneededpulluponthecenterfloorhubreleasestrap ashighasthe4corners FLOORJOINTSDONOTUNLOCK Pulluponthecenterfloorhubreleasestraptounlockfloorjoints FOLDEDPLAYARDDOESNOTFITINTOMATTRESSPAD Pulluponthecenterfloorhubreleasestrapandgatherplayardlegstowardsthe centertomaketheplayardmorecompact Ifnecessary shiftplayardloweronpad o...

Page 43: ...pecleanplasticpartswithasoftdampcloth Alwaysdrythemetal partstopreventtheformationofrustiftheplayardhascomeintocontactwithwater MAINTENANCE Periodicallychecktheplayardforloosescrews wornparts tornmaterialorstitching Replaceorrepairthepartsasneeded UseonlyChiccoreplacementparts Keepthe playardinadryplace Ifplayardbecomeswetopenplayardandallowtodry completely Prolongedexposuretodirectsunlightmaycaus...

Page 44: ...stalledandusedinaccordancewiththe instructions maycauseharmfulinterferencetoradiocommunications However thereisnoguaranteethatinterferencewillnotoccurinaparticular installation Ifthisequipmentdoescauseharmfulinterferencetoradioor televisionreception whichcanbedeterminedbyturningtheequipmentoffand on theuserisencouragedtotrytocorrecttheinterferencebyoneormoreof thefollowingmeasures Reorientorreloca...

Page 45: ...haveanyquestionsorcommentsaboutthisproduct oraremissinganyof thepartspleasedonotreturnthisproducttothestore Contactusinoneofthe followingways 877 424 4226 info usa artsana com 1826WilliamPennWay Lancaster PA17601 www chiccousa com ...

Page 46: ...www chiccousa com ...

Reviews: