1
1
WARNING
The toy of the walker frame requires 2 x “AA” 1.5 Volt alkaline type batteries (not included).
• Batteries must only be fitted by an adult.
• To fit and/or replace batteries: Loosen the screw on the battery compartment cover with a
suitable screwdriver, press the tab and remove the battery compartment cover. Then remove
the spent batteries and fit new ones, ensuring that they have been fitted in the correct polarity, as
shown inside the battery compartment. Replace the battery cover and tighten the screw.
• Always keep batteries and tools out of reach of children.
• Always remove spent batteries from the toy to avoid the danger of possible leakage from the
battery damaging the product.
• Always remove the batteries if the toy will not be used for a long period.
• Only use alkaline batteries of the same type or equivalent to the type recommended for the
correct function of this product.
• Never mix new and old batteries, or different types of batteries.
• Do not burn or dispose of spent batteries into the environment. Dispose of spent batteries at an
appropriate differentiated collection point.
• Do not short-circuit the battery terminals.
• Do not attempt to recharge non-rechargeable batteries: they might explode.
• The use of rechargeable batteries is not recommended, since they could impair the toy’s
functionality.
• If rechargeable batteries are used, take them out of the toy before recharging them. Batteries
must always be recharged under adult supervision.
Fitting and/or Replacing Batteries
1
Using Electronic Toy Trays
Uso de las bandejas electrónicas de juguete
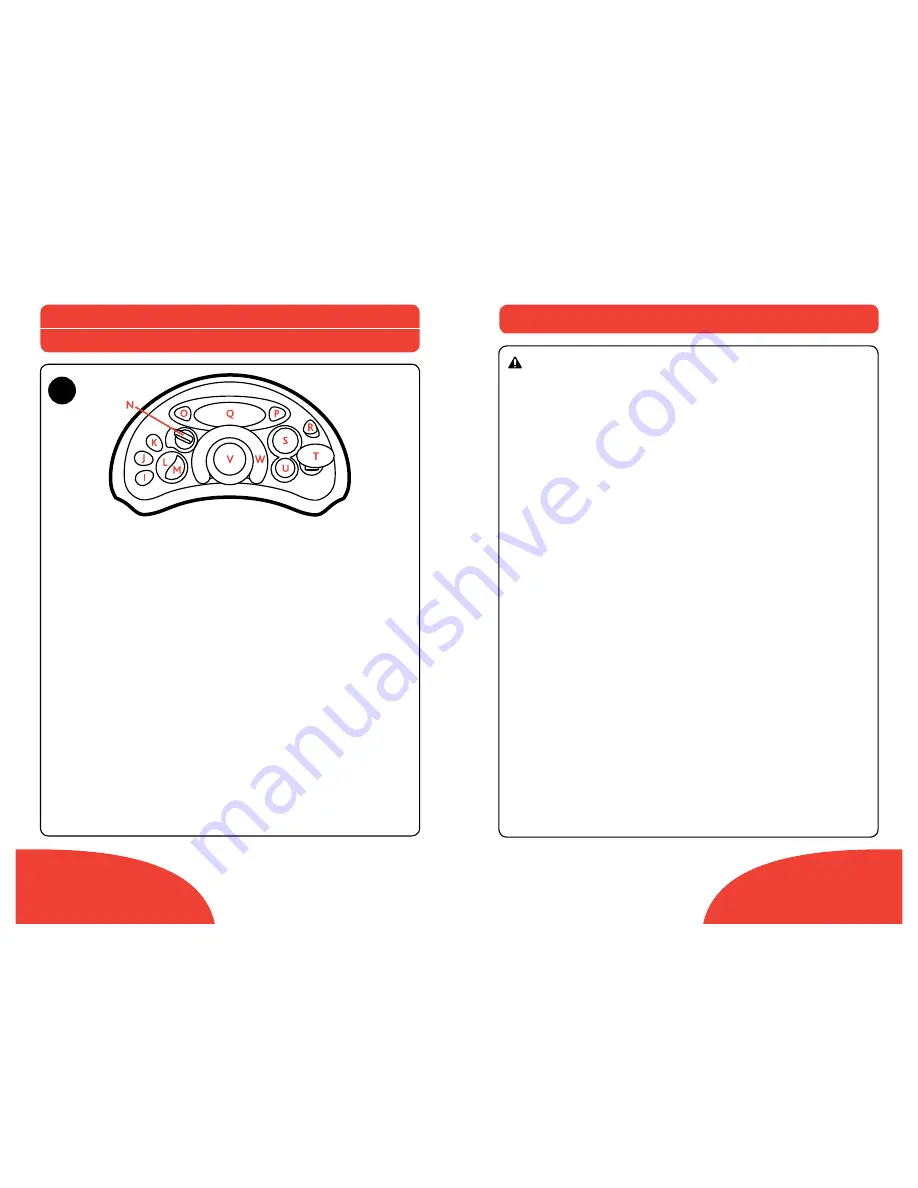
BANDEJA DEL CONDUCTOR
I. Presione el botón para escuchar pájaros.
J. Presione el botón para escuchar el mugido
de una vaca.
K. Presione el botón para escuchar pájaros.
L. Presione el botón para escuchar el ladrido
de un perro.
M. Presione el botón para escuchar el maullido
de un gato.
N. Gire la llave para escuchar el sonido de encendido.
O. Las luces se encienden en el modo intermitente.
P. Las luces se encienden en el modo intermitente.
Q. Las luces se encienden como en un tablero
de mando.
R. Suba o baje el botón para activar o desactivar
los sonidos.
S. Las luces se encienden al presionar el botón
inferior.
T. Empuje la palanca hacia delante y atrás para
cambiar las velocidades.
U. Presione el botón para el sonido de tambores.
V. Presione el botón para escuchar la bocina.
W. Gire el volante para guiar el andador.
DRIVER TRAY
I. Press button to hear birds
J. Press button to hear cow moo
K. Press button to hear birds
L. Press button to hear dog bark
M. Press button to hear cat meow
N. Turn key for ignition sound
O. Lights up like blinker
P. Lights up like blinker
Q. Lights up like dashboard
R. Slide button up or down to turn
sound on/off
S. Lights up when lower button is pushed
T. Push stick forward and pull backward
to shift
U. Press button for drums
V. Press button to hear horn
W. Turn wheel to steer
Summary of Contents for Infant Walker and Electronic PLAY TRAY
Page 1: ......
Page 11: ...www chiccousa com COMO ITALY...


