background image

SKU 93722

For technical questions please call 1-800-444-3353

Page 8

Operation

For use as a Hammer Drill:

CAUTION:

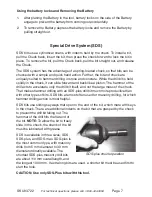
 Use only impact grade SDS-Plus bits, designed for SDS-Plus hammer

drills. Standard bits will not be properly held by this Chuck, and may break
under the force created by this tool. SDS-Plus impact grade bits are available
from Harbor Freight Tools.
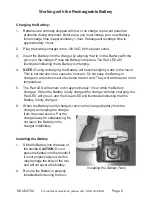
1.

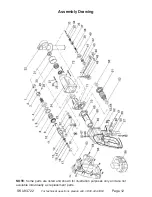
The Auxiliary Handle must be installed for additional stability when Hammer

Drilling. Always use both hands to hold this tool during hammer drill operation.
To install Auxiliary Handle, slide the Auxiliary Handle Assembly (32) over the
Front Housing (24). Tighten the screw in the Handle Assemble to lock in place.
Adjust the length of the
Depth Gauge Rod to stop
the drilling process when the
correct hole depth is
reached. Tighten the Depth
Gauge Rod in place by
tightening the screw in the
Auxiliary Handle Assembly.
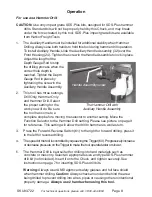
2.

This tool has three settings,

Drill Only, Hammer Only
and Hammer Drill. Select
the proper setting for the
work you will do. Be sure
the tool has come to a
complete stop before moving the selector to another setting. Move the
Function Selector to the Hammer Drill setting. Please see picture on page 9
for reference. This setting will allow the drill to hammer as well as turn.

3.

Press the Forward-Reverse Switch (61) to the right for forward drilling, press it

to the left for reverse drilling.

4.

The speed of the tool is controlled by squeezing the Trigger (60). Progressively increase

or decrease pressure on the Trigger to make the tool operate faster or slower.

5.

The Hammer Drill is best suited for drilling into hard materials such as

concrete or masonry. Select an appropriate size and type SDS-Plus hammer
drill bit (not included). Insert it onto the Chuck  and tighten securely. See
instructions on page 7 for inserting SDS-Plus drill bits.

Warning:

 Always wear ANSI approved safety glasses and full face shield

when hammer drilling. 

Caution:

 Always check around and behind the area

being drilled to prevent drilling into wires, pipes or causing other unintentional
property damage.  

Always use 2 hands when using this tool.

The Hammer Drill with

Auxiliary Handle Assembly

Handle Assembly screw

Summary of Contents for 93722

Page 1: ...Harbor Freight Tools All rights reserved No portion of this manual or any artwork contained herein may be reproduced in any shape or form without the express written consent of Harbor Freight Tools Fo...

Page 2: ...ea Do not let them handle machines tools or extension cords 4 Store idle equipment When not in use tools must be stored in a dry location to inhibit rust Always lock up tools and keep out of reach of...

Page 3: ...hes are removed from the tool or machine work surface before plugging it in 12 Avoid unintentional starting Be sure the switch is in the Off position when not in use and before plugging in Do not carr...

Page 4: ...pacemakers should consult with their physician s before using this product operation of equipment in close proximity to a heart pacemaker could cause interference or failure of the pacemaker 21 Do no...

Page 5: ...t time they are charged Allow several cycles operation followed by recharging before the Battery will become fully charged Battery Temperature Warning WARNING Battery explosion may cause serious perso...

Page 6: ...not a cause for concern Do not keep the Battery or charger in an environment of extreme heat or cold They will work best at room temperature 5 The Red LED will remain on for approximately 1 hour while...

Page 7: ...ward and back like a piston The hammer of the drill acts to accelerate only the drill bit itself and not the large mass of the chuck That makes hammer drilling with an SDS plus drill bit much more pro...

Page 8: ...ing for the work you will do Be sure the tool has come to a complete stop before moving the selector to another setting Move the Function Selector to the Hammer Drill setting Please see picture on pag...

Page 9: ...is properly centered in the Chuck Always use 2 hands when using this tool 4 Position the drill bit at the appropriate point on the workpiece and squeeze the trigger to start the drill operating The to...

Page 10: ...ol Lighten pressure on workpiece Battery Pack loses charge quickly 1 New Battery Pack will not hold a charge as long as older ones Completely deplete and recharge Battery Pack several times to extend...

Page 11: ...P t c a p m I 1 9 3 n i P 1 3 6 e t a l P e m a N t f e L 1 6 1 r e b b u R g n i R 2 0 4 e v a W g n i r a e B 1 4 6 e t a l P e m a N t h g i R 1 7 1 g n i R t n a t s i s e R 1 1 4 r e h s a W 1 5...

Page 12: ...3722 For technical questions please call 1 800 444 3353 Page 12 Assembly Drawing NOTE Some parts are listed and shown for illustration purposes only and are not available individually as replacement p...

Reviews: