background image

SKU 92455

      For technical questions, please call 1-800-444-3353.

Page 18

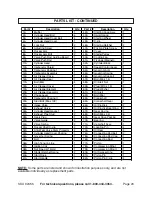
PARTS LIST

NOTE:

 Some parts are listed and shown for illustration purposes only, and are not

available individually as replacement parts.

Part # 

Description 

Qty. 

Part # 

Description 

Qty. 

Bolt (M6 x 12) w/Lock Washer 

22 

Bolt (M6 x 172) 

Engine Power Switch 

23 

Bolt (M5 x 20) 

Control Panel 

24 

Connection Board 

4 Voltmeter 

25 

Nut 

(M5) 

5 Circuit 

Breaker 

26 

Stator 

6 Outlet 

27 

Rotor 

DC Terminal 

28 

Cooling Fan 

Ground Connector 

29 

Heat Insulation Board 

DC Fuse 

30 

Fuel Tank 

10 

Pilot Light 

31 

Fuel Filter 

11 

Shock Absorber 

32 

Seal Ring 

12 

Shock Absorber Foot 

33 

Fuel Tank Cap 

13 

Lock Washer Nut 

34 

Fuel Gauge 

14 

Stator Cover 

35 

Bolt (M6 x 12) 

15 

Alternator Back Cover 

36 

Lock Washer Bolt 

(M6x12) 

16 Capacitor 

37 

Spacer 

17 

Bolt (M5 x16) 

38 

Rub Washer 

18 Rectifier 

39 

Bush 

19 

Bolt (M5x16) 

40 

Fuel Valve 

20 Cable 

Sheath 

41 

Frame 

21 

Bolt (M8 x 242) 

42 

Switch Box Cover 


43 

Engine 


PLEASE READ THE FOLLOWING CAREFULLY

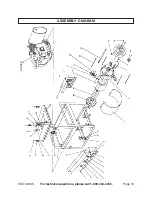
THE MANUFACTURER AND/OR DISTRIBUTOR HAS PROVIDED THE PARTS LIST AND ASSEMBLY
DIAGRAM IN THIS MANUAL AS A REFERENCE TOOL ONLY.  NEITHER THE MANUFACTURER OR
DISTRIBUTOR MAKES ANY REPRESENTATION OR WARRANTY OF ANY KIND TO THE BUYER THAT
HE OR SHE IS QUALIFIED TO MAKE ANY REPAIRS TO THE PRODUCT, OR THAT HE OR SHE IS
QUALIFIED TO REPLACE ANY PARTS OF THE PRODUCT.  IN FACT, THE MANUFACTURER AND/OR
DISTRIBUTOR EXPRESSLY STATES THAT ALL REPAIRS AND PARTS REPLACEMENTS SHOULD BE
UNDERTAKEN BY CERTIFIED AND LICENSED TECHNICIANS, AND NOT BY THE BUYER.  THE BUYER
ASSUMES ALL RISK AND LIABILITY ARISING OUT OF HIS OR HER REPAIRS TO THE ORIGINAL
PRODUCT OR REPLACEMENT PARTS THERETO, OR ARISING OUT OF HIS OR HER INSTALLATION
OF REPLACEMENT PARTS THERETO.

Summary of Contents for 92455

Page 1: ...pyright 2004 by Harbor Freight Tools All rights reserved No portion of this manual or any artwork contained herein may be reproduced in any shape or form without the express written consent of Harbor FreightTools For technical questions and replacement parts please call 1 800 444 3353 TO PREVENT SERIOUS INJURY OR DEATH READ AND UNDERSTAND ALL WARNINGS AND INSTRUCTIONS BEFORE USE REV 03 06 ...

Page 2: ...me 11 8 Continuous Running Hours Weight 103 6 Pounds This product requires oil and fuel to be added before starting Attempting to start the engine without oil WILL ruin the engine and void the warranty Caution This generator is not intended to power sensitive electronic equipment without the addition of an appropriate line conditioner sold separately SAVE THIS MANUAL You will need this manual for ...

Page 3: ...ld electrically malfunction or break down ground ing provides a low resistance path to carry electricity away from the user 5 Double insulated tools are equipped with a polarized plug one blade is wider than the other This plug will fit in a polarized outlet only one way If the plug does not fit fully in the outlet reverse the plug If it still does not fit contact a qualified electrician to instal...

Page 4: ...a generator while tired or under the influence of drugs alcohol or medication A moment of inattention while operating genera tors may result in serious personal injury 11 Dress properly Do not wear loose clothing or jewelry Contain long hair Keep your hair clothing and gloves away from moving parts Loose clothes jewelry or long hair can be caught in moving parts 12 Avoid accidental starting Make s...

Page 5: ...moving parts breakage of parts and any other condition that may affect the generator s operation If damaged have the generator serviced before using Many accidents are caused by poorly maintained generators 22 Use only accessories that are recommended by the manufacturer for your model Accessories that may be suitable for one generator may become hazard ous when used on another generator SERVICE 2...

Page 6: ...k free heat resistant piping Use the Generator only in well ventilated outdoor areas Carbon monoxide fumes are a colorless odorless gas that if inhaled can cause serious injury or death Pipes and silencer should not use any flammable materials nor should they be installed near the same Generator exhaust fumes must be within legal lim its 5 If the generator is installed outdoors it must be weatherp...

Page 7: ... away from exposed live electrical parts and connections to avoid sparking or arcing These events could ignite fumes or vapors 7 Do not refill the Fuel Tank while the Engine is running or while the Engine is still hot Do not operate the Generator with known leaks in the fuel system 8 Excessive buildup of unburned fuel gases in the exhaust system can create a potentially explosive condition This bu...

Page 8: ... not operate the Generator with safety guards removed While the Generator is running do not attempt to reach around the safety guards for maintenance or any other reason 5 Keep hands arms long hair loose clothing and jewelry away from moving parts Be aware that when engine parts are moving fast they cannot be seen clearly 6 Keep access doors on enclosures closed and locked when access is not re qu...

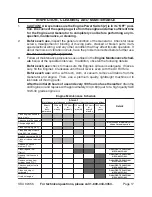
Page 9: ...d is used make sure to use only UL approved cords having the correct gauge and length See Figure A REQUIRED MINIMUM EXTENSION CORD GAUGE 120 VOLT NAMEPLATE AMPERES At Full Load EXTENSION CORD LENGTH 0 25 Feet 25 50 Feet 50 100 Feet 100 150 Feet 150 200 Feet 0 5 16 16 16 12 12 5 1 8 16 16 14 10 8 1 12 14 14 12 12 1 15 12 12 10 15 1 20 10 10 10 FIGURE A 4 Do not attempt to connect or disconnect load...

Page 10: ... a separate Generator 2 Electrical and other permits may be required for the installation of emergency power systems Investigate the local building and electrical codes before install ing this unit Installation must be completed by licensed contractors 3 WARNING The Generator weighs 103 6 pounds Use care and the proper lifting or hoisting equipment when moving it to the installation location Alway...

Page 11: ...ocedure OPERATING INSTRUCTIONS NOTE For additional references to the parts listed in the following pages refer to the Assembly Diagrams on pages 19 and 21 Pre Start Checks 1 Check to make sure the Engine s Power Switch 2 is in its OFF position See Figure B next page 2 Connect a 6 AWG grounding wire not included from the Ground Connector 8 on the Generator to a grounding rod not included that has b...

Page 12: ... questions please call 1 800 444 3353 Page 12 GROUND CONNECTOR 8 6 AWG GROUNDINGWIRE NOT INCLUDED GROUNDING ROD NOT INCLUDED FIGURE B OIL DIPSTICK 65A FIGURE C FUEL TANK 30 FUEL TANK CAP 33 FUEL GAUGE 34 ENGINE POWER SWITCH 2 ...

Page 13: ...he Fuel Tank If necessary refill the Fuel Tank with unleaded gasoline See Figure C To Start The Engine 1 Make sure the electrical powered tools equipment that will be used is not plugged in to the Generator 2 Turn the 115 volt AC Circuit Breaker 5 to its ON position See Figure D 3 Turn on the Fuel Valve 40 See Figure E 4 Close the Choke Lever 21A to about 1 8 clearance See Figure E OFF ON CIRCUIT ...

Page 14: ... slowly several times to allow the gasoline to flow into the Engine s carburetor Then hold the Start Handle firmly and pull the rope hard and fast Pull the rope all the way out using two hands if necessary If necessary pull the rope several times until the Engine starts See Figure G 7 Allow the Engine to run for several seconds Then open the Choke Lever 21A all the way See Figure E FIGURE G START ...

Page 15: ...ools and equipment See Figure D 4 When finished using the Generator turn the Engine Power Switch 2 to its OFF position Turn the Fuel Valve 40 to its OFF position Then disconnect all electrical powered tools and equipment from the Generator s 115 volt AC Duel Outlets 6 See Figures E F and G 5 After the Engine and Generator have completely cooled store the Generator in a safe clean dry location if n...

Page 16: ...start the Generator and continue powering the remaining tool or equipment See Figure H 4 Start and run the Engine as previously discussed in this manual 5 When finished using the Generator turn the Engine Power Switch 2 to its OFF position Turn the Fuel Valve 40 to its OFF position Then discon nect the electrical powered tool or equipment from the Generator s DC Terminals 7 See Figure H 6 After th...

Page 17: ... grade engine oil e l u d e h c S e c n a n e t n i a M e n i g n E l a v r e t n I s n o i t i d n o c e r e v e s r o y t s u d n i y r a s s e c e n e b l l i w e c n a n e t n i a m t n e u q e r f e r o M s l i a t e D s r u o h 8 r o y l i a d e s u e r o f e b s r u o h 0 5 r o y l k e e w s r u o h 0 0 1 r o y l k e e w i b s r u o h 0 0 2 r o y l h t n o m s r u o h 0 0 5 r o 6 y r e v e ...

Page 18: ... Washer Bolt M6x12 4 16 Capacitor 1 37 Spacer 4 17 Bolt M5 x16 4 38 Rub Washer 4 18 Rectifier 1 39 Bush 4 19 Bolt M5x16 3 40 Fuel Valve 1 20 Cable Sheath 1 41 Frame 1 21 Bolt M8 x 242 1 42 Switch Box Cover 1 43 Engine 1 PLEASE READ THE FOLLOWING CAREFULLY THE MANUFACTURER AND OR DISTRIBUTOR HAS PROVIDED THE PARTS LIST AND ASSEMBLY DIAGRAM IN THIS MANUAL AS A REFERENCE TOOL ONLY NEITHER THE MANUFAC...

Page 19: ...SKU 92455 For technical questions please call 1 800 444 3353 Page 19 ASSEMBLY DIAGRAM ...

Page 20: ...r Cleaner Element 1 60A Plug Washer 2 20A Air Cleaner Separator 1 61A Oil Alert 1 21A Choke Lever 1 62A Bolt M6 2 22A Carburetor Packing II 1 63A Crankshaft 1 23A Stud Bolt M6 x 109 2 64A Crankshaft Gear 1 24A Intake Valve 1 65A Oil Dipstick 2 25A Exhaust Valve 1 66A Oil Dipstick Seal Ring 2 26A Cylinder Head Gasket 1 67A Gear Casing 1 27A Exhaust Pipe Stud 2 68A Bolt M8 x 35 6 28A Spark Plug 1 69...

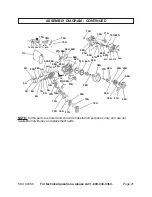
Page 21: ...4A 15A 16A 17A 18A 19A 20A 21A 22A 23A 24A 25A 26A 27A 28A 29A 30A 31A 32A 33A 36A 37A 38A 39A 40A 41A 42A 43A 44A 45A 46A 47A 48A 49A 50A 51A 52A 53A 54A 55A 56A 57A 17A 35A 68A 67A 66A 65A 64A 63A 62A 61A 60A 59A 58A 73A 72A 71A 70A 69A NOTE Some parts are listed and shown for illustration purposes only and are not available individually as replacement parts 81A 82A ...

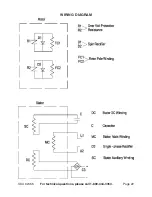
Page 22: ...SKU 92455 For technical questions please call 1 800 444 3353 Page 22 WIRING DIAGRAM ...

Page 23: ... you To take advantage of this warranty the product or part must be returned to us with transportation charges prepaid Proof of purchase date and an explanation of the complaint must accompany the merchandise If our inspection verifies the defect we will either repair or replace the product at our election or we may elect to refund the purchase price if we cannot readily and quickly provide you wi...

Page 24: ...ted part un less performed by an authorized warranty center c failure to follow recommendations on fuel use contained in the Owner s Manual d improper or inadequate maintenance of any warranted parts e repairs performed outside of the authorized warranty service dealers f alterations by changing adding to or remov ing parts from the engine 5 Service and Maintenance Component parts which are not sc...

Reviews: