background image

Page 25

For technical questions, please call 1-800-444-3353.

SKU 65414 


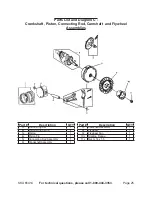
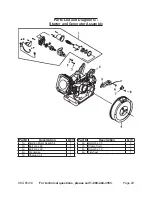
parts list and diagram c -  

crankshaft, piston, connecting rod, camshaft  and Flywheel 

assemblies

part #

description

qtY

c

 1

Piston Ring Set

1

c

 2

Piston Ring Circlip

2

c

 3

Piston

1

c

 4

Piston Pin

1

c

 5

Connecting Rod Assembly

1

c

 6

Crankshaft Assembly

1

part #

description

qtY

c

 7

Camshaft Assembly

1

c

 8

Flywheel

1

c

 9

Flywheel Fan

1

c

 10

Starting Flange

1

c

 11

Nut m 14 x 1.5

1

Summary of Contents for 65414

Page 1: ...website at http www harborfreight com Read this material before using this product Failure to do so can result in serious injury Save this manual Copyright 2008 by Harbor Freight Tools All rights reserved No portion of this manual or any artwork contained herein may be reproduced in any shape or form without the express written consent of Harbor Freight Tools Diagrams within this manual may not be...

Page 2: ...e 16 After Initial 20 Operation Hour Period 16 Every 25 Operation Hours Thereafter 16 Every 50 Operation Hours 16 Every 100 Operation Hours 16 Every 300 Operation Hours 16 Storage 17 Engine Troubleshooting 18 Equipment Troubleshooting 20 Main Parts List 21 Diagram 22 Parts List and Diagram A Crankcase Assembly 23 Parts List and Diagram B Cylinder Head Assembly 24 Parts List and Diagram C Crankshaf...

Page 3: ...ich if not avoided could result in minor or moderate injury NOTICE is used to address practices not related to personal injury CAUTION without the safety alert symbol is used to address practices not related to personal injury WARNING Read all instructions Failure to follow all instructions listed below may result in fire serious injury and or DEATH The warnings and precautions discussed in this m...

Page 4: ...ields in close proximity to a heart pacemaker could cause pacemaker interference or pacemaker failure Caution is neces sary when near the engine s magneto or recoil starter Use only accessories that are recom 6 mended by Harbor Freight Tools for your model Accessories that may be suitable for one piece of equipment may become hazardous when used on another piece of equipment Do not operate in expl...

Page 5: ...ving parts breakage of parts and any other condition that may affect the equipment s operation If damaged have the equipment serviced before using Many ac cidents are caused by poorly main tained equipment Use the correct equipment for the 20 application Do not modify the equip ment and do not use the equipment for a purpose for which it is not in tended Service precautions Before service maintena...

Page 6: ...nt out of the reach of 7 children Follow scheduled engine and equip 8 ment maintenance Refueling Precautions 9 Do not smoke or allow sparks a flames or other sources of ignition around the equipment especially when refuelling Do not refill the fuel tank while the b engine is running or hot Do not fill fuel tank to the top Leave c a little room for the fuel to expand as needed Refuel in a well vent...

Page 7: ...A If you are using one extension cord 5 for more than one tool add the nameplate amperes and use the sum to determine the required minimum cord size See Table A If you are using an extension cord 6 outdoors make sure it is marked with the suffix W A W in Canada to indicate it is acceptable for outdoor use Make sure the extension cord is prop 7 erly wired and in good electrical con dition Always re...

Page 8: ... carbu retor governor if so equipped and any other parts that control the fuel air ratio will need to be adjusted by a qualified me chanic to allow efficient high altitude use and to prevent damage to the engine and any other devices used with this product Unpacking When unpacking check to make sure that the item is intact and undamaged If any parts are missing or broken please call Harbor Freight...

Page 9: ...into the oil filler 2 neck but do not screw in then re move it to check the oil level The oil level should reach the upper limit H mark on the dipstick bottom edge of the oil fill hole If the oil level is not to the upper limit 3 mark bottom edge of the oil fill hole add the appropriate type of oil until the oil level reaches the upper limit mark Engine Oil SAE 10W 30 above 32 F SAE 5W 30 at 32 F ...

Page 10: ... warm engine Grasp the starter handle and pull 5 slowly until resistance is felt While holding the handle allow the starter rope to rewind slowly Then pull the starter handle with a rapid full arm stroke Once again while holding the handle allow the rope to rewind slowly Repeat as necessary until the engine starts After the engine starts and warms 6 up slowly move the choke lever to its RUN positi...

Page 11: ...ge than they do during continuous operation When figuring total watt age of all appliances connected to this generator use the higher start up amperage rating of each appliance Do not exceed the current limit speci 3 fied for any one receptacle Move the AC Circuit Breaker switch 4 to the ON position Plug in your extension cord or appli 5 ance Be sure that all appliances are in 6 good working order...

Page 12: ...es Motor Kill Switch must be in ON posi 1 tion for engine to start and run Move to OFF position to stop engine Power Indicator Light when lit shows 2 that the generator is producing elec tricity AC Breaker Switch protects circuits 3 when using AC 120 V or 240 V power 120 V duplex outlet provides two 4 grounded outlets for standard 110 120 V household appliances 240 V twist lock receptacles pro 5 v...

Page 13: ... please call 1 800 444 3353 SKU 65414 Control Panel Chart Motor Kill Switch Power Indicator Light A Breaker Switch 120 V Duplex Receptacle 240 V Twist Lock Receptacle DC Breaker Switch Ground Wire Connection 12 VDC Outlet REV 09f 09g ...

Page 14: ...ter Tie Rod Small End 18 002 18 07 Big Head Gap Tie Rod 0 04 0 063 0 12 Big Head Side Gap Tie Rod 0 1 0 7 1 1 Diameter Gap Intake Valve Tappet 0 15 0 02 Diameter Gap Exhaust Valve Tappet 0 20 0 02 Diameter Intake Valve Stem 5 48 5 318 Diameter Exhaust Valve Stem 5 44 5 275 Internal Diameter Intake Valve Pipe 5 5 5 572 Gap between Intake Valve and Guide Pipe hole 0 02 0 044 0 10 Gap between Exhaust...

Page 15: ...l before changing oil Place a drain pan not included un 1 derneath the crankcase s drain plug Remove the drain plug and if pos 2 sible tilt the crankcase slightly to help drain the oil out Recycle used oil Replace the drain plug and gasket if 3 supplied and tighten it Refill the oil to the proper level follow 4 ing the instructions under the Starting the Engine section Air Filter Element Maintenan...

Page 16: ... more Apply dielectric spark plug boot 6 protector not included to the end of the spark plug and reattach the wire securely Cleaning Maintenance and Lubrication Schedule Note This maintenance schedule is intended solely as a general guide If performance decreases or if equip ment operates unusually check sys tems immediately The maintenance needs of each piece of equipment will differ depending on...

Page 17: ...ean out area around spark plug c Remove spark plug and pour one tablespoon of engine oil into cylinder through spark plug hole Reinstall spark plug but leave spark d plug wire disconnected Pull recoil starter to distribute oil in e cylinder Stop after one or two revo lutions when you feel the piston start the compression stroke when you start to feel resistance Disconnect battery cables if f equip...

Page 18: ...ssion replace as 2 needed Check wear tolerances repair or 3 replace as needed Problem Engine does not start or does not run smoothly See chart below Symptom Possible Cause Possible Solution Engine is Pinging Excess wear of Piston Cylinder 1 Wall or Rings Excess wear of Piston Pin or 2 Piston Pin Hole Excess wear of Tie Rod small 3 end Excess wear of Crankshaft Roller 4 Bearing Check wear replace a...

Page 19: ...zed 2 Remove spark plug and attempt to 1 rotate engine by hand Repair or replace as needed Disconnect engine and attempt to 2 rotate generator shaft by hand Repair or replace as needed Problem Engine runs excessively hot See chart below Problem Possible Cause Possible Solution Engine runs excessively hot Improper Ignition Timing 1 Running out of fuel 2 Exhaust manifold muffler or exhaust 3 pipe da...

Page 20: ...t the AC outlets AC Breaker switch in the OFF 1 position AC circuits overloaded 2 Reset the Breaker Switch to the ON 1 position Disconnect some appliances to 2 reduce the load No power at the 12 VDC outlet DC Breaker Switch open Disconnect the 12 Volt appliance then press the 12 VDC breaker switch IN Reconnect the 12 V accessory Follow all safety precautions whenever diagnosing or servicing the eq...

Page 21: ...escription Qty 24 Exhaust Gasket 1 25 Muffler 1 26 Flange Screw M8 18 27 Frame 1 28 Shock Absorber 4 29 Shock Absorber 4 30 Flange Screw M6X12 10 31 Plain washer 6 4 32 Flange Screw M6 10 33 Grounding Wire 10cm φ6 φ6 1 34 Dentiform Washer 6 1 35 Muffler Hood YAMA 1 36 Muffler Hood YAMA 1 37 Control Panel Assembly 1 38 Flange Bolt M6X16 4 39 Fuel Tank 1 40 Fuel Marker 1 41 Fuel Tank Cap Assembly 1 ...

Page 22: ...Page 22 For technical questions please call 1 800 444 3353 SKU 65414 Diagram REV 09g ...

Page 23: ... Dipstick with Seal 2 a 12 Crankcase Cover 1 a 13 Crankcase Gasket 1 a 14 Bearing 6205 2 a 15 Set Pin m 8 x 14 2 a 16 Bolt m8 x 33 5 6 NOTE Not all engine sub assembly components shown on the following pages are available as separate replacement parts They may be shown for informational purposes only NOTE All part numbers listed on the following pages have a letter suffix For example the Crankcase...

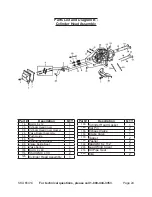
Page 24: ...et 1 b 4 Valve Rocker Assembly 1 b 5 Push Guide 1 b 6 Cap 1 b 7 Exhaust Spring Seat 1 b 8 Intake Spring Seat 1 b 9 Valve Spring 2 b 10 Bolt m 8 x 60 4 b 11 Stud AM 8 x 34 2 b 12 Cylinder Head Assembly 1 Part Description QTY b 13 Cylinder Head Gasket 1 b 14 Set Pin 2 b 15 Exhaust Valve 1 b 16 Intake Valve 1 b 17 Tappet 2 b 18 Pusher 2 b 19 Stud AM 6 x 112 2 b 20 Lead Wind Cover 1 b 21 Oil Pipe Seal...

Page 25: ...ting Rod Camshaft and Flywheel Assemblies Part Description QTY c 1 Piston Ring Set 1 c 2 Piston Ring Circlip 2 c 3 Piston 1 c 4 Piston Pin 1 c 5 Connecting Rod Assembly 1 c 6 Crankshaft Assembly 1 Part Description QTY c 7 Camshaft Assembly 1 c 8 Flywheel 1 c 9 Flywheel Fan 1 c 10 Starting Flange 1 c 11 Nut m 14 x 1 5 1 ...

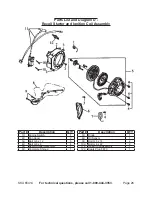
Page 26: ... Ignition Coil Assembly Part Description QTY d 1 Engine Switch 1 d 2 Fan Hood 2 d 3 Bolt m 6 x 12 5 d 4 Bolt m 6 x 8 4 d 5 Recoil Starter Assembly 1 d 6 Complete Shroud 1 Part Description QTY d 7 Diode 1 d 8 Oil Sensor 1 d 9 Bolt m 6 x 14 2 d 10 Bolt m 6 x 22 2 d 11 Ignition Coil Assembly 1 d 12 Spark Plug F6TC 1 ...

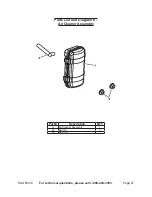
Page 27: ...Page 27 For technical questions please call 1 800 444 3353 SKU 65414 Parts List and Diagram E Air Cleaner Assembly Part Description QTY e 1 Air Cleaner Assembly 1 e 2 Nut m6 2 e 3 Air Duct 1 ...

Page 28: ...cription QTY 1f Pipe Clamp 2 2f Fuel Pipe m 4 5 x 170 1 3f Intake Gasket 1 4f Connecting Block 1 5f Carburetor Gasket 1 6f Carburetor Assembly 1 7f Air Cleaner Gasket 1 Part Description QTY 8f Regulator Assembly 1 9f Back Spring 1 10f Regulating Spring 1 11f Pulling Rod 1 12f Lock Bolt 1 13f Regulating Arm 1 14f Nut M6 1 ...

Page 29: ... Parts List and Diagram G Starter and Generator Assembly Part Description QTY g 1 Starting Motor Assembly 1 g 2 Bolt m6 x 28 1 g 3 Bolt m6 x 32 1 g 4 Crankcase 1 g 5 Charge Coil 1 Part Description QTY g 6 Bolt m6 x 35 2 g 7 Clamp Cord 1 g 8 Bolt m6 x 12 2 g 9 Flywheel 1 ...

Page 30: ...Page 30 For technical questions please call 1 800 444 3353 SKU 65414 Wiring Diagram ...

Page 31: ...e determine there is no defect or that the defect resulted from causes not within the scope of our warran ty then you must bear the cost of returning the product This warranty gives you specific legal rights and you may also have other rights which vary from state to state 3491 Mission Oaks Blvd PO Box 6009 Camarillo CA 93011 800 444 3353 Emission Control System Warranty United States Emission Con...

Page 32: ...f the previous page HFT shall not be liable for any loss of use of the engine for any alternative usage for any damage to goods loss of time or inconvenience Warranty coverage shall also be excluded for any part which fails malfunctions or is damaged due to failure to follow the maintenance and operating instructions set forth in the Owner s Manual includ ing but not limited to Use of parts which ...

Reviews: