background image

Page 17

For technical questions, please call 1-888-866-5797.

Item 61608

Troubleshooting

Problem

Possible Causes

Likely Solutions

Tool will 

not start.

1.  Cord not connected.
2.  No power at outlet. 


3.  Internal damage or wear.  

(Carbon brushes or 

switch, for example.)

1.  Check that cord is plugged in.
2.  Check power at outlet.  If outlet is 

unpowered, turn off tool and check 

circuit breaker.  If breaker is tripped, 

make sure circuit is right capacity for 

tool and circuit has no other loads.

3.  Have technician service tool.

Tool operates 

slowly.

Extension cord too long 

or wire size too small.

Eliminate use of extension cord.  

If an extension cord is needed, use one 

with the proper diameter for its length 

and load.  See Table A on page 3.

Performance 

decreases 

over time.

1.  Accessory dull or damaged. 

2.  Carbon brushes worn 

or damaged.

1.  Keep cutting accessories 

sharp.  Replace as needed.

2.  Have qualified technician replace brushes.

Excessive 

noise or 

rattling.

Internal damage or wear.  (Carbon 

brushes or bearings, for example.)

Have technician service tool. 

Overheating.

1.  Forcing machine to 

work too fast.

2.  Accessory misaligned. 

3.  Accessory dull or damaged. 

4.  Motor being strained by 

long or small diameter 

extension cord.

1.  Allow machine to work at its own rate. 

2.  Check and correct accessory to 

fence and/or table alignment.

3.  Keep cutting accessories 

sharp.  Replace as needed.

4.  Eliminate use of extension cord.  

If an extension cord is needed, use 

one with the proper diameter for its 

length and load.  See Table A on page 3.

Follow all safety precautions whenever diagnosing or servicing the tool.   

Disconnect power supply before service.

Summary of Contents for 61608

Page 1: ......

Page 2: ...d to alert you to potential personal injury hazards Obey all safety messages that follow this symbol to avoid possible injury or death Indicates a hazardous situation which if not avoided will result in death or serious injury Indicates a hazardous situation which if not avoided could result in death or serious injury Indicates a hazardous situation which if not avoided could result in minor or mo...

Page 3: ...d Table A RECOMMENDED MINIMUM WIRE GAUGE FOR EXTENSION CORDS 120 VOLT NAMEPLATE AMPERES at full load EXTENSION CORD LENGTH 25 50 100 150 0 6 18 16 16 14 6 1 10 18 16 14 12 10 1 12 16 16 14 12 12 1 16 14 12 Do not use 9 USE PROPER EXTENSION CORD Make sure your extension cord is in good condition When using an extension cord be sure to use one heavy enough to carry the current your product will draw...

Page 4: ...to persons 18 NEVER STAND ON TOOL Serious injury could occur if the tool is tipped or if the blade is unintentionally contacted 19 CHECK DAMAGED PARTS Before further use of the tool a guard or other part that is damaged should be carefully checked to determine that it will operate properly and perform its intended function check for alignment of moving parts binding of moving parts breakage of par...

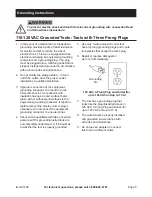
Page 5: ...result in a risk of electric shock The conductor with insulation having an outer surface that is green with or without yellow stripes is the equipment grounding conductor If repair or replacement of the electric cord or plug is necessary do not connect the equipment grounding conductor to a live terminal 4 Check with a qualified electrician or service personnel if the grounding instructions are no...

Page 6: ...orkpiece h Kickback A sudden reaction to a pinched bound or misaligned blade causing an uncontrolled workpiece to lift up and out of the saw toward the operator i Spreader A metal plate that follows the saw blade to keep the kerf gap from closing on the saw blade Spreaders except riving knives must be aligned to the blade after blade adjustment to prevent binding j Riving Knife A spreader mounted ...

Page 7: ... the influence of drugs alcohol or medication A moment of inattention while operating power tools may result in serious personal injury 22 Industrial applications must follow OSHA guidelines 23 Maintain labels and nameplates on the tool These carry important safety information If unreadable or missing contact Harbor Freight Tools for a replacement 24 Avoid unintentional starting Prepare to begin w...

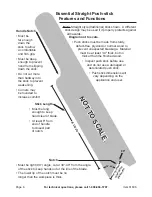
Page 8: ...k Push stick dimensions will vary depending on the application and user Handle Notch Must be far enough down the stick to allow a comfortable and firm grip Must be deep enough to prevent hand from slipping down the stick Do not cut more than halfway into the stick to prevent weakening Corners may be rounded to increase comfort Stick Length Must be long enough to keep hand clear of blade At least 6...

Page 9: ...hand past hand injuries nervous system disorders diabetes or Raynaud s Disease should not use this tool If you feel any medical or physical symptoms related to vibration such as tingling numbness and white or blue fingers seek medical advice as soon as possible 2 Do not smoke during use Nicotine reduces the blood supply to the hands and fingers increasing the risk of vibration related injury 3 Use...

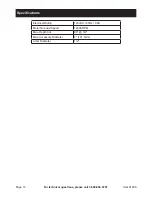
Page 10: ...r technical questions please call 1 888 866 5797 Item 61608 Specifications Electrical Rating 120VAC 60Hz 0 9A Motor No Load Speed 14000 RPM Max Depth Cut 90 3 4 Max Accessory Diameter 4 101 6mm Arbor Diameter 1 2 ...

Page 11: ...he end of this manual Assembly 1 Remove the Screw 1 at the end of the Blade Guard 3 2 Align the hole in the center of the Eye Guard 2 with the hole in the Blade Guard 3 3 The hole in the Eye Guard is countersunk to accommodate the Screw 1 Secure using the Screw 1 being careful not to overtighten 4 Swing the Blade Guard up and remove the top Screw 9 5 Slide the Blade Guard over the Riving Knife 4 a...

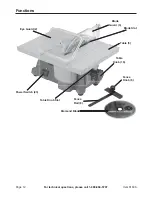
Page 12: ...For technical questions please call 1 888 866 5797 Item 61608 Functions Diamond Blade Power Switch 23 Table 5 Table Knob 16 Eye Guard 2 Blade Guard 3 Fence Knob 6 Fence Rail 8 Knob 6 Blade Slot Table Knob Slot ...

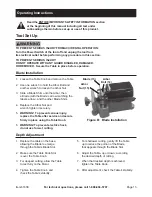
Page 13: ...then a Blade with the Blade s arrow matching the label s arrow and the other Blade Shim 4 Replace the Arbor Nut and wrench tighten it securely 5 WARNING To prevent serious injury replace the Table after service and secure firmly in place using the Table Knob 6 WARNING To prevent electric shock do not use for wet cutting Arbor Nut 15 Arbor Bolt 12 Blade 13 Figure B Blade Installation Depth Adjustme...

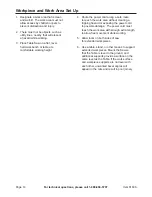
Page 14: ... the power cord along a safe route to reach the work area without creating a tripping hazard or exposing the power cord to possible damage The power cord must reach the work area with enough extra length to allow free movement while working 5 Allow room on both sides of saw for extended workpieces 6 Use a table stand or other means to support extended workpieces Mount the Saw so that the Table is ...

Page 15: ...l contact The Fence Guide rail must fit into the slot on the Table 5 Lower the Guard onto the workpiece Do not remove the Guard or attempt to operate this tool without either Guard in place 6 Tighten the Guard s Wing Nuts after every adjustment Loose Wing Nuts may result in injury or damage to the tool 7 Flip the Power Switch on 8 Using the Fence Guide to hold the workpiece steady gently feed the ...

Page 16: ...ACH USE inspect the general condition of the tool Check for a loose hardware b misalignment or binding of moving parts c cracked or broken parts d damaged electrical wiring and e any other condition that may affect its safe operation 2 AFTER USE wipe external surfaces of the tool with clean cloth a Switch off and unplug tool b Once Blade stops completely remove Blade following instructions on page...

Page 17: ...able A on page 3 Performance decreases over time 1 Accessory dull or damaged 2 Carbon brushes worn or damaged 1 Keep cutting accessories sharp Replace as needed 2 Have qualified technician replace brushes Excessive noise or rattling Internal damage or wear Carbon brushes or bearings for example Have technician service tool Overheating 1 Forcing machine to work too fast 2 Accessory misaligned 3 Acc...

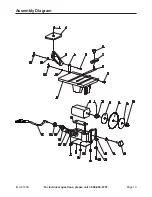
Page 18: ...E ORIGINAL PRODUCT OR REPLACEMENT PARTS THERETO OR ARISING OUT OF HIS OR HER INSTALLATION OF REPLACEMENT PARTS THERETO Parts List Part Description Qty 1 Screw M4 8 1 2 Eye Guard 1 3 Blade Guard 1 4 Riving Knife 1 5 Table 1 6 Fence Knob 1 7 Fence Guide 1 8 Fence Rail 1 9 Screw M4 16 4 10 Motor 1 11 Set Screw M5 8 1 12 Arbor Bolt 1 13 Blade 1 14 Blade Shim 2 15 Arbor Nut 1 16 Table Knob 1 17 Flat Wa...

Page 19: ...Page 19 For technical questions please call 1 888 866 5797 Item 61608 Assembly Diagram ...

Page 20: ...so the above limitation of exclusion may not apply to you THIS WARRANTY IS EXPRESSLY IN LIEU OF ALL OTHER WARRANTIES EXPRESS OR IMPLIED INCLUDING THE WARRANTIES OF MERCHANTABILITY AND FITNESS To take advantage of this warranty the product or part must be returned to us with transportation charges prepaid Proof of purchase date and an explanation of the complaint must accompany the merchandise If o...

Reviews: