Page 13
For technical questions, please call 1-888-866-5797.
Item 61608
Operating Instructions
Read the ENTIRE IMPORTANT SAFETY INFORMATION section
at the beginning of this manual including all text under
subheadings therein before set up or use of this product.
Tool Set Up
TO PREVENT SERIOUS INJURY FROM ACCIDENTAL OPERATION:
Turn the Power Switch of the tool off and unplug the tool from
its electrical outlet before performing any procedure in this section.
TO PREVENT SERIOUS INJURY:
DO NOT OPERATE WITH ANY GUARD DISABLED, DAMAGED,
OR REMOVED. Secure the Table in place before operation.
Blade Installation
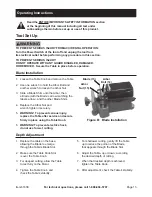
1. Loosen the Table Knob and remove the Table.
2. Use one wrench to hold the Arbor Bolt and
another wrench to loosen the Arbor Nut.
3. Slide a Blade Shim onto the Arbor, then
a Blade (with the Blade’s arrow matching the
label’s arrow), and the other Blade Shim.
4. Replace the Arbor Nut and
wrench tighten it securely.
5.
WARNING! To prevent serious injury,
replace the Table after service and secure
firmly in place using the Table Knob.
6.
WARNING! To prevent electric shock,
do not use for wet cutting.
Arbor
Nut (15)
Arbor
Bolt (12)
Blade (13)
Figure B: Blade Installation
Depth Adjustment
1. Replace the table on the base,
allowing the Blade to emerge
through the Table′s Blade Slot.
2. Make sure the Table Knob Slot
is over the Table Knob.
3. For deepest cutting, allow the Table
to rest fully on the Motor.
4. Tighten the Table Knob, and
check the Table′s stability.
5. For shallower cutting, gently lift the Table
up to reduce the portion of the Blade
that appears through the Blade Slot.
6. Adjust the Table, up or down, according
the desired depth of cutting.
7. When that desired depth is achieved,
tighten the Table Knob.
8. After adjustment, check the Table′s stability.


