background image

Assembly 

Rev CSA40036-20080528


9


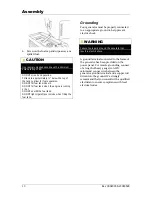
Install the Spark Arrester  

Insert the spark arrester screen into the 
muffler outlet. Secure the spark arrester by 

placing the cover plate over the end of the 

screen, with the lettering facing outward.  


Secure the cover plate with the two screws 
and lock washers provided with the spark 

arrester kit. 


  NOTE 

Federal and local laws and administrative 
requirements indicate when and where spark 
arresters are required. When ordered, spark 
arresters are required for operation of this 
generator in National Forest lands. In California, 
this generator must not be used on any forest-
covered land, brush-covered land, or grass-
covered land unless the engine is equipped with 
a spark arrester. 


CAUTION


Failure to install the spark arrester may result in 
an increased risk of fire.


Add Engine Oil 

 CAUTION 

DO NOT attempt to crank or start the engine 
before it has been properly filled with the 
recommended type and amount of oil. Damage 
to the generator as a result of failure to follow 
these instructions will void your warranty. 
 

1.


Place the generator on a flat, level 
surface. 

2.


Remove oil fill cap/dipstick to add oil. 


3.


Add 1.16 qt (1.1 L) of oil and replace oil 
fill cap/dipstick.  See “Specifications” 

page in the manual for oil 

recommendations based on operating 
conditions. 

4.


Check engine oil level daily and add as 

needed. 


CAUTION 

The engine is equipped with a low-oil-shutoff and 
will stop when the oil level in the crankcase falls 
below the threshold level. 


  NOTE 

Check oil often during the break-in period. Refer 
to the Maintenance section for recommended 
service intervals. 


  NOTE 

The generator rotor has a sealed, pre-lubricated 
ball bearing that requires no additional lubrication 
for the life of the bearing. 


Add Fuel 

1.


Use clean, fresh, regular unleaded fuel 
with a minimum octane rating of 85.  

2.


DO NOT mix oil with fuel. 

3.


Clean the area around the fuel cap.  

4.


Remove the fuel cap 

5.


Slowly add fuel to the tank. DO NOT 
overfill. Allow approximately ¼ inch of 

space for fuel expansion. 

Summary of Contents for CSA40036

Page 1: ...CSA40036 Rev CSA40036 20080528 10006 Santa Fe Springs Road Santa Fe Springs CA 90670 USA Made in China 6250 Peak Watts 5500 Running Watts PORTABLE GENERATOR Owner s Manual and Operating Instructions...

Page 2: ......

Page 3: ...attage Reference Chart 12 Maintenance 13 Engine Maintenance 13 Oil 13 Spark Plugs 13 Air Filter 14 Spark Arrester 14 Cleaning 14 Adjustments 14 Maintenance Schedule 14 Generator Maintenance 14 Storage...

Page 4: ......

Page 5: ...ories designed to help you get the most from your purchase To find out more about our covers power cables and storm kits please visit our web site at www championpowerequipment com This Booklet Every...

Page 6: ...imminently hazardous situation which if not avoided will result in death or serious injury WARNING WARNING indicates a potentially hazardous situation which if not avoided could result in death or ser...

Page 7: ...ltage DO NOT touch bare wires or receptacles DO NOT use electrical cords that are worn damaged or frayed DO NOT operate generator in wet weather DO NOT allow children or unqualified persons to operate...

Page 8: ...re away from sparks open flames pilot lights heat and other sources of ignition WARNING Rapid retraction of the starter cord will pull hand and arm towards the engine faster than you can let go Uninte...

Page 9: ...uel Valve Turn this valve to the On position to supply fuel to the engine 3 Choke Used to start the engine 4 Air Cleaner Protects the engine by filtering dust and debris from the intake air 5 Recoil S...

Page 10: ...This receptacle powers 120 Volt AC 60 Hz single phase loads requiring up to 25 A or 3000 Watts of power 6 120 240 V 30 A Twist Lock Protected by a 25 A flip to reset circuit breaker This receptacle po...

Page 11: ...the following parts Wheel Kit Handle Assembly 1 set 8 Solid Wheel 2 piece Axle Assembly 2 sets Support Leg 1 piece Vibration Mounts 2 piece Support Leg Hardware 1 set Oil Funnel 1 piece Wrench 1 piec...

Page 12: ...not intended for over the road use You will need the following tools to install the wheels 17 mm wrench OR adjustable wrench not included Socket wrench with a 16 mm socket Pliers not included 1 Slide...

Page 13: ...ed with the recommended type and amount of oil Damage to the generator as a result of failure to follow these instructions will void your warranty 1 Place the generator on a flat level surface 2 Remov...

Page 14: ...arettes or smoke when filling the fuel tank Grounding Your generator must be properly connected to an appropriate ground to help prevent electric shock WARNING Failure to properly ground the generator...

Page 15: ...er Supply UPS device Most UPS devices come with a rechargeable battery between the electronic equipment and power supply source The device buffers the voltage and protects against virtually all short...

Page 16: ...ow the engine to stabilize 5 Plug in and turn on the next item 6 Allow the engine to stabilize 7 Repeat steps 5 6 for each additional item NOTE Never exceed the generator capacity when adding loads Wa...

Page 17: ...f oil for your operating environment 1 Remove the oil drain plug with a 15 mm socket and extension 2 Allow the oil to drain completely 3 Replace the drain plug 4 Remove oil fill cap dipstick to add oi...

Page 18: ...s The air fuel mixture is not adjustable Tampering with the governor can damage your generator and your electrical devices and will void your warranty CPE recommends that you contact our service line...

Page 19: ...amage the generator windings Use a damp cloth to clean exterior surfaces of the generator Use a soft bristle brush to remove dirt and oil Use an air compressor 25 PSI to clear dirt and debris from the...

Page 20: ...m the fuel line and carburetor to prevent gum from forming 4 Add a fuel stabilizer into the fuel tank 5 Change the oil 6 Remove the spark plug and pour about ounce of oil into the cylinder Crank the e...

Page 21: ...S gallons 24 L Use regular unleaded gasoline with a minimum octane rating of 85 Oil Oil capacity is 1 16 qt 1 1 L Spark Plugs Your generator comes equipped with a long reach plug 18mm Intermittent use...

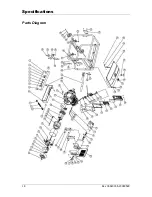
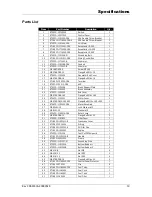
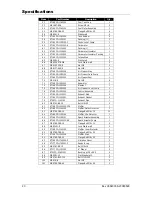
Page 22: ...Specifications 18 Rev CSA40036 20080528 Parts Diagram...

Page 23: ...1152035 Brush Assembly 1 22 ST05FD 1152032 End Cover 1 23 GB5789 FB6 165 Flange Bolt M6 165 4 24 ST04FD 1152001 Stator Cover 1 25 GB5789 FB10 1 25 250 Flange Bolt M10 1 25 250 1 26 ST04FD 1152020 CSA...

Page 24: ...1 74 ST188FD 1090004 Element 1 75 ST188FD 1090200 Air Cleaner Cover Comp 1 76 ST188FD 1080200 Control Assembly 1 77 ST188FD 1010001 Exhaust Stud 2 78 ST188FD 1100001 Exhaust Gasket 2 79 ST05FD 1100100...

Page 25: ...Specifications 21 Wiring Diagram...

Page 26: ...supply enough power or overheating Generator is overloaded Review load and adjust See Power Management Insufficient ventilation Check for air restriction Move to a well ventilated area No AC output C...

Page 27: ...whole Installation Use and Maintenance This warranty will not apply to parts and or labor if this generator is deemed to have been misused neglected involved in an accident abused loaded beyond the ge...

Page 28: ...Notes 24 Rev CSA40036 20080528 Notes...

Reviews: