background image

18

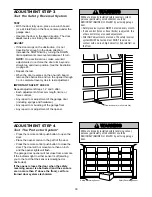
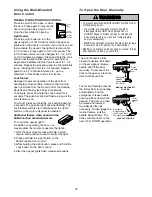
LOCK

LIGHT

Figure 4  

REMOVE COVER

INSTALLATION STEP 6

Install the Door Control

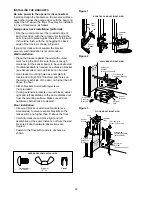
Locate door control within sight of the door at a
minimum height of 5 feet where small children cannot
reach, and away from moving parts of the door and
door hardware. The installation surface must be
smooth and flat. If installing into drywall (Figure 1),
drill 5/32" holes and use anchors provided. For 
pre-wired installations (as in new home construction),
it may be mounted to a single gang box (Figure 2).
NOTE: After installation, a green or amber indicator
light behind the cover will indicate proper connection.
If not lit, the Lock and Light features will not function
(reverse wires to correct).

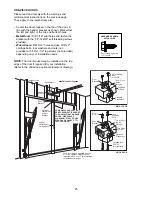
1. Strip 7/16" of insulation from one end of bell wire

and connect to the two screw terminals on back of
door control by color: white wire to WHT and
white/red wire to the RED (Figure 3). 

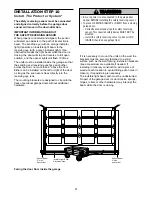
2. Remove white cover by gently prying on a side

corner near the top of the cover with a small flat
head screwdriver (Figure 4). Fasten with
6ABx1-1/4" self-tapping screws (drywall
installation) or 6-32x1" machine screws (into gang
box) as follows:

• Drill and install bottom screw, allowing 1/8" to

protrude above wall surface.

• Position bottom of door control on screw head

and slide down to secure. Adjust screw for snug
fit.

• Install top screw with care to avoid

cracking plastic housing. Do not overtighten.

• Insert bottom tabs and snap on cover. 

NOTE: The push bar may stick if the door control is
not mounted on a smooth surface. If a click is not
heard when pressing the push bar, loosen the two
mounting screws or relocate the door control to a
smoother surface.

3. (Standard installation only) Run bell wire up wall

and across ceiling to motor unit. Use insulated
staples to secure wire in several places. Do not
pierce wire with a staple, creating a short or open
circuit.

4. Strip 7/16" of insulation from end of bell wire.

Connect bell wire to the quick-connect terminals as
follows: white to white and white/red to red 
(Figure 5).

NOTE: When connecting multiple door controls to the
opener, twist same color wires together. Insert wires
into quick-connect holes: white to white and red/white
to red.

5. Use tacks or staples to permanently attach

entrapment warning label to wall near door control,
and manual release/safety reverse test label in a
prominent location on inside of garage door.

NOTE: DO NOT connect the power and operate the
opener at this time. The trolley will travel to the full
open position but will not return to the close position
until the sensor beam is connected and properly
aligned. See Safety Reversing Sensor Instructions
beginning on page 21.

WHT

RED

 Bell Wire

Terminal 
Screws

 Bottom Mounting Hole

 Top Mounting Hole

Dry Wall Anchors

Insulated
Staples 

Screw 6AB x 1-1/4" 
(drywall installation)

Screw 6-32 x 1" 
(gang box installation)

HARDWARE SHOWN ACTUAL SIZE

Figure 2

To Replace
Insert Bottom Tabs First

PRE-WIRED INSTALLATION

24 Volt
Bell Wire

LOCK

LIGHT

LOCK

LIGHT

To Replace
Insert Bottom Tabs First

Figure 1

STANDARD 
INSTALLATION

Single
Gang Box

Figure 3  

MULTI-FUNCTION 
DOOR CONTROL (BACK)

Figure 5

To release wire, push in tab
with screwdriver tip

Door Control
Connections

7/16"

Strip wire 7/16"

Red

Grey

White

To prevent possible SERIOUS INJURY or DEATH from
electrocution:
• Be sure power is not connected BEFORE installing door

control.

• Connect ONLY to 24 VOLT low voltage wires. 
To prevent possible SERIOUS INJURY or DEATH from a
closing garage door:
• Install door control within sight of garage door, out of

reach of children at a minimum height of 5 feet, and away
from all moving parts of door.

• NEVER permit children to operate or play with door

control push buttons or remote control transmitters.

• Activate door ONLY when it can be seen clearly, is properly

adjusted, and there are no obstructions to door travel.

• ALWAYS keep garage door in sight until completely

closed. NEVER permit anyone to cross path of closing
garage door.

WARNING

CAUTION

WARNING

WARNING

KG

1

3

9

7

5

KG

1

3

9

7

5

Summary of Contents for Whisper Drive WD912K

Page 1: ...unless The Protector System is connected and properly aligned Periodic checks of the opener are required to ensure safe operation The model number label is located on the left side panel of your open...

Page 2: ...ally 32 Care of your garage door opener 33 Having a problem 33 34 Programming 35 36 To add a hand held remote control 35 To erase all codes 35 Multi function remotes 35 To add or change a Keyless Entr...

Page 3: ...ring your garage door Before you begin Disable locks Remove any ropes connected to garage door Complete the following test to make sure your garage door is balanced and is not sticking or binding 1 Li...

Page 4: ...t bracket and additional fastening hardware may be required Installation Step 10 Depending upon garage construction extension brackets or wood blocks may be needed to install sensors Installation Step...

Page 5: ...NG Support bracket fastening hardware is required See page 17 Safety Reversing Sensor Header Wall Safety Reversing Sensor Gap between floor and bottom of door must not exceed 1 4 Access Door Wall moun...

Page 6: ...y Reversing Sensors 1 Sending Eye and 1 Receiving Eye with 2 Conductor White White Black Bell Wire attached Safety Sensor Bracket 2 Belt Pulley Motor Unit with 2 Light lenses Your garage door opener i...

Page 7: ...lley Threaded Shaft 1 Wing Nut 1 4 20 2 Hex Bolt 5 16 18x7 8 4 Carriage Bolt 1 4 20x1 2 2 Spring Trolley Nut 1 Nut 5 16 18 4 Clevis Pin 5 16 x2 3 4 1 NOTICE Handle Insulated Staples 30 Clevis Pin 5 16...

Page 8: ...oor reversals 3 Assemble lock nuts ensure alignment and tighten NOTE If rail is not assembled exactly as shown trolley will not travel smoothly along length of rail or it will hit against nuts 4 Posit...

Page 9: ...er the belt pulley bracket Remove the two 5 16 18x1 2 washered bolts mounted in the top of the motor unit Align the holes in the back section of the rail with the holes in the motor unit Fasten the ra...

Page 10: ...ugh the hole in the trolley 2 Hold the belt at the trolley shaft to avoid twisting as you thread the spring trolley nut by hand on the shaft until finger tight against the trolley Figure 3 Do not use...

Page 11: ...Mount emergency release handle 6 feet above floor 7 NEVER connect garage door opener to power source until instructed to do so 8 NEVER wear watches rings or loose clothing while installing or servici...

Page 12: ...shown Draw an intersecting horizontal line on the header wall 2 above the high point This height will provide travel clearance for the top edge of the door Proceed to Step 2 page 14 One piece door wi...

Page 13: ...shown Measure the distance from the top of the door to the floor Subtract the actual height of the door Add 8 to the remainder See Example 3 Close the door and draw an intersecting horizontal line on...

Page 14: ...Garage Door Travel Vertical Centerline Header Wall Garage Door UP CEILING MOUNT ONLY Wall Mounting Holes Optional Wall Mounting Holes The nail hole is for positioning only You must use lag screws to m...

Page 15: ...e opener securely on a temporary support to allow the rail to clear the spring Position the rail bracket against the header bracket Align the bracket holes and join with a clevis pin as shown Insert a...

Page 16: ...g an ideal door to rail distance Raise the opener onto a stepladder You will need help at this point if the ladder is not tall enough Open the door all the way and place a 2x4 laid flat on the top sec...

Page 17: ...the rail is centered over the door or in line with the header bracket if the bracket is not centered above the door 7 Remove the 2x4 Operate the door manually If the door hits the rail raise the head...

Page 18: ...ll wire to the quick connect terminals as follows white to white and white red to red Figure 5 NOTE When connecting multiple door controls to the opener twist same color wires together Insert wires in...

Page 19: ...Secure with an overhand knot at least 1 from the end of the rope to prevent slipping Thread the other end of the rope through the hole in the release arm of the outer trolley Adjust rope length so the...

Page 20: ...he black line wire to the screw on the brass terminal the white neutral wire to the screw on the silver terminal and the ground wire to the green ground screw The opener must be grounded Reinstall the...

Page 21: ...her can be installed on the left or right of the door as long as the sun never shines directly into the receiving eye lens The mounting brackets are designed to clip onto the track of sectional garage...

Page 22: ...dge of the track as shown in Figure 1 If your door track will not support the bracket securely wall installation is recommended Wall installation Place the bracket against the wall with curved arms fa...

Page 23: ...AND WIRING THE SAFETY SENSORS Slide a 1 4 20x1 2 carriage bolt head into the slot on each sensor Use wing nuts to fasten sensors to brackets with lenses pointing toward each other across the door Be...

Page 24: ...or panel support and the door bracket Drill 3 16 fastening holes Secure the door bracket using the two 1 4 14x5 8 self threading screws Figure 2A Alternately use two 5 16 bolts lock washers and nuts n...

Page 25: ...INUM STEEL DOORS WITH GLASS PANEL ETC NOT PROVIDED ONE PIECE DOORS Please read and comply with the warnings and reinforcement instructions on the previous page They apply to one piece doors also Cente...

Page 26: ...far apart as possible to increase door arm rigidity Figure 3 Hole alignment alternative If holes in curved arm are above holes in straight arm disconnect straight arm Cut about 6 from the solid end Re...

Page 27: ...s 5 16 Ring Fastener Straight Arm Bolts 5 16 18x7 8 Door Bracket Clevis Pin 5 16 x1 1 4 Curved Door Arm Figure 4 Door Arm Door Arm Connector Hole Closed Door Fully Closed Trolley Emergency Release Han...

Page 28: ...tment Step 2 If the door does not close completely Increase down travel Turn the down limit adjustment screw counterclockwise One turn equals 2 of travel If door still won t close completely and the t...

Page 29: ...lockwise Make small adjustments until the door completes a close cycle After each adjustment run the opener through a complete travel cycle Do not increase the force beyond the minimum amount required...

Page 30: ...on the one inch board remove the obstruction and run the opener through 3 or 4 complete travel cycles to test adjustment IMPORTANT SAFETY CHECK Repeat Adjustment Steps 1 2 and 3 after Each adjustment...

Page 31: ...the Light feature on the Multi Function Door Control is activated Bulb size is 100 watts maximum Security light feature Lights will also turn on when someone walks through the open garage door With a...

Page 32: ...ooner The 4 1 2 minute interval can be changed to 1 1 2 2 1 2 or 3 1 2 minutes as follows Press and hold the Lock button until the light blinks about 10 seconds A single blink indicates that the timer...

Page 33: ...there a build up of ice or snow under the door The door may be frozen to the ground Remove any restriction The garage door spring may be broken Have it replaced Repeated operation may have tripped th...

Page 34: ...ment Step 2 If door reverses in the fully closed position decrease the travel limits Adjustment Step 1 Repeat safety reverse test after adjustments to force or travel limits The need for occasional ad...

Page 35: ...sh bar on the Multi Function Door Control all three buttons are held 4 Release buttons when the motor unit lights blink It has learned the code If light bulbs are not installed two clicks will be hear...

Page 36: ...then press and hold the button The opener light will blink twice Release the button 2 Press the new 4 digit PIN you have chosen then press ENTER The motor unit lights will blink once when the PIN has...

Page 37: ...are kit see page 7 KEY PART NO NO DESCRIPTION 1 41C494 1 Multi function door control panel 2 41A5056 19 Multi function remote control housing only no circuit board 3 10A20 3V2032 Lithium battery 4 29B...

Page 38: ...els 6 4A1344 Light socket 7 108D68 Lens 8 30B363 Capacitor 1 2 HP 9 12A373 Capacitor bracket 10 41A3150 Terminal block w screws KEY PART NO NO DESCRIPTION 11 41C4842 Universal replacement motor bracke...

Page 39: ...Extension Brackets Optional For safety sensor installation onto the wall or floor To order call 1 800 528 9131 Motion Detecting Control Panel Multi function door control with motion sensor that automa...

Page 40: ...re paid and insured to our service center for warranty repair You will be advised of shipping instructions when you call the toll free service number Please include a brief description of the problem...

Reviews: