3
Adjustments
Program the Travel
Your garage door opener is designed with electronic controls to
make setup and adjustments easy. The adjustments allow you to
program where the door will stop in the open (UP) and close
(DOWN) position. The electronic controls sense the amount of
force required to open and close the door. The force is adjusted
automatically when you program the travel and cannot be
changed.
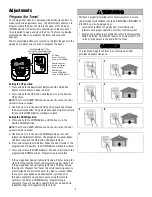
The programming buttons are located on the left side panel of the
garage door opener and are used to program the travel.
To prevent damage to vehicles, be sure fully open door
provides adequate clearance.
Setting the UP position:
1. Press and hold the Adjustment Button until the UP Button
begins to flash and/or a beep is heard.
2. Press and hold the UP Button until the door is in the desired
UP position.
NOTE:
The UP and DOWN Buttons can be used to move the door
up and down as needed.
3. Once the door is in the desired UP position press and release
the Adjustment Button. The garage door opener lights will flash
twice and the DOWN Button will begin to flash.
Setting the DOWN position:
4. Press and hold the DOWN Button until the door is in the
desired DOWN position.
NOTE:
The UP and DOWN Buttons can be used to move the door
up and down as needed.
5. Once the door is in the desired DOWN position press and
release the Adjustment Button. The garage door opener lights
will flash twice and the UP Button will begin to flash.
6. Press and release the UP Button. When the door travels to the
programmed UP position, the DOWN Button will begin to flash.
7. Press and release the DOWN Button. The door will travel to the
programmed DOWN position. Programming is complete.
* If the garage door opener lights are flashing 5 times during the
steps for Program the Travel, the programming has timed out.
If the garage door opener lights are flashing 10 times during
the steps for Program the Travel, the safety reversing sensors
are misaligned or obstructed (refer to owner’s manual). When
the sensors are aligned and unobstructed, cycle the door
through a complete up and down cycle using the remote
control or the UP and DOWN buttons. Programming is
complete. If you are unable to operate the door up and down,
repeat the steps for Programming the Travel.
UP Button
Bouton UP (HAUT)
Botón de UP (ARRIBA)
Adjustment Button
Bouton de Réglage
Botón de Ajuste
DOWN Button
Bouton DOWN (BAS)
Botón de DOWN (ABAJO)
PROGRAMMING BUTTONS
BOUTONS DE PROGRAMMATION
BOTONES DE PROGRAMACIÓN
Without a properly installed safety reversal system, persons
(particularly small children) could be SERIOUSLY INJURED or
KILLED by a closing garage door.
• Incorrect adjustment of garage door travel limits will
interfere with proper operation of safety reversal system.
• After any adjustments are made, the safety reversal system
MUST be tested. Door MUST reverse on contact with 1-1/2"
(3.8 cm) high object (or 2x4 laid flat) on floor.
1
2
3
4
5
7
6


