-7-
-6-
ASSEMBLY AND OPERATION
ASSEMBLY
OPERATION
OPERATION
Your Challenge steamer cleaner is
designed for safe, fast removal of wallpaper
and can be used as a handheld cleaner to
enable the user to complete numerous
cleaning and other tasks around the home,
in the garden and in the car. Use the following
as a guide for the various accessories and
recommended uses.
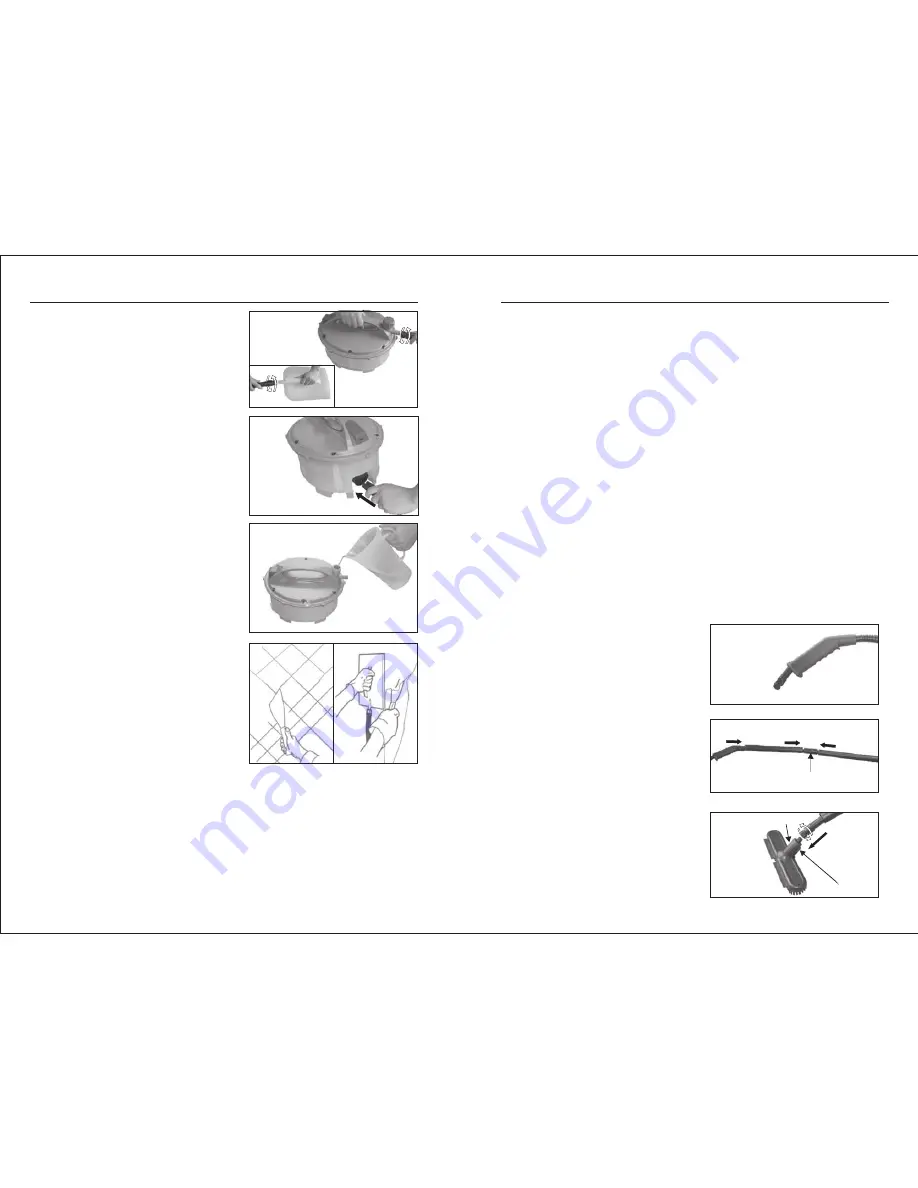
5. Place the plate on another section of wallpaper while taking away the paper from the
previously steamed area, Dia4B. Repeat this operation more times if you are having
difficulties removing stubborn areas of paper.(Dia.4B)
6. Operation time with 3.5 litres of water is about 60 minutes.
7. Avoid the unit boiling dry.
8. Fill up approx. every 50 minutes, use pure water(without additives), allow at least 5
minutes to cool before refilling.
9. Always place the unit on a flat level surface.
10. Do not leave the steamplate unattended, possible drops of hot water may damage the
surrounding areas(always lift the unit and steamplate using the proper handle).
11. Attention! Always wait at least for 5 minutes after removing the plug before refilling the
unit.(BURN DANGER - steam is very hot).
Note
: The unit gets hot in operation and may damage carpets, furniture etc. Always ensure
unit is placed on a stable solid base that is heat resistant. We suggest placing the boiler on
wooden board or tray for protection.
Safety Valve
The unit is fitted with a safety valve for your protection. If the valve operates steam will
escape from the cover(Item 1 from component dia.).
Disconnect immediately and allow to cool.
Check hose for blockage. Allow the valve to re-set(about one minute) and resume work.
Using the Accessories
Assembling the extension tube
1. Push the steam hose through the handle
(Part 11)and pull through enough to go through
the assembled extension tubes before
assembling the tubes. (Dia.5)
2. Insert the 2 extension tubes(Part 14)into the
joining piece(Part 15)making sure the clips are
fully home, then insert the hose through the
assembled tubes. (Dia.6)
3. Attach the end of the hose to the large
brush, then large brush, then clip the end of
the extension tube onto the large brush
(Part 9 ).(Dia.7)
Using the large brush
The brush can be used by itself or with the
bonnet as a carpet/upholstery cleaner.
Some carpets have stain resistant treatments,
which may be affected by steam cleaning.
Try cleaning a small area of carpet that is
normally unseen, then allow 24 hours to
check whether there have been any unusual
1. Connect one end of the hose to the steam
plate, and the other end to the steam outlet
on the boiler and tighten securely(Dia.1).
2. Plug in the mains power cable to the
element socket(Dia.2).
3. Check that the unit is not plugged in to
the mains supply(disconnected)before filling
or emptying it.
4. Remove filler cap, fill the container with
3.5litres of cold water(Dia.3). Use hot water if
you want to shorten the starting time, do not
overfill the container,(max 3.5 litres). If in doubt
about the quantity of water in the container
empty all water from tank and refill with 3.5 ltrs
of water.
Note: Do not use any additives or chemicals
in the stripper.
5. Connect the mains lead to a power supply
and wait for the water to get warm. The
steaming time depends on the quantity of
water put into the container(with 3.5 litres of
water it is about 12 minutes).
Using the steam plate
1. Connect hose to steam plate. Dia. 1
2. When the steam comes out (steam without pressure)from the plate, you can start working.
Note: A small amount of hot water will precede the steam, always shake this water out of
the steam plate into a bucket before commencing work.
3. Score the wallpaper slightly to be removed in a criss cross pattern acting in accordance
with the condition of the wall and of the paper(more or less, old paper, more layers, etc)
(Dia.4A).
4. Hold the steam plate to the wall and let the steam act for at least 10-20 seconds. We
recommend the use of a stout pair of gloves for operation.
Note: Always check on a small area of wall before commencing work.
Dia.2
Dia.4A
Dia.4B
Dia.3
Dia.1
Dia.5
Dia.6
Joining Piece
Dia.7
Screw
Conneter


