Quick Start Guide for 3680A/B Cable and Antenna Analyzer
connected to the test port of Analyzer, and then use the calibration kit (option) with diameter of 3.5mm to
calibrate the Analyzer as described in section 3.1.
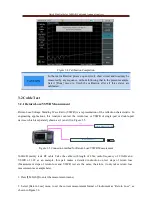
4. After calibration, connect the measured attenuator to Analyzer and the match load to the terminal of
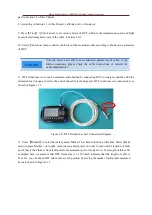
attenuator as shown in Figure 3.15.
Figure 3.15 Attenuator Measurement Connection Diagram
Make some corresponding adjustments on the displayed amplitude according to amplitude set-method
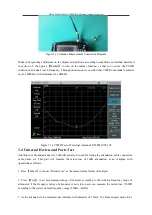
described in Section 3.5; we can find that the return losses of attenuator are all below 30dB. Based on the
test data, designer can confirm attenuator index by contrasting with design index, as shown in Figure 3.16.
Figure 3.16 Return Loss Test of 10dB Attenuator
3.5 Test Skills
As there have given a detailed description to the test steps for several test formats, this part will make a
brief introduction on some common skills used in the measurement process.
1.
Amplitude
: 3680A/B provides three ways for amplitude adjustment: First, through the top and bottom
adjustment; Second, through automatic ratio adjustment; Third, through the adjustment on reference
value, location and ratio. In order to make a clearer and more intuitive observation on the measured curve,
the amplitude of displayed curve can be adjusted by adopting any ways under
【
Amptd
】
. After


