Cervis SmaRT 902 Manual Download Page 9

User Manual 

©

2007 Cervis, Inc. 


5


1.  Remove power from the base unit. 

2.  Stand near the base unit in line of sight with the handheld in your hand. 

3.  Press and hold both buttons (see Figure 5). TX lights steady green.  

4.  Continue to hold both buttons for the five seconds it takes for the LINK 

LED to begin flashing yellow. 

5.  When LINK flashes yellow, release the two buttons. The RX button flash-

es red allowing two (2) seconds for you to make the next button press. 

9

Note: If the next button press is not performed within the two second interval that RX 

flashes red, the procedure is aborted and must be started anew to establish 
the Association. 

6.  Press and hold the Disassociate button. (See Figure 5 above.) The RX 

extinguishes, the TX lights steady green, and the LINK LED lights steady 
yellow.  

7.  Apply power to the base unit while continuing to hold the Disassociate 

button.  

The base unit and all previously linked handhelds begin to Disassociate communica-
tions links. Once the Disassociation is complete, the yellow LINK led extinguishes, the 
RX begins flashing red, and the TX lights steady green and remains so until the button 
is released.  

8.  Release the Disassociate button. The RX LED extinguishes, the TX LED 

flashes green for a brief time, and then it too extinguishes.  

The SmaRT BU-902F Base Unit will not communicate with any handheld remote units. 
A handheld remote must use the Association Procedure to re-establish a communica-
tion link with the base unit. 

Summary of Contents for SmaRT 902

Page 1: ...It2 2007 Cervis Inc SmaRT 902 Remote Control System Manual U007 0 SmaRT902_system R...

Page 2: ...dify any information without prior notification FCC Statements 15 19 Two Part Warning This device complies with Part 15 of the FCC rules Operation is subject to the follow ing two conditions 1 This de...

Page 3: ...on 7 4 0 Using the SmaRT PTO 902 Handheld Remote 8 To operate the system 8 5 0 Wiring Harness 9 6 0 Specifications 10 6 1 Handheld 10 6 2 Base Unit 11 Figures Figure 1 PTO 902 Handheld Remote and BU 9...

Page 4: ...SmaRT 902 Remote Control System U007 0 SmaRT902_system R ii Notes...

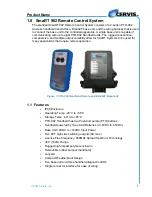
Page 5: ...to be used for many applications that require remote operation Figure 1 PTO 902 Handheld Remote and BU 902F Base Unit 1 1 Features IP65 Enclosure Operating Temp 20 C to 55 C Storage Temp 40 C to 85 C...

Page 6: ...vided The handheld is powered by three size AAA batteries Three status diagnostic LEDs are visible on the handheld faceplate as shown in Figure 2 below Figure 2 PTO 902 without bumper 1 3 BU 902F Base...

Page 7: ...tes Each handheld must first establish a communications link with the base unit before the base unit can recognize the handheld unit This process is called Association 1 4 1 Associate Handheld to Base...

Page 8: ...so until the button is released 8 Release the Associate button The RX LED extinguishes the TX LED flashes green for a brief time and then it too extinguishes The SmaRT 902 System is ready for use wit...

Page 9: ...ociation 6 Press and hold the Disassociate button See Figure 5 above The RX extinguishes the TX lights steady green and the LINK LED lights steady yellow 7 Apply power to the base unit while continuin...

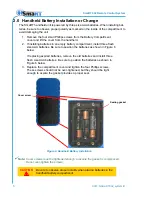
Page 10: ...batteries Be sure to position the batteries as shown in Figure 6 below If replacing expired batteries remove the old batteries and install three fresh size AAA batteries Be sure to position the batte...

Page 11: ...much to your discretion with the following guidelines Before installing make sure that the configuration diagrams supplied with the system are available Keep them so they are available at all times M...

Page 12: ...be established using the Association Procedure 1 4 1 2 You must be line of sight of the base unit while holding the handheld within 300 ft 100m of the unit 3 Each button is push to operate PTO Each i...

Page 13: ...User Manual 2007 Cervis Inc 9 5 0 Wiring Harness...

Page 14: ...C 40 F to 131 F Humidity 0 to 100 Radio Frequency 906 924MHz License No license required Modulation DSSS Antenna Internal Enclosure Dimensions 119mm x 133mm x 36mm 5 24 x 4 69 x 1 42 Total Weight 165...

Page 15: ...to 100 Vibration Shock IEC60068 2 6 Radio Frequency 906 924MHz License No license required Modulation DSSS Antenna Internal Enclosure Dimensions 119mm x 133mm x 36mm 5 24 x 4 69 x 1 42 Durability High...

Page 16: ......

Page 17: ...maRT902_system R Cervis Inc Visit our Web site at www cervisinc com The SmaRT Remote Control System is manufactured and distributed by Cervis Inc 2007 Cervis Inc All rights reserved Content is subject...

Reviews: