19
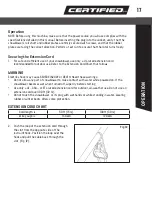
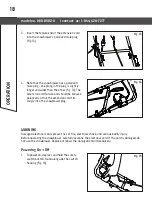
2. While depressing the safety switch button,
pull the ON/OFF switch lever toward you.
Once the snowblower powers on, release
the safety switch button and begin
operation (Fig. 16). The snowblower can only
be started by depressing the safety switch
button first, followed by squeezing the ON/
OFF switch lever; reverse operation will not
start the snowblower.
3. To power off, release your grip on the ON/
OFF switch lever.
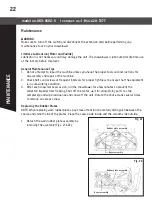
4. On this model, the LED light can be used to
illuminate the surface in front. To use the
light, turn on the light switch located on
the back side of the snowblower (Fig. 17).
NOTE:
The light will only turn ON when the snowblower is running. When you have finished clearing
snow, REMEMBER to TURN OFF the light switch.
WARNING
Moving the Machine and Clearing Snow
Foreign objects, such as rocks, broken glass, nails, wire, or string, can be picked up and
thrown by the snowblower, causing serious personal injury.
Remove all foreign objects from the area to be plowed before operating the snowblower.
1. Keep the area of operation free of foreign objects that can become thrown by the rotating
paddle. Perform a thorough inspection of the area since some objects may be hidden from view
by surrounding snow. If the snowblower hits an obstruction or picks up a foreign object during
use, stop the snowblower, disconnect the extension cord, remove the obstruction, and inspect
the unit for damage. Repair or replace any damaged part before restarting and operating the
unit.
2. Keep children, pets, and bystanders away from the area of operation. Be aware that the normal
noise of the machine when turned on may make it difficult for you to hear approaching people.
3. When moving the snowblower, use the wheels on one side as the pivot point. Slightly tilt the
snowblower on this pivot point to move it forward or backward.
OPERATION
Fig. 17
Fig. 16

