Radikal Gasser
Page 20
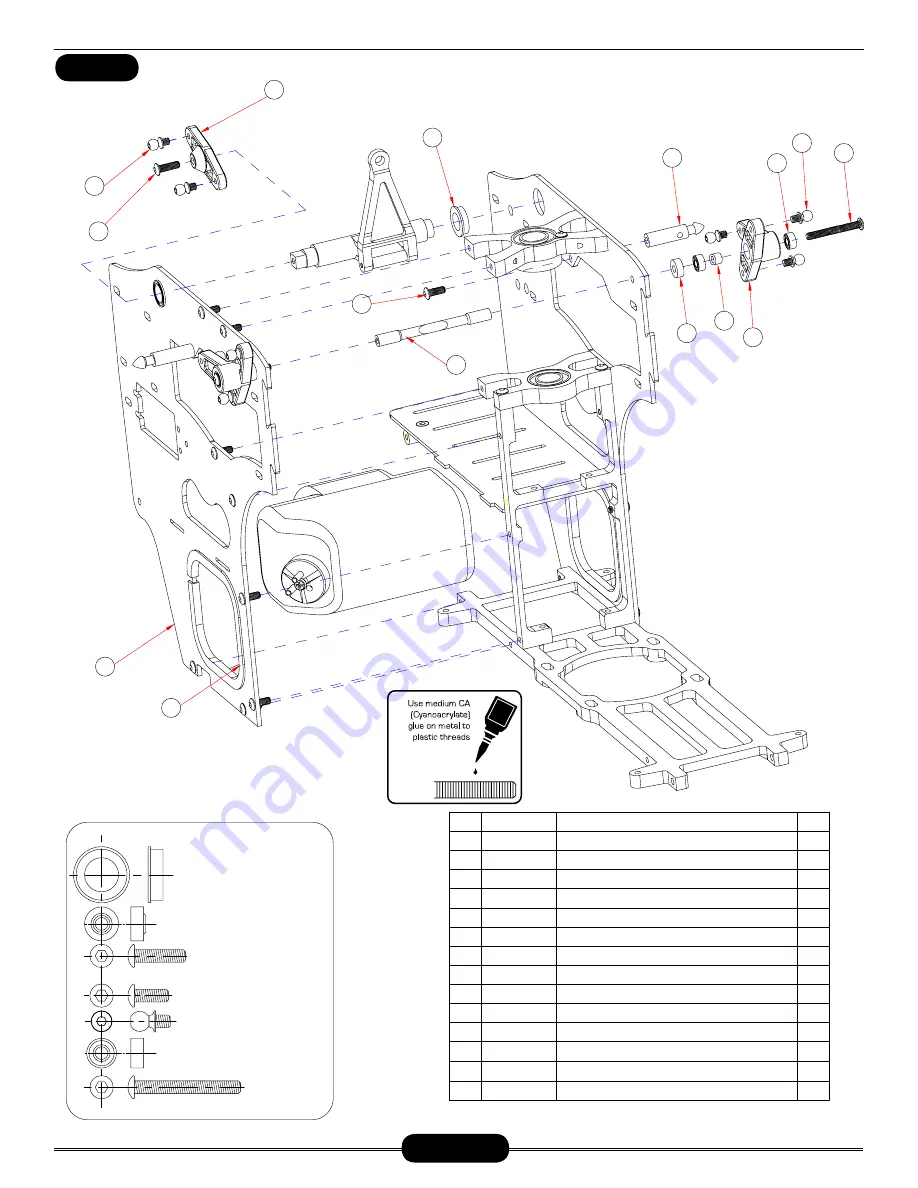
REAR SIDEFRAME (RIGHT)
BAG 2
Canopy Standoff(
机头罩支架
)
Button Head Cap Screw(
圆头内六角螺丝
)M3x25
CNM3x25BHCS
M3 Linkage Ball(
球头螺丝
)
CNLR1014
Bell Crank(
左右控制臂
)
Bearing(
滚珠轴承
)3x7x3
CNBB0730
Bellcrank Spacer(
垫片
)3x8x3.5
Elevator Lever Flange Bearing(
带边滚珠轴承
)
CNBB812F
Button Head Cap Screw(
圆头内六角螺丝
)M3x8
CNM3x8BHCS
Aluminum Post(
铝柱
)
Button Head Cap Screw(
圆头内六角螺丝
)M3x12
CNM3x12BHCS
HI6031G
HI6031G
HW6125B
HI6031S
HI6032GB
HI6139B
No.
Description
Qty
1
2
3
4
6
7
5
8
9
10
12
13
14
11
Bellcrank Spacer(
垫片
)3x5x7.5
HI6031G
Part #
2
2
8
2
4
2
2
2
10
1
1
Elevator Bellcrank(
控制臂
)
2
Fuel Tank Isolators(
油箱橡胶垫
)
2
左右后侧板
)
1
HI6116R
Right Rear Frame (
1
2
3
4
6
7
8
10
9
2
11
12
13
14
5
CNM3x8BHCS
CNM3x25BHCS
CNLR1014
CNBB0730
3x8x3.5
CNM3x12BHCS
CNBB812F
CA
When installing the elevator bellcrank, make sure to apply medium
CA to the M3x12 button head cap screw.
Assemble the aileron bellcranks by
first pressing in the 3x7x3 bearing
followed by the 3x5x7.5 spacer. In-
stall the remaining bearing along with
the metal balls. It is easier to thread
the M3 linkage balls into the plastic
bell cranks if you use an available M3
screw to make threads. Apply me-
dium CA to the linkage balls. Once
you have the aileron bell cranks built,
install the right rear frame and ap-
ply medium threadlock to the M3x8
button head screws and tighten onto
the skeletal support frame. Apply
medium threadlock to the M3x25
button head cap screws and install
the aileron bell cranks onto the alu-
minum post.
If you have carbon fiber frames, just add a “C” to the end of the frame
part number.


