Page 3
SKU 95378
for technical questions, please call 1-800-444-3353.
Maintain tools with care. Keep cutting tools sharp and clean. Properly main-
tained tools with a sharp cutting edge are less likely to bind and are easier to control.
Do not use a damaged tool. Tag damaged tools “Do not use” until repaired.
do not overtighten the wing nut on the wheel holding the blade in place.
warning: the brass components of this product contain lead, a chemical
known to the state of California to cause birth defects (or other reproductive
harm). (California Health & Safety code § 25249.5,
et seq.
)
unpaCKing
When unpacking, check to make sure that the item is intact and undamaged. If any
parts are missing or broken, please call Harbor Freight Tools at the number shown on the
cover of this manual as soon as possible.
10.
11.
12.
asseMbly instruCtiOns
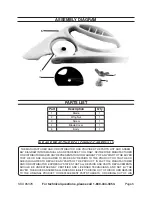
note: For additional information regarding the parts listed in the following pages, refer to
the Assembly Diagram near the end of this manual.
attaching and removing the blade
With gloves on, hold the Carpet Cutter so that the Wing Nut (2) is facing you.
Unscrew the Wing Nut (2) and remove the Screw (3) holding the Blade Cover (4)
and Blade (1) in place.
Push up and lift out the Blade (1) from the Body (5).
Replace with a new Blade (1). Insert the Screw (3), replace the Blade Cover (4)
and thread on the Wing Nut (2). Note that the Wing Nut (2) and Screw (3) will only
fit onto the Carpet Cutter one way, do not force them into place.
OperatiOn instruCtiOns
note: It may require practice to make clean, straight, consistent cuts.
Place a straight edge on top of the carpet you wish to cut.
Insert the end of the carpet into the space at the front of the Carpet Cutter. The
carpet must slide between the Blade (1) and the inside of the Carpet Cutter Body.
Firmly and evenly slide the Carpet Cutter forward along the straight edge.
1.
2.
3.
4.
1.
2.
3.


