background image

8

7.3 Installing the Unit onto a Solid Wall

1. Refer to steps 1 to 6 above.  Replace fasteners and wall 

anchors from the hardware kit with customer-supplied 
components as desired.  The through-hole size for the 
wall mounts is sized for a #8 screw (approximately 
0.175” diameter).

2. Use the base as a template to mark the hole location of 

the other two mounting holes.  Remove the base from 
the wall and drill the remaining two mounting holes 
(3/16” drill bit).

3. Insert wall anchors into the holes in the wall, then place 

the Height Strip base back onto the mounting screw 
in the wall.  Align the base with the 5-foot mark as in 
Step 5 of the previous section.  Tighten the remaining 
mounting screws to secure the Height Strip base to the 
wall.

4. Knockouts are provided at the top and bottom of the unit 

for cable entry and conduit fittings.

5. Remove the desired knockout by pushing it into the base 

with a screw driver, then bending it back and forth until 
it snaps off.

6. Insert an appropriate conduit fitting into the hole, then 

run the customer-supplied power and video cables into 
the conduit fitting.

7. Refer to Step 14 of the previous section when connecting 

video and power cables to the camera.

8. Follow steps 15 – 18 of the previous section to complete 

the installation.

7.4 Installing the Unit using the Accessory 
Wall Bracket (MT-HS)

Note:

 cable entry can only be accomplished via the 

knockouts at the top or bottom of the Height Strip 
when using the MT-HS wall bracket.

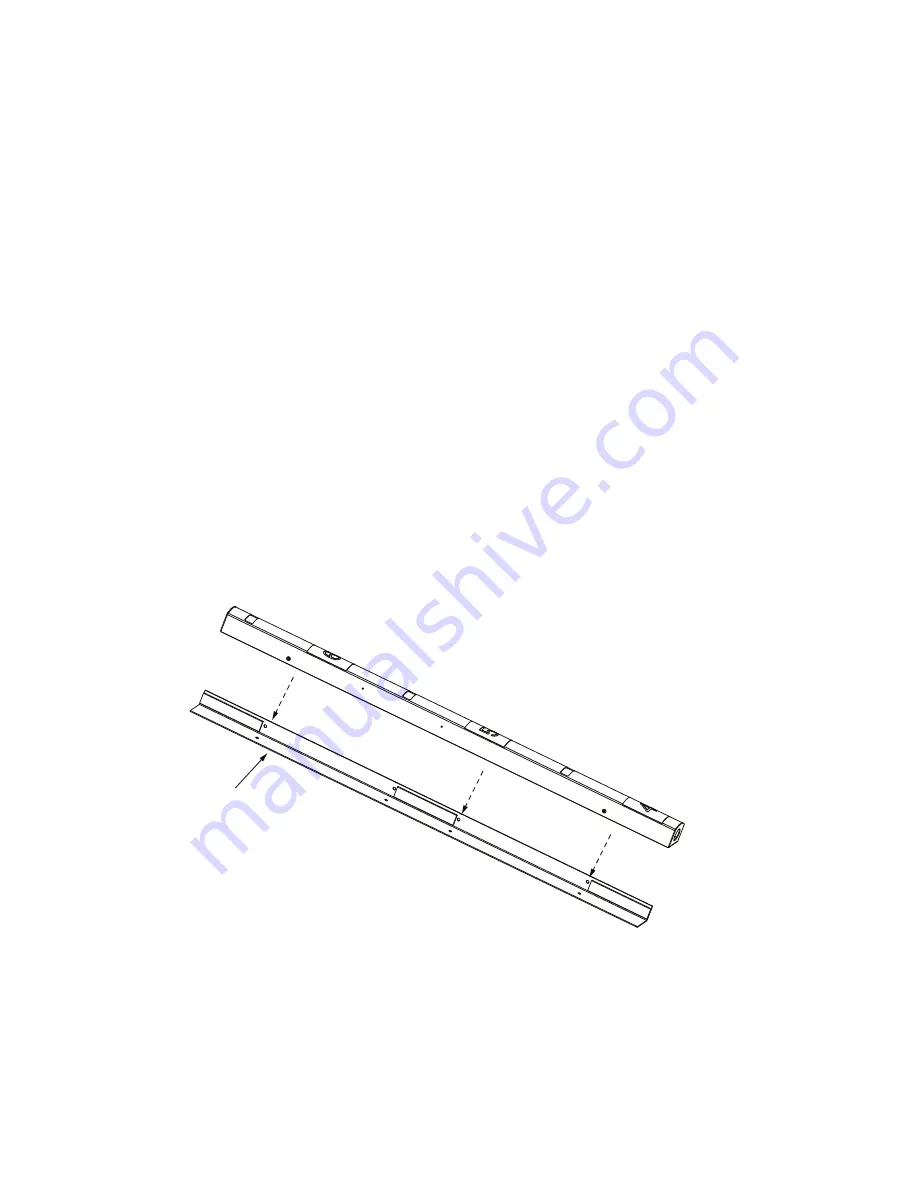
1. Refer to 

Figure 8

 and 

Figure 9

 when installing this 

accessory.

2. Measure from the floor to the 5-foot mark on the 

mounting surface.  Make a mark at 5 feet.

3. The side of the MT-HS with the rubber pads and notches, 

see 

Figure 9

, near the center through-holes is the side 

that gets screwed to the wall.  Always use the 

lower


of the two center through-holes as your 5-foot mark 
reference.  The Height Strip can be mounted facing 
either left or right of the accessory bracket by spinning 
the bracket 180°.

4. Orient the bracket as appropriate for your installation.  

Line up the notch of the lower through hole with the 
5-foot mark.

5. Use the MT-HS bracket as a template to mark the 

mounting hole locations.

6. Drill 3/16” holes in the mounting surface if using the 

anchors and screws from the Height Strip’s hardware kit.  
Drill an appropriate size hole if using other fasteners.

7. Insert wall anchors into the holes and secure the MT-HS 

to the mounting location using the screws.

Ensure the M4 
screw head is 
on THIS  side 
of the Bracket 
once the cover 
is secured. 

Figure 8 Accessory Wall Bracket (MT-HS)

Summary of Contents for HSW-H30

Page 1: ...I N S T A L L A T I O N A N D O P E R A T I N G I N S T R U C T I O N S W W W C O M P U T A R G A N Z C O M window a Pen St d f Count HEIGHT STRIP CAMERA HSW H30 ...

Page 2: ...aced upon or against them paying particular attention to cords and plugs convenience receptacles and the point where they exit from the appliance 12 Power Lines An outdoor system should not be located in the vicinity of overhead power lines or other electric light or power circuits or where it can fall into such power lines or circuits When installing an outdoor system extreme care should be taken...

Page 3: ...below have been included HSW H30 Height Strip w one color camera and 3 0mm lens white housing Hardware Kit 5 x Cable Ties 5 x Cable Tie Mounts 3 x Plastic Wall Anchor 3 x No 8 cross recessed self tapping screw 1 1 2 length 1 x Barrel Plug Connector 2 1mm pin 36 length stripped leads CAM HS30 Accessory color camera w 3 0mm lens Hardware Kit 1 x 12VDC 0 5 Amp Power Adapter 6 foot cord 1 x M3 Nylon L...

Page 4: ...housings are intended to improve in store security in two ways First when installed next to the main entrance of a store cameras within the store will capture a subject s height when exiting as he or she passes the brightly colored labels Second the Height Strip s on board camera will provide a facial shot of the subject as he or she exits Each Height Strip unit can support up to five 5 Color Hi R...

Page 5: ...mm or 7 32 nut driver to remove the M3 nut that attaches the camera bracket to the base see Figure 4 Remove the camera and bracket from the base 3 When installing a new camera or relocating the existing camera always refer to the keyhole to ensure the camera is not installed upside down The circular part of the keyhole should face the ground and the slot should face the ceiling Always install the ...

Page 6: ...ng remove the camera bracket and L bracket from the base Hold the cover next to the base Locate the two small indentations countersinks on each side of the cover Mark the countersink that corresponds to your mounting location 7 Fit the cover back over the base and tighten down the four 4 M3 screws to secure 8 Locate the marked countersink in the cover 9 Drill out an appropriate sized hole in the H...

Page 7: ... drill a hole in the mullion wide enough to accept the customer provided power and video cables 12 Feed the cables down into the mullion and fish them out of the through hole 13 Hang the Height Strip back on the mounting screw in the mullion and feed the power and video cables into the unit 14 Align the base with the 5 foot mark as in Step 5 of this section and tighten the screw 15 Insert the rema...

Page 8: ... to the camera 8 Follow steps 15 18 of the previous section to complete the installation 7 4 Installing the Unit using the Accessory Wall Bracket MT HS Note cable entry can only be accomplished via the knockouts at the top or bottom of the Height Strip when using the MT HS wall bracket 1 Refer to Figure 8 and Figure 9 when installing this accessory 2 Measure from the floor to the 5 foot mark on th...

Page 9: ... into the conduit fitting Notches designate 5 foot mark The mounting holes in the Height Strip base are not symmetrical Take care to select the correct hole for your particular application 15 Terminate the ends of the customer supplied cables as required and connect power and video cables to the camera s Be sure to supply 12VDC with the correct polarity to the camera The center pin black white wir...

Page 10: ...19 X3 MOUNTING HOLES 14 7 9 7 374 7 247 7 1 7 1 6 34 12 12 2 5 3 7 5 6 Viewing window for camera Top Down Bottom Up Viewing window for camera Viewing window for camera in mm 43 2 40 6 190 5 304 8 863 6 152 4 304 8 63 5 76 2 10 DIMENSIONAL OUTLINES ...

Page 11: ...he button to the right so it reads ELC Bright 050 n a DC Ref 010 n a Lens ELC E Shutter Auto Auto 1 60 1 100 000 The Electronic Shutter feature controls how long the shutter remains open Longer shutter times 1 60 result in brighter images but the recorded footage can Bright 050 0 100 The Brightness setting adjusts the overall brightness of the image HBLC D WDR Off Off BLC HLI D WDR This feature al...

Page 12: ...Sense Up determine at which light threshold the feature is activated canceled Function Mirror Off Off Flips the image horizontally Sharpness 020 0 30 Controls how crisp the image appears in high contrast areas Monitor Mode1 Mode1 Mode2 Switch between the Monitor Modes to choose the best option for your particular monitor Gamma User 0 45 0 45 0 60 1 00 User Set the Gamma level which is the baseline...

Page 13: ...the video Turn the Title to On and press the button to enter the title Manual DPC Manual Off Off Manual DPC Dead Pixel Compensation allows the DSP to compensate for dead pixels by using information from the surrounding pixels The DSP is able to reduce or eliminate pixels that have ceased functioning Auto DPC Auto Off Off Auto OLPF 650 650 850 The Optical Low Pass Filter OLPF feature helps reduce t...

Reviews: