background image

Contents

1. Safety Instruction                                                            2

2. Product Features                                                            3

3. Front Panel Review                                                   4

4. Rear Panel Review                                                    5

5. Power-on                                                                     6

6. Music Part Operating Instruction                                             7 

    6.1. Music Input Line Option                                                  7

    6.2. Music Volume Setting                                                       7

    6.3. Music Tone Set                                                                 7

    6.4. Music PEQ Setting                                                            8

    6.5. The Maximum Volume Setting                                      8

    6.6. Music Noise Gate Setting                                               8

    6.7. The Music Low-Cut Set                                                8                                                 

7. Microphone Part Instruction                                           8

    7.1. Microphone Input and Potentiometer Setting               8

    7.2. Microphone Volume Setting                                           8

    7.3. Microphone Enhancement Feature                               9

    7.4. Microphone Optimization Setting                                   9

    7.5. Microphone Noise Gate Setting                                     9

    7.6. Microphone Feedback Elimination Setting                   9

    7.7. Microphone High & Low-Cut Setting                              9


    7.9. Microphone PEQ Setting                                              10

    7.10. Microphone Direct Sound Volume, Phase Setting      10

    7.11. The Effect Volume Settings                                       11

    7.12. The High and Low-Cut of Effect Setting                11

    7.13. The Effect of the PEQ Setting                                  11

    7.14. Echo Volume & Phase Setting                                    12

    7.15. Echo Delay Setting                                                      12

    7.16. The Maximum Volume of Effect Setting                    12

    7.17. Echo Mode, Echo Thickness Setting                         13

    7.18. The Reverberation Volume & Phase Setting             13

    7.19. Reverb Pre-Delay & Reverb Time Setting                  13

    7 20. Reverb Type Setting                                                    14

8. The Main Output Setting Instruction                                 14

    8.1. Main Output Volume, PEQ Setting                               14

    8.2. Direct Sound  to the Main Output Volume Setting     15

    8.3. Music to Center Volume Setting                                15

    8.4. Main Output PEQ Setting                                          15

    8.5. Left & Right Delay Settings of Main Output                16

    8.6. The Main Output Limit Setting                                   16

7.8. Microphone

                     10

.

 1 to 5 Volume Setting    

9. Center Part Operating Instruction                                      17

    9.1. Center Volume Setting                                                   17

    9.2. Direct Sound to the Center Volume Setting                 17

    9.3. Center Musical Delay Setting                                        17

    9.4

Center PEQ                                                                     18

    9.5. Center High & Low-Cut Settings                                  18

10. The Sub Woofer Operating Instruction                              19

    10.1. Sub Woofer Level and Phase Setting                         19

    10.2. Sub Woofer High & Low-Cut Setting                          19

    10.3. Sub Woofer PEQ Setting                                             20

    10.4. Sub Woofer Music Delay Setting                                20

    10.5. Sub Woofer Limit Setting                                            21

11. Program/Memories Management Function                      20

    11.1. Program Saved Feature                                               21

    11.2. Program Recall Feature                                               21

    11.3. Program Delete Feature                                               22

    11.4. Program Data is saved to the Computer  Feature    22

    11.5. Program Upload Data to the Processor                     22

12. Power-On to Load the Selected Program                         22

13. Volume, Maximum Gain Limit Function                        22

14.  Volume  Fader  Function                                                                          22

15. Sub Woofer Output Option                                        23

16. Music Pitch Auto-Recovery Function                           23

17. Panel Lock, Parameter Lock Function                          23

    17.1. Panel Lock Function                                                    23

    17.2. Parameter Lock Function                                            23

18. Power-On Reset Function                                              23

19. Screen Automatically Return to Stant Menu                   23

20. Language Selection Function                                           23

21. The Wireless Remote Control                                        24

    21.1. Wireless Remote Control                                            24

    21.2. Line Remote Control                                                 24

22.  Computer  Interface  Software  Control  Function                    25

23. Install the software to PC                                                  25

24. Accessories                                                                                                          25

25. Technical Specification                                                 26

1

Summary of Contents for DK3

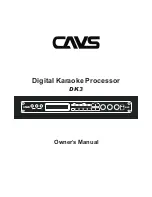
Page 1: ...Digital Karaoke Processor DK3 Owner s Manual DK3 USER PROGRAM PARAMETER 1 2 MIC ENHANCE MIC MODE CENT MODE SUB MODE 3 4 STORE MAIN MODE MUS MODE EFF MODE MUS VOL EDIT PUSH EFF VOL MIC VOL 1 2 3 MIC...

Page 2: ...r Volume Setting 15 8 4 Main Output PEQ Setting 15 8 5 Left Right Delay Settings of Main Output 16 8 6 The Main Output Limit Setting 16 7 8 Microphone 10 1 to 5 Volume Setting 9 Center Part Operating...

Page 3: ...r at a level that is uncomfortable If you experience any hearing loss or ringing in the ears you should consult an audiologist 6 This product should be located so that its location or position does no...

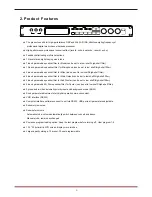
Page 4: ...for Sub Woofer can be set to low shelf high shelf filter 3 band parametric EQ filter equalizer filter for Center can be set to low shelf high shelf filter 3 group audio video automatic priority input...

Page 5: ...rising tone falling tone 7 Microphone Enhance Button 8 Microphone Mode Button 9 Effect Mode Button 10 Music Mode Button 11 Main Output Mode Button 12 Center Mode Button 13 Subwoofer Mode Button 14 Mus...

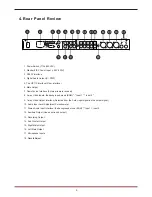
Page 6: ...rom the 3 way input signal as the output signal 10 Audio Input Level Adjustment Potentiometer 11 Stereo Audio Input Interface the background music BGM Input 1 Input 2 12 Auxiliary Output Use as surrou...

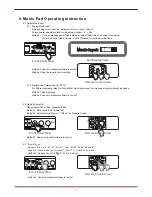
Page 7: ...llows The music input line BGM IN1 IN2 Panel lock means the panel has been locked no display indicates unlocked Encoder lock means some parameters have been locked no display indicates unlocked Subwoo...

Page 8: ...automatically recognize Method 1 Panel settings Method 2 Use own windows software to control 6 2 Music Volume Set Range Mute 30db 0db Stepping 0 5db Method 1 Panel knob usic volume set Method 2 Adjust...

Page 9: ...re to control 7 1 Microphone Input Potentiometer Setting There are a total of 5 microphone connector 3 on the front panel 2 on rear panel 3 Microphone on the front panel with Level Adjust input in gen...

Page 10: ...ur howling whistle the phenomenon often makes the listener feel irritable serious cases will damage the speaker and amplifier Adjustment the feedback elimination setting howling will be eliminated aut...

Page 11: ...7 10 Microphone Direct Sound Volume Phase Setting Volume range 0 100 Stepping 1 Phase range 0 180 Method 1 1 Press the panel button microphone mode or select MIC DIR VOL PHASE on screen see below 2 P...

Page 12: ...e to control 7 13 Effect PEQ Setting The PEQ qty 3 Type parametric equalization filter can be set to low treble tone filter graphic equalizer Frequency range 20hz 20khz Gain Range 15db 12 db step 0 1d...

Page 13: ...e panel or select ECHO DELAY ECHO DEPTH on screen see below 2 Press Switching Echo Delay and Depth 3 Turning knob Music Volume Edit Press to set Method 2 Use own windows software to control 7 16 Effec...

Page 14: ...VOL PHASE on screen see below 2 Press and switch Reverb Volume and Phase 3 Turning knob Music Volume Edit Press to set Method 2 Use own windows software to control 7 19 Reverb Pre delay Reverb time Se...

Page 15: ...Method 1 1 Press the buttons Main Output Mode on the panel or select MAIN OUT VOL MAIN BALANCE LR on screen see below 2 Press and to switch the main output volume and main output balance 3 Turning kn...

Page 16: ...he buttons Main Output Mode on the panel or select MUS TO MAIN on screen see below 2 Turning knob Music Volume Edit Press to set Method 2 Use own windows software to control 8 4 Main Output PEQ Settin...

Page 17: ...Output Compression Setting Threshold range 20 16 db Stepping 0 5db Ratio 2 1 4 1 8 1 16 1 32 1 64 1 128 1 Range On Off Method1 1 Press the buttons Main Output Mode on the panel or select MUS COMP THRE...

Page 18: ...C DIR TO CENT EFF TO CENT on screen see below 2 Press and to switch Direct Sound to the Center and Effect to the Center 3 Turning knob Music Volume Edit Press to set Method 2 Use own windows software...

Page 19: ...95 Method1 1 Press the buttons Mic Mode on the panel or select CENT PEQ on screen Only can set EQ gain on the panel see below 2 Press and to select the needing PEQ 3 Turning knob Music Volume Edit Pre...

Page 20: ...2 High cut Low cut setting Low cut range 19 7 1000hz 203 stepper High cut range 35 1 2000hz 209 stepper Method 1 1 Press the button Sub Woofer Mode on the panel or select HPF LPF on screen see below 2...

Page 21: ...are to control all the parameter of EQ can be set 10 4 Subwoofer Music Delay Direct Sound to the Subwoofer Volume Setting Subwoofer music delay range 0 20ms Stepping 0 5ms Direct sound to the subwoofe...

Page 22: ...Press the keys Save on the panel see below 2 Turning knob Music Volume Edit Press to choose the program to save 3 Press the button Save again to save the program Method 2 Use own windows software to...

Page 23: ...0db 0db Stepping 0 5db Maximum volume of center mute 30db to 0db stepper 0 5db Maximum volume of subwoofer Mute 30db 0db Stepping 0 5db The maximum gain of music equalizer 6 0 db to 12 0 db Stepping 0...

Page 24: ...automatically Reboot while holding down the keys Main Output Mode and sic Mode until the display shows as below Mu Note After the reset the user program will be deleted Please stored in the computer i...

Page 25: ...Code Keys Keys Keys Keys MIC MIC MUSIC MUSIC EFFECT EFFECT Demote Tone Original Tone Rise Tone SUB SUB Cent Cent EQ EQ Feedback Eliminate Default user Background Music BGM Input 1 Output 2 1 2 3 4 00...

Page 26: ...ore PC connection b Do not move the computer the machine and the connecting cable after PC connection c Do not use the panel operation or touch the key on the panel after PC connection d Do not insert...

Page 27: ...ance 1Vpp 75ohm Sub Woofer Parts THD 0 01 20Hz 2000Hz Frequency Response 20Hz 2000Hz 0 5dB 3 bands PEQ Type PEQ High shelf Low shelf Gain 12dB 15dB Stepping 0 1dB Frequency 20Hz 2000Hz Bandwidth 0 011...

Reviews: