background image

CC-TR100


43

42


CC-TR100

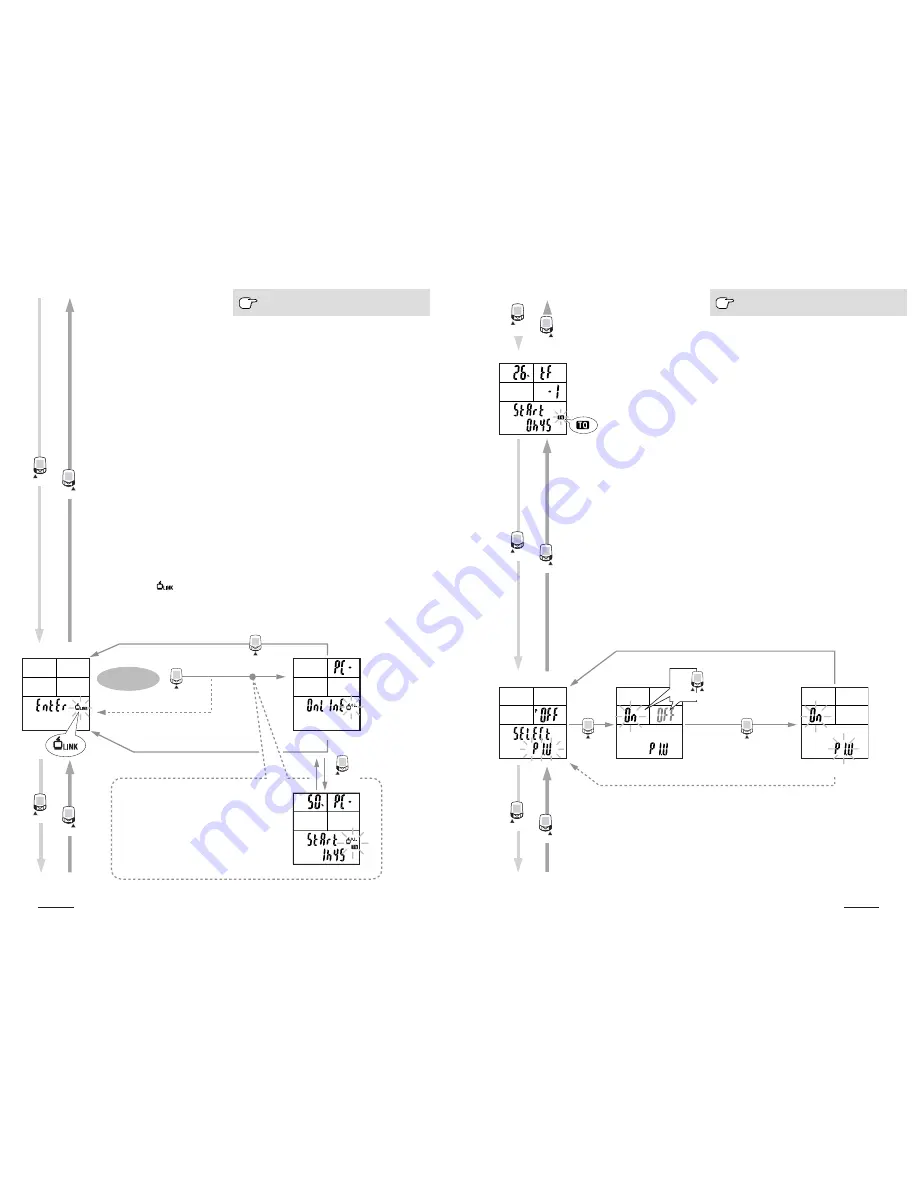
Wheel circumference menu
screen

PC link menu screen

MODE-

1

MODE-

2

MODE-

1

MODE-

2

MODE-

1

MODE-

2

Torque menu screen

MODE-

1

MODE-

2

MODE-

1

MODE-

2

Power menu screen or
Power select menu screen

Data storage menu screen

On
OFF

MODE-

1 or 

MODE-

2

S/S/E

S/S/E

For the basic information on how to use the
menu screen, refer to page 28.

Torque

When “On” is selected for “Power Select” on the menu screen, “Torque” menu is added. This
menu can only be used when the optional power unit is installed. For details, see the instruc-
tion manual for the power unit.

NOTE:

Before carrying out torque measurement, turn the data storage setting on.

The torque measurement data are recorded as a data file in the same way as data
storage. Therefore, the torque measurement menu is not displayed when the data stor-
age setting is off.

Power select

This menu should be set when the optional power unit is used.

If the setting is turned on, calibration starts to check whether or not the power unit is con-
nected. After calibration has been completed, the software of the main unit is available for the
power unit.

The default setting for the power select menu is “Off”.

NOTE:

If the original menu screen reappears after the “Error” message has been displayed,
the power unit may be connected incorrectly, or pedaling may be carried out during
the calibration. For further information, refer to the manual provided with the optional
power unit.

After calibration, the menu screen reappears automatically.

If calibration is canceled, the “Error” message is displayed to return to the menu screen.

Calibration (for 10 seconds)

Power select menu screen

For the basic information on how to use the
menu screen, refer to page 28.

MODE-

1

S/S/E

S/S/E

PC Link

You can specify settings for connection of TR100 with your personal computer. By using the
optional download kit, you can download and also upload data. In addition, with the power unit
you can perform real-time online measurement while connected to your personal computer.

NOTE:

For details, see the instruction manuals for optional download kit and power unit.

• PC Online

Mount the main unit to the download kit while connected to a personal computer.

When the START/STOP/ENTER button is pressed, “PC Online” appears, indicating that com-
munication with download software is enabled.

Upload or download data with the attached e-Train Data

TM

 Ver.3 software.

NOTE:

When downloading is completed, the PC Link menu screen reappears. It may take up
to 5 minutes to download data. Be sure not to break the connection while download-
ing, as the data will be lost.

Downloadable items ..... Data files

Uploadable items ......... Recording interval; HR zone range; Cadence zone range; tire cir-

cumference; auto mode; sound; date; time; and speed unit. These
can all be specified on your personal computer using e-Train
Data

TM

 Ver.3.

NOTE:

If “PC-Line Error” appears and the menu screen reappears, connection with the per-
sonal computer is not properly set up.

The 

 icon flashes while data transfer is in progress.

Connect to the
computer

If the computer is not properly
connected, an error message is
displayed for 3 seconds and the
menu screen will reappear.

Communication on standby

After 10 seconds

Online power measurement

When “On” is selected for “Power select”

on the menu screen, the “Online Power”

menu is added. This menu can only be

used when the optional power unit is in-

stalled. For details, see the instruction

manual for the power unit.

Online power measurement

Switch

Cancel

Click DOWNLOAD
button of download
software to begin
downloading

When downloading is completed, the PC
Link menu screen reappears automatically.

PC link menu screen

Summary of Contents for CC-TR100

Page 1: ...HEART RATE CADENCE SPEED 2 8 25 Kuwazu Higashi Sumiyoshi ku OSAKA JAPAN 546 0041 ENGLISH 066600331 1 ...

Page 2: ...ively and analyze their data It features wired speed and cadence and coded wireless heart rate for minimal interference with other external signals The computer can store up to 150 hours of computer downloadable data through the use of an optional download kit An optional power unit can also be purchased to record your torque and power output in watts Read this instruction manual thoroughly and un...

Page 3: ...intenance 48 Spare accessories 49 Specifications 50 Registration 51 Registration card 51 Limited warranty 52 Tire circumference reference table 53 Registration Please register your TR100 to validate the warranty Refer to page 51 and make user registration About the manuals You can find the desired operating method or function description from the following three guides Basic installation and opera...

Page 4: ...the main unit HR receiver or sensors Regularly check the positions of the magnet and the speed cadence sensors and make sure that they are securely mounted Do not use paint thinner or rubbing alcohol to clean the unit Do not subject the main unit HR receiver or sensors to strong impact take care also to prevent any of them from falling Heart rate sensor NOTE The heart rate transmitter has a maximu...

Page 5: ...ate zone or cadence zone k Stored Data icon Lights up when the Stored Data function is turned on Flashes when the Stored Data cannot be performed l Wheel selection icon Indicates the wheel currently selected 1 In order to use this function the optional power unit must be installed 2 In order to use this function the optional download kit or power unit is required Display 4 Display 5 Screen display...

Page 6: ... tie should be on the outside Inward side of the left crank arm J J M J G Left chain stay Installing the unit on your bicycle Follow steps 1 through 5 to mount the TR100 on your bicycle 5 1 2 3 1 Mount the bracket and HR receiver and then attach the main unit Mount the bracket E to the handlebar using the rubber pad K as a spacer Adjust the bracket to a position that provides good visibility and s...

Page 7: ...n while pressing and holding the MENU button then release the RESTART button only When a beep sounds release the MENU button All items displayed After a few seconds have elapsed proceed to the heart rate sensor ID check Press the RESTART button All items displayed for 1 sec To heart rate sensor ID check Insulation sheet Close Open 5 Installing the remote buttons Select the positions to mount the r...

Page 8: ... Completion of initial set up When the setup is completed set the date and time as described in Configuring main unit on page 28 Display 1 Rotate the rear wheel Display 3 Rotate the crank arm Changing a value Select Increases the value Shifting the digit 3 Checking heart rate sensor ID The heart rate sensor ID must be checked within five minutes after the formatting or restarting operation Before ...

Page 9: ... sen sor is operating properly NOTE The heart rate sensor will start transmission approximately three seconds after it has stabilized Therefore a short time lag occurs before the icon begins to blink If the icon does not flash move the electrode pad little by little to find the optimum position for the heart rate reception Dryness may make measurement difficult Moistening the electrode pad allows ...

Page 10: ...data on Display 5 Basic operations TR100 measures data when the bicycle starts moving You can view various data by pressing the MODE 1 and MODE 2 buttons You can also record lap data up to 199 laps or intervals Main computer functions The main screen has 5 windows which display different types of data Pressing the MODE 1 and the MODE 2 buttons change the displayed information as shown in the illus...

Page 11: ...one simultaneously press the START STOP ENTER and MODE 1 buttons while the main measurement is displayed 3 Resetting the second measurement data To reset to zero all erasable data in the second measurement display only simultaneously press START STOP ENTER and MODE 1 while the second measurement icon is on Second measurement icon Lap Pressing the lap button during data measurement records lap time...

Page 12: ...uring range 0 30 to 260 bpm M Maximum cadence Indicates the maximum cadence Measuring range 0 20 to 299 rpm Total Pedal Count Indicates the total pedal count When the count exceeds 9999 the x10 appears Measuring range 0 to 99990 rotations 2 Sec Display 1 and 4 Measured data NOTE You must wear the heart rate sensor to perform the heart rate measurement Current speed Indicates the current speed upda...

Page 13: ...ap recording for about five seconds and the viewing of lap data 1 When the optional power unit is used power related data is displayed For details see the instruction manual for the power unit Display 5 TM 1 Elapsed time Indicates the elapsed time from the start of measurement to 1 10 second When it exceeds 10 hours 1 10 second is not displayed Measuring range 0 00 00 0 to 99 59 59 DST 1 Trip dist...

Page 14: ...es are on and the value is out of your target zone An alarm will sound if the sound feature is turned on Heart rate zone alert Four heart rate zones can be set with range and target The range of each zone may overlap The zone value will flash when the target zones are on and the value is out of your target zone An alarm will also sound if the sound feature is turned on You can check the time in an...

Page 15: ...page 39 MODE 2 MODE 1 Lap function Recording lap data Pressing the Lap button on the main display while riding records lap data Immedi ately after recording the lap number is displayed alternating between lap time average lap speed and split time lap distance NOTE Up to 199 laps can be recorded Lap times cannot be shorter than 5 seconds pressing the LAP button consecutively within 5 seconds will n...

Page 16: ...t is not displayed as the de fault setting for Power Select is off To use these functions the optional power unit is required 4 To use the data files recorded in this menu the optional download kit or power unit is required Tire circumference input Auto mode Date Power select Cadence zone Heart rate zone Heart rate sensor ID Data file 4 Main display See page 29 See page 29 See page 30 See page 30 ...

Page 17: ...g Minute setting Select Select Setting clock This function is used to set the clock and to choose between 12 and 24 hour modes Clock setting cannot be changed while the bicycle is in motion NOTE Press and hold the MODE 2 button to speed up the progression of numbers For the basic information on how to use the menu screen refer to page 28 Sound 1 Alarm sound setup An alarm will alert when the heart...

Page 18: ...ART STOP ENTER LAP LAP Lt LIGHT Defining remote button setting menu screen Select Select For the basic information on how to use the menu screen refer to page 28 S S E S S E K K km h M mph MODE 1 or MODE 2 MODE 1 MODE 1 MODE 2 S S E S S E Manual odometer input menu screen Speed unit menu screen Manual odometer input Enter any numeric value as the odometer value Odo This allows the input of past da...

Page 19: ...king selection impossible When a lower limit value greater than the upper limit value is entered the upper limit value is automatically adjusted to the value of the lower limit value plus one When a wrong upper limit value is entered the same adjustment is made First digit First digit Digit shift Third digit Second digit Second digit Digit shift Changing the lower limit value Changing the upper li...

Page 20: ...pper limit value is entered the upper limit value is automatically adjusted to the value of the lower limit value plus one When a wrong upper limit value is entered the same adjustment is made The range of each zone may overlap Select First digit Changing the lower limit value Changing the upper limit value Third digit Second digit Digit shift First digit Second digit Third digit Digit shift Digit...

Page 21: ... to Copy data For details see the instruction manual for the download kit Alternating data display Switch file End Memory consumption Recording interval Number of laps used in file Date of ride Ride time Ride start time Data file check screen File number For the basic information on how to use the menu screen refer to page 28 S S E S S E Heart rate sensor ID This function allows the ID signal tran...

Page 22: ... 0 or 99 files have already been stored further data storage cannot be performed When the remaining memory indicates 0 while the data storage is in progress a data file is created at that point Measurement after that is switched to the regular measurement from the data storage When the regular measurement is performed even though the data storage is turned on the icon flashes Select recording inte...

Page 23: ...S S E PC Link You can specify settings for connection of TR100 with your personal computer By using the optional download kit you can download and also upload data In addition with the power unit you can perform real time online measurement while connected to your personal computer NOTE For details see the instruction manuals for optional download kit and power unit PC Online Mount the main unit t...

Page 24: ...erview of training with heart rate data For more complete information there are books and websites with more in depth information Generally the heart rate increases during exercise getting higher in conjunction with the in tensity of the workout Measuring the rate of your heart beat is a good indicator of the intensity of your workout By setting target HR heart rate zones and sticking to pre set e...

Page 25: ...t be changed when measurement is in progress Make sure that the timer and or speed measurement are stopped Some menu screens require all data to be reset Trouble shooting If a malfunction occurs check the following before contacting CatEye or your retailer for repair or service Trouble on display Trouble Check Items Remedy Display motion becomes slower Is the surrounding temperature low below zero...

Page 26: ...rmly close the battery cover NOTE After replacement be sure to perform the restarting operation page 11 check the HR sensor ID page 31 and set the date and time page 31 Heart rate sensor Battery life Approx 6 months when worn for 1 hour per day Using a coin or similar object turn and remove the battery cover on the surface of the heart rate sensor transmitter Replace used battery with a new lithiu...

Page 27: ...p speed Split time Lap distance Second measurement Elapsed time Trip distance Average speed Control system 8 bit one chip microcomputer crystal oscillator Display system Liquid crystal display With white LED backlight Speed Cadence sensor signal detection system Noncontact magnetic sensor Heart rate sensor signal transmission and reception Electromagnetic induction radio system With the ID functio...

Page 28: ...re Tire size Tire circumference reference table Tire size Limited warranty Applies only to Main unit HR receiver and Heart Rate Sensor Excluding depletion of batteries and wire damage Should the main unit HR receiver or Heart Rate Sensor fail under normal condition of use we will repair or replace it free of charge The warranty service will be performed directly by the CATEYE CO LTD When sending i...

Reviews: