background image

8

Introduction

How to install the 

unit on your bicycle

Setting up the 

computer

Others

Changing the 

computer con-

figuration

Uploading the mea-

surement data

Setup of your 

PC

How to use the 

computer

How to use the computer

This unit is a sensor-less cyclocomputer using GPS. An environment where a GPS signal can be received is required for measurement.

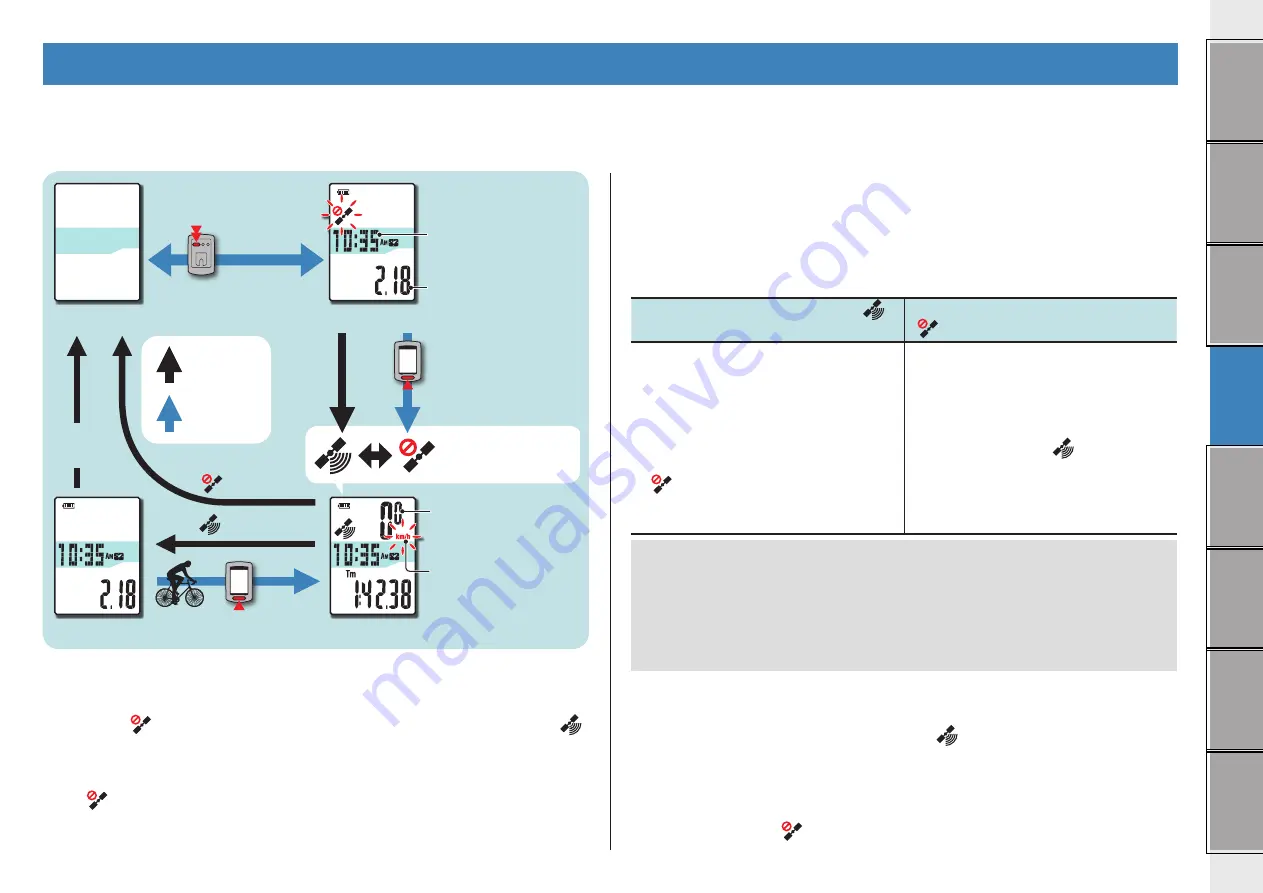
Three screens of GPS search screen, measurement screen, and standby screen are available in this unit, which are displayed alternatively according to the GPS receiving status and the bicycle 

operating status. This section describes the flow of the screen after the power is turned on until measurement is started.

GPS search screen (when the power is turned on)

When the power is turned on, the GPS search screen will appear, and the GPS signal non-

receiving icon (

) will flash. Once GPS signal is received, the GPS signal receiving icon (

will light up, and the display will change to the measurement screen.
* In an environment, including indoor, where GPS signal cannot be received, press the 

MODE button to change to the measurement screen while the GPS signal non-receiving 
icon (

) is still flashing.

* This unit starts searching GPS after the power is turned on. It may take several minutes to 

acquire GPS signal depending on the receiving status.

Measurement screen

This is the basic screen of this unit. This screen is used during measurement.

Your can start/stop measurement and view the data under measurement.

According to the GPS signal receiving status, the computer operates in a different way as follows.
* For the functions available on the measurement screen, see “Functions available on the 

measurement screen” (page 9).

When the GPS signal receiving icon (

lights up

When the GPS signal non-receiving icon 
(

) flashes

Measurement is enabled, and the unit 

starts/stops measurement in sync with the 

bicycle motion.

The speed unit flashes during measure-

ment.
* If GPS signal cannot be received while 

riding, the GPS signal non-receiving icon 

(

) will flash, and the unit will stop 

measurement.

In such status, measurement is disabled 

even while riding; however, only viewing the 

measurement data and the resetting opera-

tion are enabled.
* Once GPS signal is received, the GPS 

signal receiving icon (

) will light up, 

and measurement will be enabled.

* The unit turns off the power automatically 

in 10 minutes without pressing any button 

in such status. (Auto power off)

GPS signal may not be received, thus the unit may stop measurement or may not display 

appropriate measurements in the following locations or environments.

•  In a tunnel, underground and building, between high-rise buildings, under an elevated 

structure and arcade, etc.

•  In bad weather (snow, rain, etc.)
•  Near a high-voltage line or a mobile telephone relay station.
•  When the computer display does not face to the sky.

Standby screen

The unit changes to the standby screen automatically in 10 minutes without any bicycle motion or 
button operation, while the GPS signal receiving icon (

) flashes on the measurement screen.

Riding again returns to the measurement screen.
* The unit turns off the power automatically in 50 minutes with the standby screen dis-

played. (Auto power off)

* When the GPS signal cannot be received with the standby screen displayed, the GPS sig-

nal non-receiving icon (

) flashes. In such a case, the computer does not return to the 

measurement screen even if you ride the bicycle.

POWER

MODE

MODE

GPS search screen

Measurement screen

Power OFF

When GPS 

signal is 

received

When GPS 

signal cannot 

be received

Current speed

0.0 (3.0) - 105.9 km/h 

[0.0 (2.0) - 65.9 m/h]

To be changed accord-

ing to the GPS signal 

receiving status.

Speed unit

Clock

0:00 - 23:59

[AM1:00 - PM12:59]
Date

(press & hold)

Power ON/OFF

Standby screen

No operation 

for 10 minutes

No operation 

for 10 minutes

Changed 

automatically

Changed by 

operating 

buttons

or

No opera-

tion for 50 

minutes

Summary of Contents for CC-GL10

Page 1: ...is device may not cause harmful interference and 2 this device must accept any interference received including interfer ence that may cause undesired operation L appareil est conforme à la réglementation FCC section 15 et Industrie Canada RSS standard exempts de licence s Son utilisation est soumise à deux conditions 1 L appareil ne doit pas provoquer d interférences nuisibles et 2 L appareil doit...

Page 2: ...se of the CatEye STEALTH 10 Warning Caution Do not concentrate on the computer while riding Ride safely Mount firmly the bracket on your bicycle and check periodically that it is not loosened Do not leave the computer in direct sunlight for a long period of time Do not disassemble the computer Do not drop the computer to avoid malfunction or damage Be sure to tighten the dial of the FlexTight brac...

Page 3: ...e current speed is faster or slower than the average speed Faster Slower GPS signal receiving icon Indicates the GPS signal receiving status Light up GPS signal is strong GPS signal is weak GPS signal non receiving icon Flashes when GPS signal cannot be received In such status measurement cannot be performed When such status lasts for 10 minutes the com puter turns off the power automatically Auto...

Page 4: ...may damage the screw thread When attaching the FlexTight bracket to the stem When attaching the FlexTight bracket to the handlebar To receive GPS signal effectively adjust the direction of the bracket so that the computer display faces to the sky Cut the excess length of the band using scissors Caution Round off the cut edge of the bracket strap to prevent injury To mount the bracket to an aero sh...

Page 5: ...lick the button then a browser will open and a video will be played back How to turn on off the power how to charge the battery Power ON OFF Press and hold the button on the back of the computer for 2 seconds Set up the computer when you turn on the power for the first time For details see Setting up the computer on the right of this page When the remaining battery capacity is small charge it acco...

Page 6: ...W Moscow 3 THR Tehran 3 5 DXB Dubai 4 KBL Kabul 4 5 KHI Karachi 5 DEL Delhi 5 5 DAC Dhaka 6 RGN Yangon 6 5 BKK Bangkok 7 HKG Hong Kong 8 TYO Tokyo 9 City code City name Time difference DRW Darwin 9 5 SYD Sydney 10 NOU Noumea 11 WLG Wellington 12 PPG Pago Pago 11 HNL Honolulu 10 ANC Anchorage 9 LAX Los Angeles 8 DEN Denver 7 CHI Chicago 6 NYC New York 5 CCS Caracas 4 RIO Rio de Janeiro 3 LON HNL AN...

Page 7: ...ON OFF MODE Register the setting press hold Change ON OFF according to the period of daylight saving time 5 Select the clock display format Select the display format of 12h 12 hours display or 24h 24 hours display MODE 12h 24h Date and clock are acquired from GPS signal therefore it is not necessary to enter them 6 Press the MENU button to complete setting Setting up is completed and the computer ...

Page 8: ...ent in sync with the bicycle motion The speed unit flashes during measure ment If GPS signal cannot be received while riding the GPS signal non receiving icon will flash and the unit will stop measurement In such status measurement is disabled even while riding however only viewing the measurement data and the resetting opera tion are enabled Once GPS signal is received the GPS signal receiving ic...

Page 9: ...xceeds about 27 hours or Dst exceeds 999 99 km Average Speed cannot be measured while displaying E Reset the data Backlight When using it during night time the backlight always lights up Example Setting of the night time 7 00 PM to 6 00 AM The night time can be set to your needs For information on how to set the night time see Changing the computer configuration page 20 As default it is set to 7 0...

Page 10: ...rip data for the 2nd day to the 4th day are generated Trip data is not yet generated MODE Resetting operation MODE Resetting operation A trip is continued unless the resetting operation is performed even if the power is turned off during measurement The trip distance 2 Dst2 is not reset to 0 since it is to be reset separately For details see Resetting the trip distance 2 below The total distance O...

Page 11: ...las to register as a member Then install CATEYE Sync to your PC Windows Mac You can upload the trip data measured with this unit to CATEYE Atlas STRAVA TrainingPeaks and others or change the computer configuration using your PC Caution Use the PC with an Internet access environment to access CATEYE Atlas or download CATEYE Sync Membership registration to CATEYE Atlas You can use the same account w...

Page 12: ...en appears 3 Click on Settings The setting screen appears 4 Click on Account setting and enter your e mail address and password Enter correctly the e mail address and password you registered at CATEYE Atlas 5 Click on Apply Login setting for CATEYE Sync is completed Now setup of your PC is completed For information on how to upload the trip data see Uploading the measurement data trip data page 13...

Page 13: ... the cradle 1 Set the computer to the cradle Caution Do not set wet computer to the cradle for example after ride in the rain It may cause short circuit and damage the computer or the data 2 Insert the USB plug into your PC Only battery icon is displayed on the screen 3 Start CATEYE Sync Double click on the shortcut CATEYE Sync to start CATEYE Sync Watch video YouTube Uploading the measurement dat...

Page 14: ...the first time After clicking the upload button follow the on screen instructions and enter the authentica tion code issued by the site It may take time to upload depending on the trip data size and line condition When the upload is complete the sites to which the data was uploaded are indicated in the Status column and links to the trip are displayed in the adjacent column Clicking the link launc...

Page 15: ...is can be used when transferring the trip data in the past to a new PC when renewing your PC gpx A general purpose GPS data file This can be used after reading into Google Earth etc fit A file that can be read into STRAVA and TrainingPeaks A window for selecting the destination to save appears 3 Select the destination to save and then click on Open The file will be exported to the destination spec...

Page 16: ...nd capacity limit This unit records data at the specified interval The record interval can be selected from 1 2 or 5 seconds according to your use Default 1 second The maximum recording time and the maximum time for one trip depend on the selected record interval as follows Record interval Maximum recording time total time of all trip data Maximum time for one trip Maximum number of trips 1 second...

Page 17: ... Click on Login here When you have not registered your membership see Mem bership registration to CATEYE Atlas page 11 3 Enter your e mail address and password and then click on Login Enter correctly your e mail address and password registered to login The My Page appears On My Page you can view the trip and trip data in the past and set the target trip dis tance in a certain period of time 4 Clic...

Page 18: ... particular GPS points on the route 1 Click on Delete GPS point from the trip information editing screen The trip route appears on the map 2 Click on a start point for the route section you want to delete A section appears according to the cursor movement 3 Click on an end point of the section covering the route you want to delete A confirmation message appears 4 Click on Delete the GPS point sele...

Page 19: ...ploading the mea surement data Setup of your PC Uploading the mea surement data Exporting to a GPX fil Export a general purpose GPS data file from the trip This can be used with other services including Google Earth 1 Click on GPX export on the trip information editing screen A confirmation message appears 2 Click on Export A GPX file is downloaded ...

Page 20: ...one page 22 This can be used when changing the setting with not using a PC Changing the setting with CATEYE Sync 1 Set the computer to the cradle Caution Do not set wet computer to the cradle for example after ride in the rain It may cause short circuit and damage the com puter or the data 2 Insert the USB plug into your PC Only battery icon is displayed on the computer screen 3 Start CATEYE Sync ...

Page 21: ... setting OFF 6 When you do not want to turn on the backlight throughout the day set the same value for both Night time setting ON and Night time setting OFF Setting items Description Tire circumference This is not used with this unit Total distance You can enter the start value of the total distance and add the trip distance to it Setting range 00000 to 99999 This can be used when you renew and or...

Page 22: ...e zone page 23 Changing the settings of the computer alone Pressing the MENU button with the measurement screen displayed changes to the menu screen Various settings can be changed on the menu screen After you change the setting be sure to press the MENU button to register it Leaving the menu screen without any operation for 1 minute returns to the measurement screen Clock display format Select th...

Page 23: ...ne again Current setting TYO Tokyo Setting before the change NYC New York When you travel back and forth between two cities having different time zone you can easily return it to the original time zone by performing the shortcut operation even after changing the time zone in the second city The time zone stored for the shortcut is the previous setting only City code City name Time difference LON L...

Page 24: ...al to record the measurement data The maximum recording time maximum time for one trip that can be recorded in the computer depends on the selected interval Record interval Maximum recording time total time of all trip data Maximum time for one trip 1 S 1 second 35 hours 12 hours 2 S 2 seconds 70 hours 24 hours 5 S 5 seconds 175 hours 60 hours MODE 1 S 2 S 5 S MODE press hold Changing the settings...

Page 25: ...reen items will light up for 2 seconds and the unit will change to the GPS search screen AC AC Data to be stored data to be deleted Data to be stored deleted upon the restarting operation are as follows Data to be stored Data to be deleted Speed unit Data under measurement elapsed time trip distance trip dis tance 2 average speed maximum speed and GPS route information Clock setting time zone prev...

Page 26: ...tart end time see Changing the computer configuration page 20 The backlight lights up during the daytime Is the start time of the night time set correctly For information on how to set the start time see Changing the com puter configuration page 20 Trouble Check Items Remedy When the power is turned on bat tery icon flashes and then no display ap pears Remaining battery capacity is nearly zero Cha...

Page 27: ...easurement function Upper display Current speed 0 0 3 0 105 9 km h 0 0 2 0 65 9 m h Middle display Clock 0 00 23 59 AM1 00 PM12 59 Both 12 and 24 hour modes can be selected Automatic adjustment using GPS Lower display Elapsed Time 0 00 00 9 59 59 Trip Distance 0 00 999 99 km mile Trip Distance 2 0 00 999 99 1000 0 9999 9 km mile Average Speed 0 0 105 9 km h 0 0 65 9 m h Maximum Speed 0 0 3 0 105 9...

Page 28: ...nclose the warranty certificate proof of purchase with instruction for repair Please write or type your name and address clearly on the warranty certificate Insurance handling and transportation charges to CatEye shall be borne by person desiring service For UK and REPUBLIC OF IRELAND consumers please return to the place of purchase This does not affect your statutory rights Please register your C...

Reviews: