background image

GETTING ACQUAINTED

E-30

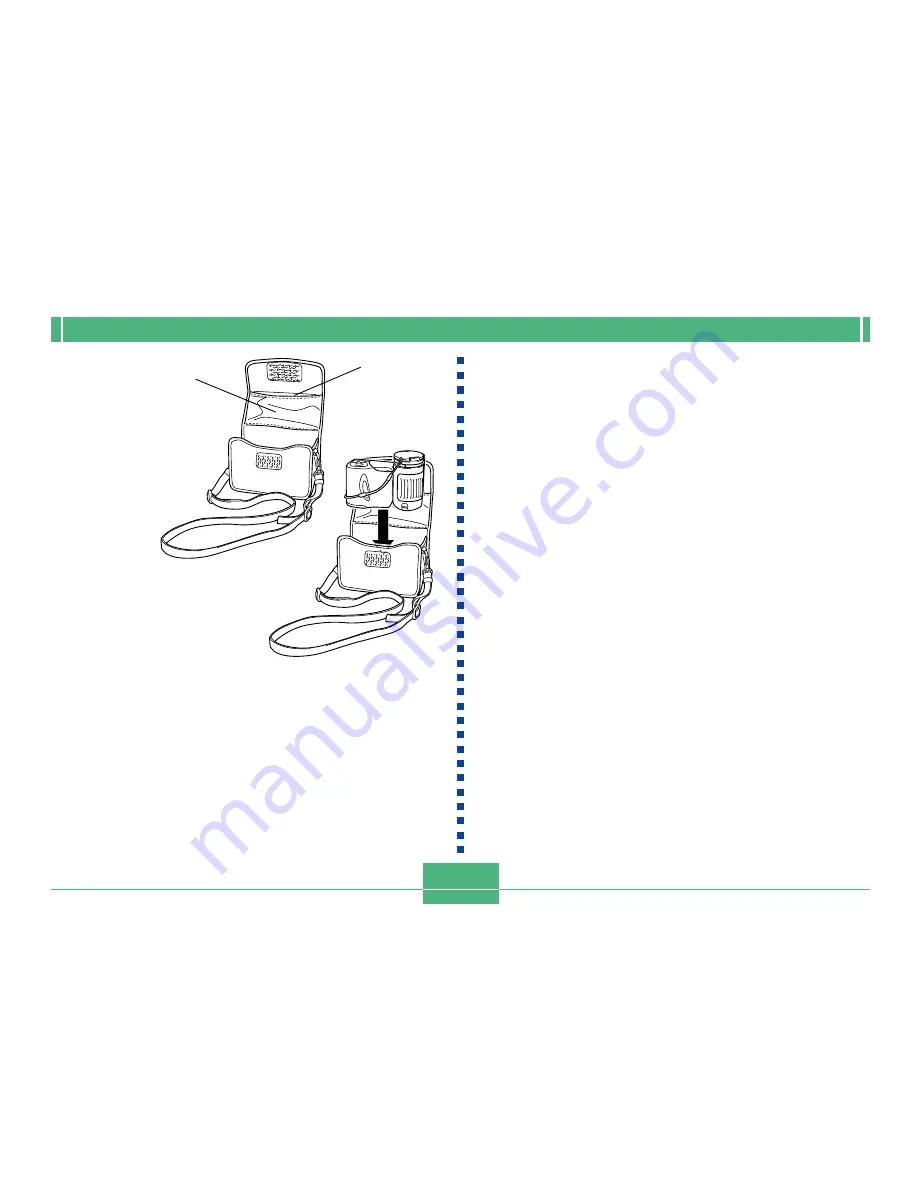
A pocket is provided
inside the case for
memory card storage.
To insert a memory
card, open the flap of
the pocket and slide
the card into it.

Flap

IMPORTANT!

• Never put any other objects besides the camera into

the soft case.

• The strap that comes with the camera is intended for

use with the soft case only. Never use it for any other
purpose.

• Never swing the camera around by the soft case

strap.

• Handing the camera from your neck by the soft case

strap creates the risk of damage to the camera by
striking surrounding objects, and the risk of personal
injury due to the camera being caught in a door, etc.

• Keep the soft case out of the reach of small children.

The soft case strap can become wound around the
next and create the risk of personal injury.

When inserting the camera into the soft case, make sure the
lens is facing upwards and the monitor screen is facing in the
direction shown in the illustration.

Summary of Contents for QV-2300UX

Page 1: ...Camera User s Guide QV 2300UX QV 2800UX English All example procedures in this User s Guide are based on the QV 2300UX The same procedures also apply to the QV 2800UX unless specifically noted otherwi...

Page 2: ...eck to make sure that all of the items shown below are included with your camera If something is missing contact your dealer as soon as possible Camera Soft case Lens cap cap holder The lens cap shoul...

Page 3: ...Conversion Lens E 22 Lens Precautions E 23 Monitor Screen Indicators E 24 REC mode E 24 PLAY mode E 25 Operation Indicator Lamp E 26 REC mode E 27 PLAY mode E 27 Using the Bundled Accessories E 28 Us...

Page 4: ...ying Image Size and Quality E 59 Using the Self timer E 60 Exposure Compensation E 61 E 63 OTHER RECORDING FUNCTIONS Shooting Portraits E 63 Shooting Landscapes E 64 Shooting Night Scenes E 65 Instant...

Page 5: ...the Playback Image E 97 Displaying the 9 image View E 98 Selecting a Specific Image in the 9 image View E 99 Using the Slide Show Feature E 100 E 101 DELETING IMAGES Deleting the Displayed Image E 101...

Page 6: ...SB Port Connection Windows Macintosh E 123 Using a Serial Port Connection E 124 Using a Memory Card to Transfer Image Data E 125 Memory Card Data E 126 DCF Protocol E 126 Memory Card File Structure E...

Page 7: ...INTRODUCTION E 7 Quick Reference Getting Ready 1 2 Load batteries Set the current time and date page E 31 3 PUSH 1 2 Insert the memory card page E 38 page E 44 3 1 2 3...

Page 8: ...de the REC PLAY selector to REC Point the camera at the subject compose the image on the monitor screen and press the shutter release button half way to focus the image Slide the POWER ON OFF switch t...

Page 9: ...4 CARD POWER ON OFF W T MENU PLAY REC SHIFT INFO MF 2 3 Slide the REC PLAY selector to PLAY Use forward and back to scroll through stored images on the monitor screen Slide the POWER ON OFF switch to...

Page 10: ...he one you want to delete 5 Slide the REC PLAY selector to PLAY Double check to make sure you really want to delete the image you selected You can exit the image delete operation by pressing MENU 6 Us...

Page 11: ...eplacement Be sure to back up all important data on other media to protect against its loss Windows and Internet Explorer are registered trademarks of Microsoft Corporation Macintosh is a registered t...

Page 12: ...orage protocol provides image inter compatibility between the digital camera and printers VIDEO OUT terminal Connect to your TV for big screen viewing of images USB compatibility Connect to your compu...

Page 13: ...INTRODUCTION E 13 Recording Features page E 63 Portrait Mode Scene Mode page E 66 page E 64 Landscape Mode Movie Mode page E 69 page E 65 Night Scene Mode Panorama Mode page E 71...

Page 14: ...posure modes Program AE aperture priority AE shutter speed priority AE manual exposure pages E 74 to E 79 Three metering modes Multi pattern center weighted spot pages E 80 to E 81 Four focus modes Au...

Page 15: ...n or snow at the seashore or beach in the bathroom etc Should foreign matter or water ever get into the camera immediately turn power off unplug the AC adaptor from the power outlet and contact your d...

Page 16: ...omponents Condensation can cause malfunc tion of the camera so you should avoid exposing it to con ditions that might cause condensation To keep condensation from forming place the camera into a plast...

Page 17: ...urs a day Should the LCD image appear abnormally dark take the camera to your dealer or an authorized CASIO service pro vider to have the light source replaced Note that you will be charged for this r...

Page 18: ...e the camera General Guide The following illustrations show the names of each component button and switch on the camera Front GETTING ACQUAINTED Shutter release button page E 47 Terminal panel cover p...

Page 19: ...55 98 Self Timer Delete button pages E 60 101 SHIFT INFO Shift Information button pages E 25 90 Memory card slot cover page E 38 REC PLAY selector page E 47 Zoom slider page E 50 Monitor screen page E...

Page 20: ...IN 6V DIGITAL ON OFF W T DIGITAL terminal page E 116 USB port page E 116 DC IN 6V terminal page E 35 VIDEO OUT terminal page E 116 Open Terminal Panel Cover Tripod screw hole Release button page E 31...

Page 21: ...B B B A Image displayed when recording B Display of recorded image IMPORTANT Do not use undue force when rotating the lens mecha nism and never try to force it past the point where rota tion stops nat...

Page 22: ...tor LU 8A in order to use a conversion lens or a com mercially available lens filter QV 2800UX A conversion lens or a commercially avail able lens filter can be installed directly without an adaptor C...

Page 23: ...re to use the Conversion Lens Adaptor when ever you install a conversion lens or filter If you don t the lens will come into contact with the conversion lens or filter when it extends from the camera...

Page 24: ...t of range aperture or shutter speed causes the corresponding monitor screen value to turn yellow Aperture value Recording Mode indicator Self timer 10 SEC 2 SEC Quality FINE NORMAL ECONOMY Memory cap...

Page 25: ...or program AE aperture priority AE shutter speed priority AE manual Screen when SHIFT INFO is pressed SHIFT INFO MF SHIFT INFO button PLAY mode Image protection indicator Folder name File number Image...

Page 26: ...s recorded using a different digital camera model Shutter speed value Aperture value Folder name File number Metering Mode indicator Flash Mode indicator White balance Operation lamp SHIFT INFO MF Ope...

Page 27: ...r Memory card is not formatted No memory card in the camera Lamp Color Green Amber Red On Auto focus operation complete Monitor screen turned off due to sleep state activation Exposure warning Cannot...

Page 28: ...e to turn off camera power and let the lens retract into the camera before attaching the lens cap Never turn on camera power with the lens cap affixed to the lens Attaching the Strap Attach the strap...

Page 29: ...case A pocket is provided inside the case for memory card storage To insert a memory card open the flap of the pocket and slide the card into it Monitor screen facing down Flap QV 2800UX Attach the n...

Page 30: ...ever swing the camera around by the soft case strap Handing the camera from your neck by the soft case strap creates the risk of damage to the camera by striking surrounding objects and the risk of pe...

Page 31: ...anese batteries Use only the battery types specifically mentioned in this User s Guide PUSH Power Requirements Your camera features a two way power supply that lets you use either AA size batteries or...

Page 32: ...ch you use flash zoom and other functions and how long you leave power turned on Battery Life Guidelines The battery life guideline values given below indicate the amount of time at standard temperatu...

Page 33: ...in the camera The following examples show how alkaline battery life changes under different conditions photographic conditions shooting conditions Example 1 Intermittent use of the camera shortens ba...

Page 34: ...of a battery and never try to take batter ies apart Do not expose batteries to direct heat or dispose of them by burning Doing so can create the danger of explosion Never mix batteries of different ty...

Page 35: ...are wet Doing so creates the risk of electrical shock Do not overload extension cords or wall out lets Doing so creates the danger of fire and electrical shock Should the cord of the AC adaptor become...

Page 36: ...ou can specify 30 seconds 1 minute or 2 minutes before the sleep state is triggered or you can turn off this setting entirely Be sure to turn off power before connecting or disconnect ing the adaptor...

Page 37: ...is playing When you are performing operations on a com puter printer or other external device connected to the camera s DIGITAL terminal or USB port While the AC adaptor is connected to the camera To...

Page 38: ...d with arrow Memory Cards This camera uses a memory card CompactFlash CF TYPE I II card or microdrive for image storage IMPORTANT Make sure that the power of the camera is turned off before you insert...

Page 39: ...eject the CompactFlash card while the card slot is facing downwards Doing so creates the danger of the CompactFlash card falling which can corrupt im age data on the card Never remove the memory card...

Page 40: ...memory card deletes all images on the card even if some or all of the images are protected page E 107 Data deleted by a memory card format operation can not be recovered Be sure to carefully check an...

Page 41: ...r the camera Interruption of cam era power during the format operation results in improper formatting making it impossible to use the memory card Memory Card Precautions Images cannot be recorded with...

Page 42: ...can greatly reduce battery life When using alkaline batteries certain operating conditions and certain battery brands can result in batteries going dead right after you install new ones Whenever using...

Page 43: ...the REC PLAY selector to PLAY 3 Press MENU 4 Use and to select the item you want and then press the shutter release button Make setting in accordance with the guidance mes sages that appear on the mo...

Page 44: ...icates that the time and date clock settings have been cleared Use the procedure on this page to make the correct time and date set tings If you do not set the camera s built in clock to the cur rent...

Page 45: ...ocedure to select one of the three different date formats 1 Turn on the camera and then use the REC PLAY selector to select either REC or PLAY 2 Press MENU 3 Select Date Style using one of the followi...

Page 46: ...e lower right corner of each image as it is recorded Note that once an image is stamped the date and time cannot be deleted 1 Turn on the camera and then slide the REC PLAY selector to REC 2 Press MEN...

Page 47: ...shot The camera s Program AE Mode P Mode is for simple snapshots In this mode the camera automatically sets the shutter speed and aperture for you in accordance with sub ject brightness 1 Before turni...

Page 48: ...nt Camera Shake Indicator The camera shake indicator appears on the monitor screen when the zoom slider is set to T telephoto or when a slow shutter speed is being used If the camera shake indicator a...

Page 49: ...varying distances from the camera Subjects in poorly lit areas Auto Focus also may not work properly when the camera is unsteady or shaking Fixed Focusing Distances The following are the fixed focusi...

Page 50: ...operation If you have a microdrive loaded in the camera the above message appears whenever the battery level is indicated as or lower The message Press to cancel save also appears momentarily during s...

Page 51: ...use Only the area of the image within the frame is recorded with the resulting image measuring 800 x 600 pixels 4X digital zoom is not available in the Movie Mode and Panorama Mode 2X and 4X digital...

Page 52: ...he indicator for the one you want is on the monitor screen Each press of cycles through the available flash modes described below SHIFT INFO MF Flash mode To do this Have the flash fire automatically...

Page 53: ...nt and the flash will be fired SHIFT INFO MF It means this Flash unit is charging Flash unit cannot be charged for some reason If the operation lamp is doing this Flashing amber Flashing red Adjusting...

Page 54: ...atically in accordance with exposure Because of this the flash does not fire if the subject is well lit White balance is fixed while the flash is being used so sun light fluorescent lighting or other...

Page 55: ...us Mode 2 Compose the image to the object you want within the focus frame and then press and hold the shutter release button about half way down Selecting the Focus Mode You can use the following proc...

Page 56: ...ter release button about half way down The following shows the relationship between optical zoom factor and the focusing distance for the Macro Mode 1 Press to cycle through the focus mode settings un...

Page 57: ...ion lamp and focus frame See Using the Auto Focus Mode on page E 55 for more information Using the Manual Focus Mode With Manual Focus you make the required focus settings by hand The following shows...

Page 58: ...down while in the Manual Focus Mode Using Focus Lock Normally Auto Focus automatically focuses on the object that is inside the focus frame Focus lock is a technique you can use in the Auto Focus Macr...

Page 59: ...ality to suit the type of image you are recording 1 Enter the REC mode 2 Press MENU 3 Select FUNCTION Size Quality and then press the shutter release button 4 Select the size and quality setting you w...

Page 60: ...der is 250 Because of this even if you are using a card that allows storage of more than 250 images the camera s monitor screen will show its capacity for up to 250 images only The number of images th...

Page 61: ...e button is pressed Record two seconds after the shutter release button is pressed Exposure Compensation Whenever program AE shutter speed priority AE or aper ture priority AE is selected as the expos...

Page 62: ...ooting under very dark or very bright condi tions you may not be able to obtain satisfactory re sults even after performing exposure compensation An EV value setting you make remains in effect until y...

Page 63: ...traits The Portrait Mode blurs the background slightly which makes the foreground subject stand out better 1 Enter the REC mode 2 Press MENU 3 Select PORTRAIT Portrait Mode and then press the shutter...

Page 64: ...Landscape Mode indoors in a shaded loca tion or in any other areas where lighting is dim can result in distant objects being out of focus Shooting Landscapes The Landscape Mode brings everything from...

Page 65: ...scene background IMPORTANT The shutter speed is quite slow in the Night Scene Mode so be sure to use a tripod to hold the camera steady Auto Focus is difficult in the dark If you experience problems u...

Page 66: ...he Auto Focus Frame is also adjusted on the monitor screen so it is in the appropriate location to suit the composition outline This camera does not support Camera Orientation Detec tion which stores...

Page 67: ...image NOTES Scene Mode images are not images recorded using this camera They are intended for reference pur poses only The actual conditions that are present when you record your image may make it im...

Page 68: ...camera as a user setup for the Scene Mode page E 66 After you register a user setup you can recall it just as you do with other scenes in the Scene Mode User Setup Parameters Focus mode aperture A and...

Page 69: ...s Approximately 300KB second Maximum Movie Length 16 seconds 6 The camera returns to the REC mode after reg istration is complete Now you can use the pro cedure under Instant Setup Using the Scene Mod...

Page 70: ...eady to record press the shut ter release button all the way down Auto Focus continues to adjust the focus as the sub ject moves 5 Follow the subject with the camera and press the shutter release butt...

Page 71: ...make up the panorama each time using the right edge of the previous image to compose the next image correctly 6 After recording the images you want press MENU You can group up to 10 images into a pano...

Page 72: ...g Multiple shots at fixed intervals starting from now Timer Shooting Single shot at a specific time Interval Timer Shooting Multiple shots at fixed intervals starting at a specific time 1 Enter the RE...

Page 73: ...inute in tervals in the Interval Mode 4 Specify a value for Shots and then press the shutter release button You can skip this step if you want to shoot only a single image Select MAX shots when you wa...

Page 74: ...e automatically in accordance with the brightness of the subject 1 Enter the REC mode 2 Press MENU 3 Select FUNCTION Exposure Mode and then press the shutter release button 4 Select P Program and then...

Page 75: ...erture increases depth of field Large Aperture Small Aperture Note that a smaller number indicates a larger aperture and a larger number indicates a smaller aperture Aperture Settings 1 Enter the REC...

Page 76: ...different aperture settings to find the one that produces the best results Shutter Speed Priority AE The S Mode shutter speed priority AE lets you specify a shutter speed and automatically adjusts ap...

Page 77: ...you depress the shutter button Because of this use of the wired remote control unit is recommended whenever using the BULB setting The self timer is disabled while the Shutter Speed is set to BULB The...

Page 78: ...ect FUNCTION Exposure Mode and then press the shutter release button 4 Select M Manual and then press the shut ter release button 5 Use and to specify the shutter speed Shutter Speed Press this button...

Page 79: ...n to be different from the brightness of the image that is re corded Quick Exposure Mode Selection You can also use the following procedure to change the ex posure mode without going through the menu...

Page 80: ...on 4 Select the metering mode you want and then press the shutter release button Multi This mode takes readings across the entire image and provides balanced exposure settings Center This mode takes r...

Page 81: ...e monitor screen in the sequence shown below multi center spot Setting the Sensitivity Level Use the following procedure to specify the sensitivity level 1 Enter the REC mode 2 Press MENU 3 Select FUN...

Page 82: ...with one of a selection of different colors 1 Enter the REC mode 2 Press MENU 3 Select FUNCTION Filter and then press the shutter release button 4 Select the setting you want and then press the shutte...

Page 83: ...t this Auto Daylight Shade Tungsten Fluorescent Manual NOTE Use Daylight for shooting in the Night Scene Mode You can also use manual white balance if the Day light setting does not produce the desire...

Page 84: ...rn off the camera or change its white balance back to Auto or another white balance set ting the last value obtained by manual white balance is retained in memory and restored the next time you select...

Page 85: ...olor enhancement Enhance reds Enhance greens Enhance blues Enhance flesh tones Select this Off Red Green Blue Flesh Tones NOTES The filter function page E 82 produces the same ef fect as if a piece of...

Page 86: ...onitor screen to help you compose your images before recording them 1 Enter the REC mode 2 Press MENU 3 Select FUNCTION Grid and then press the shutter release button To do this Turn the grid off Turn...

Page 87: ...utton To do this Make outlines sharp Leave outlines as they are Make outlines soft Select this Hard Normal Soft Specifying Color Saturation Use the following procedure to control the saturation of im...

Page 88: ...ight Scene Mode Specifying Power On Default Settings Configuring the camera s mode memory controls power on default settings Turning a mode memory item on specifies that the setting of the item when t...

Page 89: ...Auto Auto Normal On Setting at power off 6 Press Resetting the Camera Use the following procedure to reset all of the camera s set tings to their initial defaults as shown under Camera Menus on page...

Page 90: ...page E 93 Cycling through settings on the FUNCTION menu This shortcut lets you cycle through the settings of the cur rently selected FUNCTION menu item without advancing to the item s setting screen S...

Page 91: ...ring page E 81 White Balance page E 84 Button Icon Setting Program AE Aperture Priority AE Shutter Speed Priority AE Manual Multi Center Spot Auto Daylight Shade Tungsten Fluorescent Manual To assign...

Page 92: ...h of the three shortcut buttons Assigning a menu item to a shortcut button changes the icon that appears above the button when SHIFT INFO is pressed in the REC mode as shown below Icon After Assignmen...

Page 93: ...ut to cycle through the settings of REC mode FUNCTION menu items without displaying the setting screen for the item 1 Enter the REC mode 2 Display the FUNCTION menu and select the item whose setting y...

Page 94: ...and to scroll through the images on the monitor screen NOTES Holding down or scrolls images at high speed In order to allow for faster playback image scrolling the image that initially appears on the...

Page 95: ...3 Press the shutter release button to start play ing the movie The following describes operations that are available during movie playback If you want to do this Toggle the movie between full screen a...

Page 96: ...de icon 3 Press the shutter release button to start play ing the panorama The following describes operations that are available during panorama playback If you want to do this Toggle the panorama betw...

Page 97: ...ou can select either 2X or 4X enlargement 1 Enter the PLAY mode 2 Use and to display the image you want to enlarge 3 Press MENU 4 Select ZOOM and then press the shutter re lease button to enlarge the...

Page 98: ...rgement settings in the PLAY mode without selecting ZOOM on the menu Displaying the 9 image View The following procedure displays nine images on the monitor screen at the same time 1 Enter the PLAY mo...

Page 99: ...9 image view 2 Press SHIFT INFO This causes a pointer to appear in the upper left cor ner of the monitor screen 3 Use and to move the pointer to the image you want to select and then press the shutte...

Page 100: ...release button IMPORTANT Auto Power Off page E 36 is disabled whenever Slide Show is being used This means you should not leave Slide Show running when using batteries to power the camera Doing so can...

Page 101: ...tected image cannot be deleted See Protecting Images Against Deletion on page E 107 for details on protecting and unprotecting images Delete operations are disabled when all of the images on the camer...

Page 102: ...ted by the deletion Deleting Selected Images The following procedure lets you select one or more image for deletion 1 Enter the PLAY mode 2 Press MENU 3 Select DELETE Select and then press the shutter...

Page 103: ...esponse to the confirmation message that appears use and to select Yes If you change your mind and want to cancel the delete select No instead 8 Press the shutter release button Deleting All Images in...

Page 104: ...confirmation message that appears use and to select Yes If you change your mind and want to cancel the delete select No instead 8 Press the shutter release button Deleting All Unprotected Images Use...

Page 105: ...r full details about the organization of folders on the memory card see Using a Memory Card to Transfer Im age Data on page E 125 Folders A folder is created automatically whenever you shoot the first...

Page 106: ...ample 26th image shot on November 7 In addition to image files memory cards also contain a number of other files used by the system for image data management The actual number of files you will be abl...

Page 107: ...e folder you selected Protecting Images Against Deletion Image protection guards against accidental deletion of im ages stored on the camera s memory card A protected im age cannot be deleted until it...

Page 108: ...ou can repeat steps 4 and 5 to turn on the icon for multiple images if you want 6 Press to protect all the images marked for protection and unprotect the unmarked im ages Protecting and Unprotecting A...

Page 109: ...rs if you want 6 Press to protect the images in all the fold ers marked for protection and unprotect the images in the unmarked folders Protecting and Unprotecting All Images 1 Enter the PLAY mode 2 P...

Page 110: ...ompatible printer or at a professional print service from the memory card in accordance with the file name and number of copies settings recorded on the card DPOF Settings File Name number of copies d...

Page 111: ...gs for multiple image files if you want 6 After you are finished making the settings you want press to complete the procedure Making DPOF Settings for Particular Folders 1 Enter the PLAY mode 2 Press...

Page 112: ...shutter release button 4 Use the button operations described below to make the DPOF settings you want To do this Decrease the number of copies value Increase the number of copies value Toggle printin...

Page 113: ...r battery capacity 1 Enter the REC mode or PLAY mode 2 Select Indicators using one of the following two key operations and then press the shutter release button OTHER SETTINGS Select this on the menu...

Page 114: ...Language using one of the following two key operations and then press the shutter release button 4 Select the setting you want and then press the shutter release button To do this Display on screen t...

Page 115: ...ode 2 Press MENU 3 Select Beep using one of the following two key operations and then press the shutter re lease button If you are here REC mode PLAY mode Select this on the menu screen FUNCTION SET U...

Page 116: ...these terminals to connect the camera to a television VCR computer or other external equipment The QV 2800UX also includes an external flash sync terminal that can be used to connect a commercially a...

Page 117: ...appens a faint after image remains on the screen even after you disconnect the camera To avoid this you should not leave the same image dis played on such a screen for very long periods This camera do...

Page 118: ...upports both NTSC used in U S Japan and other countries and PAL used in Europe and other areas video output signal systems The video system you should use depends on the country of origin of the equip...

Page 119: ...l of brightness guide number than you get when using the built in flash alone An external flash also makes it possible to extend the effective range of flash photography The guide number of the intern...

Page 120: ...xternal flash 2 Attach the external flash unit to its bracket and affix the bracket to the camera s tripod hole If you are using a grip type flash unit affix the flash unit directly to the camera s tr...

Page 121: ...t in flash fires whenever its Flash Mode setting is something other than Off The camera s sensitivity is fixed at ISO 80 when the built in flash is turned on Improper installation of an external flash...

Page 122: ...re based on the widest optical zoom 1X Using telephoto can cause slight lens darkness Adjust the aperture and ISO sensitivity settings of the external flash unit and the camera as required when using...

Page 123: ...nection using a standard USB cable is not supported USB VIDEO OUT DC IN 6V DIGITAL USB port Special USB cable bundled with camera Small connector Large connector standard USB connector USB port USB Po...

Page 124: ...nging data You cannot turn off the camera while the USB cable is con nected Disconnect the USB cable first when you want to turn off the camera Using a Serial Port Connection You can connect a compute...

Page 125: ...or is recom mended whenever performing data communication with the camera This camera does not support data communication with any of the optionally available CASIO PC link software applications LK 1...

Page 126: ...ome with the PC Card Adapter for information about how to use it Memory Card Data Images recorded with this camera and other data is stored on the memory card using DCF Design rule for Camera File sys...

Page 127: ...Card Browser Files Files and folders required for the Card Browser display Card Browser Files Files and folders required for the Card Browser display Folder and File Contents Parent Folder Contents Al...

Page 128: ...odify or delete memory card files to change management file contents or to change image file sequence and attributes and then transfer the images back to the camera you may end up with the wrong image...

Page 129: ...emory card and delete its contents before us ing it to record more images The camera formats memory cards using ATA format which means that a Macintosh sees all memory card files a text files To view...

Page 130: ...ed using the Web browsers listed below Movie files require QuickTime Microsoft Internet Explorer 4 01 or later Netscape Communicator 4 5 or later Specifying the Card Browser Type 1 Enter the REC mode...

Page 131: ...s the shutter release button When a Card Browser type is selected a file named INDEX HTM is created inside the DCIM folder whenever you turn off the camera Other files are also created and stored on t...

Page 132: ...rd slot cover Unplugging the AC adaptor Removing the camera s batteries Other actions similar to those above Note that Card Browser files may be corrupted if bat teries go low or if the memory card be...

Page 133: ...yed in full screen size regardless of the size at which they were recorded The thumbnail gallery uses the contents of the Pre view Folder page E 127 Images copied from an other digital camera or a com...

Page 134: ...metering Metering mode Shutter speed Shutter speed Aperture stop Aperture stop Exposure comp Exposure compensation Focusing mode Focusing mode Flash mode Flash mode Sharpness Sharpness Saturation Sat...

Page 135: ...will make it im possible to view image normally using the Card Browser Never edit or delete any of the files inside the DCIM folder You can use the Photo Loader application con tained on the bundled...

Page 136: ...ed Green Blue Yellow Pink Purple P A S M Multi Center Spot Auto Daylight Shade Tungsten Fluorescent Manual Off Red Green Blue Flesh Tones Off On Strong Normal Weak Hard Normal Soft High Normal Low Hig...

Page 137: ...Browser Beep Date Style Date Time Language Format VIDEO OUT LINK Restore Focus Digital Zoom Flash Intensity Indicators Card Browser Beep Date Style Date Time Language Format VIDEO OUT LINK Restore Off...

Page 138: ...Blurs the background Displays a composing frame Blurs the background Macro Mode with high saturation High saturation Hard sharpness high saturation enhanced greens Hard sharpness high saturation enhan...

Page 139: ...s 4 User Setup User Setup User Setup Remarks Hard sharpness Macro Mode with high saturation Macro mode B W filter hard sharpness high contrast Blue filter Negative EV shift blue filter High contrast B...

Page 140: ...1 1000 1 1000 Auto Auto Auto Auto Auto Auto Auto Auto Auto Auto Auto Auto Auto Auto Auto Auto Auto Auto Auto Auto Auto Auto Auto Small Small Auto Auto Auto Auto Auto Auto Auto Auto Auto Auto 0 0 0 0 0...

Page 141: ...l Soft Soft Soft Normal Normal Normal Hard Hard Normal Normal Normal Normal Normal Normal Normal Normal Normal Hard Normal Hard Normal Hard Normal Normal Normal Normal Normal Normal Normal Normal Norm...

Page 142: ...e Exposure Mode Normal Portrait Landscape Night Scene Scene Movie Normal Movie Past Panorama Interval P Mode A Mode S Mode M Mode Partial Shutter Release Button Press AF Lock AE Lock Flash Mode Self t...

Page 143: ...ally changes the shutter speed to 1 second Recording Mode Exposure Mode Combinations The following table shows to what extent each recording mode can be used in combination with each exposure mode Rec...

Page 144: ...screen No recording when the shutter release button is pressed Unable to focus properly with Auto Focus Recorded image is blurred 1 Load batteries correctly page E 31 2 Replace batteries with a full...

Page 145: ...Direct sunlight or light from another source shin ing into the lens 2 Image quality setting You are operating the and buttons while the scroll operation is still being performed Memory card images rec...

Page 146: ...ct 1 The monitor is asleep 2 Communication over the USB cable is in progress 1 Connect correctly using the video cable page E 117 2 Check the documentation that comes with the TV and set it up correct...

Page 147: ...lowing procedure deletes all files currently stored on the memory card Before proceeding try to back up the contents of the memory card onto your computer s hard disk drive or some other type of exter...

Page 148: ...her file page E 127 cannot be created due to insufficient memory when downloading data from a computer to the memory card Use your computer to delete unneeded im ages to free up memory card space for...

Page 149: ...lens for 35mm film Zoom QV 2300UX Optical zoom 3X Digital zoom 12X in combination with optical zoom QV 2800UX Optical zoom 8X Digital zoom 32X in combination with optical zoom Image size is 800 x 600...

Page 150: ...anual switching Self timer 10 seconds 2 seconds Built in Flash Flash Modes AUTO OFF ON Red eye reduction Flash Range QV 2300UX Approximately 0 5 to 2 meters QV 2800UX Approximately 0 5 to 2 5 meters R...

Page 151: ...dicate the number of hours before battery failure under normal operating temperature 25 C These values are for reference only and do not guarantee that any particular set of batteries actually will pr...

Reviews: