background image

E-5

English

Connections

IMPORTANT!

• Whenever connecting something to the digital piano, 

first use the 

VOLUME

 controller to set the volume to 

a low level. After connecting, you can adjust the 
volume to the level you want.

Connecting headphones to either of the 

PHONES

 jack 

cuts off output to the speakers, which means you can 
practice even late at night without bothering others. To 
protect your hearing, make sure that you do not set the 
volume level too high when using headphones.

NOTE

• Be sure to push the headphones plug into the 

PHONES

 jacks as far as it will go. If you don’t, you 

may hear sound from only one side of the 
headphones.

• If the plug of the headphones you are using does not 

match the 

PHONES

 jacks, use the applicable 

commercially available adaptor plug.

• If you are using headphones that require an adaptor 

plug, make sure you do not leave the adaptor 
plugged in when you unplug the headphones. If you 
do, nothing will sound from the speakers when you 
play.

You can connect audio equipment or a music amplifier 
to the digital piano and then play through external 
speakers for more powerful volume and better sound 
quality.

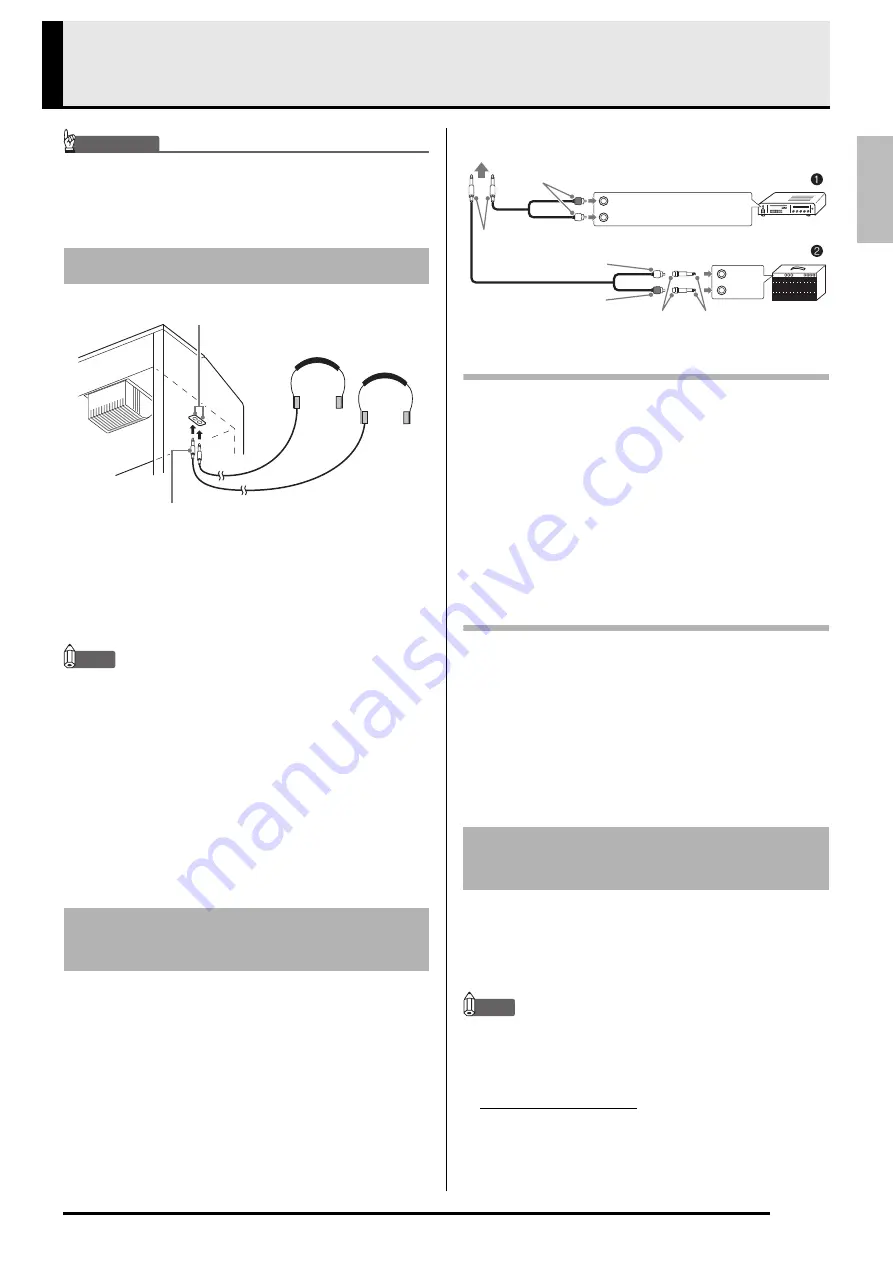
Connecting Audio Equipment (Figure 

1

)

Use commercially available connecting cords 
(Standard Plug × 1, Pin Plugs × 2) to connect as shown 
in Figure 

1

. Make sure that the end of the cord that 

you connect to the digital piano is a stereo standard 
plug. A monaural standard plug will result in output of 
only one of the two stereo channels. Normally, you 
should set the input selector of the audio equipment to 
the terminal where the digital piano is connected (AUX 
IN, etc.) Adjust volume using the digital piano’s 

VOLUME

 controller.

Connecting a Music Amplifier (Figure 

2

)

Connect the connecting cord

*

 to one of the types of 

amplifiers shown in Figure 

2

.

Adjust volume using the digital piano’s 

VOLUME


controller.

Use only accessories that are specified for use with this 
digital piano.
Use of unauthorized accessories creates the risk of fire, 
electric shock, and personal injury.

NOTE

• You can get information about accessories that are 

sold separately for this product from the CASIO 
catalog available from your retailer, and from the 
CASIO website at the following URL.

http://world.casio.com/

Connecting Headphones

Connecting Audio Equipment 
or an Amplifier

Stereo standard plug

PHONES

 jacks

Bottom

*

Digital Piano: Stereo standard plug
Amplifier

: Inputs signals for the left and right 

channels. Not connecting either plug 
will result in output of only one of the 
two stereo channels.

Bundled and Optional 
Accessories

INPUT 1

INPUT 2

Audio amplifier AUX IN jack, etc.

Guitar amplifier

Keyboard amplifier, etc.

Pin plug

Pin jack

Standard plug

RIGHT (Red)

To either of the digital piano’s 

PHONES

 jack

Stereo standard plug

Pin plug (red)

Pin plug (white)

LEFT (White)

Summary of Contents for PRIVIA PX-735

Page 1: ...ce Guarde toda informaci n para tener como referencia futura Safety Precautions Before trying to use the piano be sure to read the separate Safety Precautions Precauciones de seguridad Antes de intent...

Page 2: ...d to rain or moisture does not operate normally or has been dropped The apparatus shall not be exposed to dripping or splashing and that no objects filled with liquids such as vases shall be placed on...

Page 3: ...8 Keyboard Keys Used for Configuring Settings E 19 Parameter List E 20 Reverb E 20 Chorus E 20 Tone selection E 20 Brilliance BRILLIANCE E 20 Layer balance E 20 Tempo TEMPO E 20 Song select SONG SELEC...

Page 4: ...E 2 General Guide bn 5 6 8 7 bl bk 9 bm bo 1 2 3 4 Front Bottom Rear...

Page 5: ...the Keyboard on page E 18 z The following table shows how pressing the FUNCTION button changes the operation of certain buttons Your digital piano lets you save its current settings and lock its butto...

Page 6: ...force Never repeatedly pull on the cord Never twist the cord at the base of the plug or connector During Movement Before moving the digital piano be sure to unplug the AC adaptor from the power outlet...

Page 7: ...e that the end of the cord that you connect to the digital piano is a stereo standard plug A monaural standard plug will result in output of only one of the two stereo channels Normally you should set...

Page 8: ...he tone button lamps cycle on and off in the sequence for about seven seconds to let you know that system initialization is in progress 2 Select the tone you want Selecting and Playing a Tone POWER GR...

Page 9: ...o Track 2 1 While holding down the FUNCTION button use the BRILLIANCE keys to specify a brilliance value in the range of 3 to 0 to 3 NOTE To return a tone to its initial default setting 0 press T and...

Page 10: ...button or by using the procedure under Selecting and Playing a Tone page E 6 NOTE You cannot layer the BASS 1 or BASS 2 tone with another tone You cannot perform the layer operation when recording to...

Page 11: ...ause the notes you play to reverberate for a very long time When a GRAND PIANO tone MODERN CLASSIC MELLOW BRIGHT VARIATION is selected as the tone pressing this pedal will cause notes to reverberate w...

Page 12: ...digit Be sure to input all three digits Example To enter 96 press keys 0 9 6 4 Press the METRONOME button or SONG a button to turn off the metronome NOTE To return the tempo setting to the default te...

Page 13: ...the ranges of the left and right keyboards in octave units from their initial default settings This comes in handy for example if the initial default range is not enough when one person is playing th...

Page 14: ...g play NOTE The tune selection and playback stop operations described above are the only operations that are possible during demo tune play The Music Library includes both built in songs 01 to 60 plus...

Page 15: ...second piano Secondo tone and play along with the song PREPARATION Select the song you want to practice and adjust the tempo See Configuring Settings with the Keyboard on page E 18 A number of tunes...

Page 16: ...tting Track 1 only Temperament and base note settings Track 1 only Octave shift setting Track 1 only Recording Data Storage Starting a new recording deletes any data that was previously recorded in me...

Page 17: ...2 R lamp Example Track 1 selected 3 Select the tone and effects Track 1 only you want to use in your recording Tone page E 6 Effects page E 9 NOTE If you want the metronome to sound while you are reco...

Page 18: ...t the tone and effects Track 1 only you want to use for your recording 6 Press the SONG a button or play something on the keyboard This will start both playback of the recorded track and recording to...

Page 19: ...ress the RECORDER button until its lamp is lit This will cause the lamp of the track you selected in step 2 of this procedure to flash Example If you selected Track 2 for deletion 4 Once again hold do...

Page 20: ...complete the setting procedure NOTE You can configure the digital piano so no operation tone sounds in step 3 For details see bt Operation tone under Parameter List on pages E 20 E 22 Keyboard Setting...

Page 21: ...FF ON OFF ON OFF ON Left keyboard Overall Center keyboard Right keyboard 7Tempo Temperament select bnMetronome beat bkBrilliance boTouch response 1Reverb blSong volume 2Chorus 3Keyboard key Transpose...

Page 22: ...etronome recording and playback etc page E 10 Always enter three digits when using the number keys 0 to 9 to input a value Example To input 90 enter 0 9 0 leading zero required During recording pressi...

Page 23: ...tone part and layered tone part You cannot configure octave shift settings for split tone parts 6 7 8 Temperament TEMPERAMENT Temperament select TEMPERAMENT SELECT Temperament Base note BASE NOTE Tem...

Page 24: ...Operation tone Off On Default On A Selecting Off disables sounding of the operation tone whenever a keyboard key is pressed while the FUNCTION is depressed This setting is retained even when the digi...

Page 25: ...o the Digital Piano 3 Turn on the Digital Piano If this is the first time you are connecting the Digital Piano to your computer the driver software required to send and receive data will be installed...

Page 26: ...e Digital Piano Note that it takes about 20 seconds for the format operation to finish and you will not be able to perform any operation during that time 1 Perform steps 1 through 3 of the procedure u...

Page 27: ...file in the MUSICLIB folder named BIDSNG01 MID Change the name of the current BIDSNG01 MID to something else and then rename the copied file to BIDSNG01 MID To transfer Recorder memory data between t...

Page 28: ...MODERN button GRAND PIANO CLASSIC button and GRAND PIANO MELLOW button lamps are all lit and all other lamps are unlit Copyrights The rights of creators and copyright holders of music images computer...

Page 29: ...open and close during assembly creating the risk of personal injury to your hands and fingers Take care that you do not pinch your fingers between parts when assembling them When placing the digital...

Page 30: ...es 2 Perform the following steps to attach side panel A to the digital piano IMPORTANT When inserting the corner of the side panel into the bracket on the side of the digital piano in step 2 3 below t...

Page 31: ...holes align with the screw holes in the side panels and then tighten the screws D If you have trouble inserting the screws D into the joint connector K holes use a screwdriver to rotate the joint con...

Page 32: ...kets you removed in step 10 and insert pedal unit brackets I a and I b between the each of the corner brackets and the side panels A and B WARNING The corner brackets help to prevent the stand from ti...

Page 33: ...ut connections see To connect the cable page E 32 Perform steps 1 through 9 starting on page E 28 10 Loosen the bracket screws at the bottom of the stand s side panels A and B to create a gap between...

Page 34: ...corner bracket screws 1 Making sure that the pedal unit cable plug is oriented as shown in the illustration below plug it into the pedal connector on the bottom of the digital piano Press the plug ful...

Page 35: ...off the digital piano and then exit the music software on your computer Next turn the digital piano back on and then restart the music software on your computer It takes a long time before I can use...

Page 36: ...L R Recorder Functions Real time recording playback Number of Song 1 Number of Tracks 2 Capacity Approximately 5 000 notes total Recorded Data Protection Built in flash memory Pedals Damper with half...

Page 37: ...late at night are closing the window and using headphones Any reproduction of the contents of this manual either in part or its entirety is prohibited Except for your own personal use any other use of...

Page 38: ...1 Do not allow the electrical load output to exceed the label rating 12 Make sure the surrounding area is dry before plugging into a power source 13 Make sure the product is oriented correctly 14 Unpl...

Page 39: ...erszenen 16 Tr umerei Kinderszenen 17 Tambourin 18 Menuet BWV Anh 114 Clavierb chlein der Anna Magdalena Bach 19 Inventio 1 BWV 772 20 Inventio 8 BWV 779 21 Inventio 13 BWV 784 22 Praeludium 1 BWV 846...

Page 40: ...e Mode 3 X Mode 3 X Default Messages Altered 0 32 1 5 6 38 7 10 11 16 17 18 19 64 65 Bank select Modulation Portamento Time Data entry LSB MSB 2 Volume Pan Expression DSP Parameter0 2 DSP Parameter1 2...

Page 41: ...83 84 91 93 100 101 Sostenuto Soft pedal Vibrato rate Vibrato depth Vibrato delay DSP Parameter4 2 DSP Parameter5 2 DSP Parameter6 2 DSP Parameter7 2 Portamento Control Reverb send Chorus send RPN LSB...

Page 42: ...the packaging conforms to the environmental protection legislation in Germany Esta marca de reciclaje indica que el empaquetado se ajusta a la legislaci n de protecci n ambiental en Alemania MA1104 A...

Reviews: