


Appendix/Apéndice
A-2
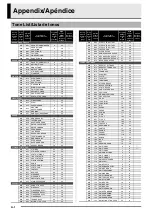
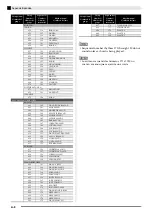
NOTE
•
Acoustic resonance (page E-41) is applied only to
tones indicated by “
O
”.
•
While sequential numbered tone 065 (STEEL
STR.GUITAR 2) or 066 (STEEL STR.GUITAR 3) is
selected, pressing multiple keys on the far left side of
the keyboard will produce a guitar strumming
sound. It does not indicate malfunction.
•
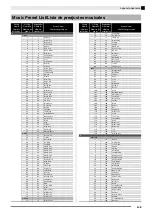
See the “Drum Assignment List” (page A-3) for the
percussion instrument assigned to each keyboard
key when a drum set (Sequential Number 237 to 250)
is selected.
•
La resonancia acústica (página S-42) se aplica
solamente a los tonos indicados mediante “
O
”.
•
Cuando los tonos secuenciales número 065 (STEEL
STR. GUITAR 2) o 066 (STEEL STR. GUITAR 3)
estén seleccionados, si presiona múltiples teclas en el
extremo izquierdo del teclado producirá un sonido
de rasgueo de guitarra. Esto no es ningún signo de
anomalía.
•
Consulte la “Lista de asignación de batería”
(página A-3) para saber cuáles son los instrumentos
de percusión asignados a cada tecla cuando se
selecciona un ajuste de batería (números
secuenciales 237 a 250).
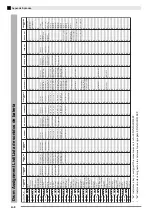
062
134
GM STEEL STR.GUITAR
25
0
063 135
GM
JAZZ
GUITAR
26
0
064
136
GM CLEAN GUITAR
27
0
065
137
GM MUTE GUITAR
28
0
066
138
GM OVERDRIVE GT
29
0
067
139
GM DISTORTION GT
30
0
068
140
GM GT HARMONICS
31
0
069
141
GM ACOUSTIC BASS
32
0
070
142
GM FINGERED BASS
33
0
071
143
GM PICKED BASS
34
0
072
144
GM FRETLESS BASS
35
0
073
145
GM SLAP BASS 1
36
0
074
146
GM SLAP BASS 2
37
0
075 147
GM
SYNTH-BASS
1
38
0
076
148
GM SYNTH-BASS 2
39
0
077 149
GM
VIOLIN
40
0
078
150
GM VIOLA
41
0
079 151
GM
CELLO
42
0
080
152
GM CONTRABASS
43
0
081
153
GM TREMOLO STRINGS
44
0
082
154
GM PIZZICATO
45
0
083 155
GM
HARP
46
0
084
156
GM TIMPANI
47
0
085
157
GM STRINGS 1
48
0
086
158
GM STRINGS 2
49
0
087
159
GM SYNTH-STRINGS 1
50
0
088
160
GM SYNTH-STRINGS 2
51
0
089
161
GM CHOIR AAHS
52
0
090
162
GM VOICE DOO
53
0
091 163
GM
SYNTH-VOICE
54
0
092
164
GM ORCHESTRA HIT
55
0
093 165
GM
TRUMPET
56
0
094
166
GM TROMBONE
57
0
095 167
GM
TUBA
58
0
096
168
GM MUTE TRUMPET
59
0
097
169
GM FRENCH HORN
60
0
098
170
GM BRASS
61
0
099
171
GM SYNTH-BRASS 1
62
0
100
172
GM SYNTH-BRASS 2
63
0
101
173
GM SOPRANO SAX
64
0
102
174
GM ALTO SAX
65
0
103 175
GM
TENOR
SAX
66
0
104
176
GM BARITONE SAX
67
0
105 177
GM
OBOE
68
0
106
178
GM ENGLISH HORN
69
0
107 179
GM
BASSOON
70
0
108
180
GM CLARINET
71
0
109 181
GM
PICCOLO
72
0
110
182
GM FLUTE
73
0
111 183
GM
RECORDER
74
0
112
184
GM PAN FLUTE
75
0
113 185
GM
BOTTLE
BLOW
76
0
114
186
GM SHAKUHACHI
77
0
115 187
GM
WHISTLE
78
0
116
188
GM OCARINA
79
0
117
189
GM SQUARE LEAD
80
0
118
190
GM SAW LEAD
81
0
119 191
GM
CALLIOPE
82
0
120
192
GM CHIFF LEAD
83
0
121 193
GM
CHARANG
84
0
122
194
GM VOICE LEAD
85
0
123
195
GM FIFTH LEAD
86
0
124
196
GM BASS+LEAD
87
0
125 197
GM
FANTASY
88
0
126
198
GM WARM PAD
89
0
127 199
GM
POLYSYNTH
90
0
128
200
GM SPACE CHOIR
91
0
129
201
GM BOWED GLASS
92
0
130
202
GM METAL PAD
93
0
131
203
GM HALO PAD
94
0
132
204
GM SWEEP PAD
95
0
133 205
GM
RAIN
DROP
96
0
134
206
GM SOUND TRACK
97
0
135 207
GM
CRYSTAL
98
0
136
208
GM ATMOSPHERE
99
0
137 209
GM
BRIGHTNESS
100
0
138
210
GM GOBLINS
101
0
139 211
GM
ECHOES
102
0
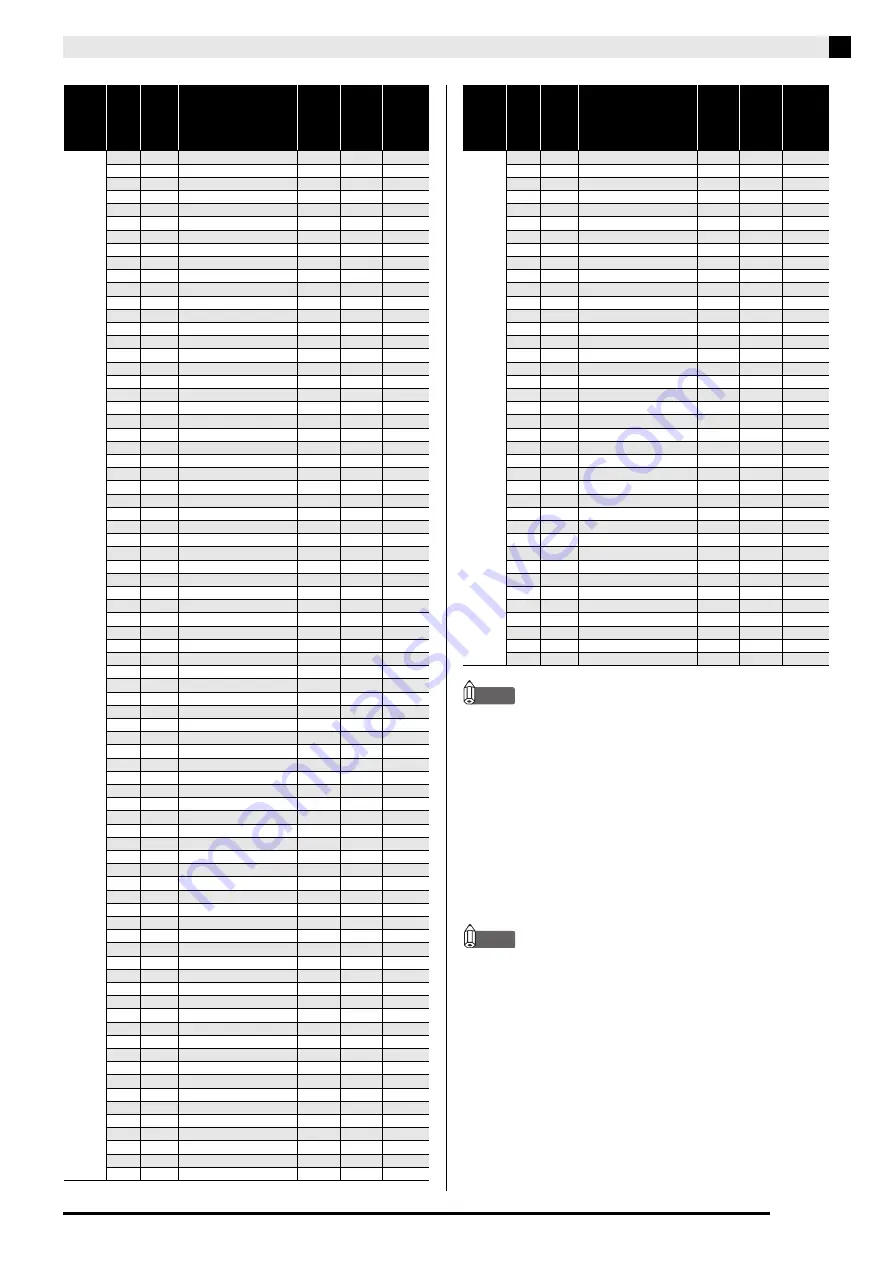
Group
Name/
Nombre
del
grupo
Group
Number/
Número
de
grupo
Sequential
Number/
Número
secuencial
Tone Name/
Nombre del tono
Program
Change/
Cambio
de
programa
Bank
Select
MSB/
MSB de
Selección
de banco
Acoustic
Resonance/
Resonancia
acústica
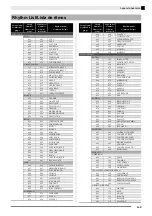
140
212
GM SF
103
0
141 213
GM
SITAR
104
0
142
214
GM BANJO
105
0
143 215
GM
SHAMISEN
106
0
144
216
GM KOTO
107
0
145
217
GM THUMB PIANO
108
0
146
218
GM BAGPIPE
109
0
147 219
GM
FIDDLE
110
0
148
220
GM SHANAI
111
0
149
221
GM TINKLE BELL
112
0
150
222
GM AGOGO
113
0
151 223
GM
STEEL
DRUMS
114
0
152
224
GM WOOD BLOCK
115
0
153 225
GM
TAIKO
116
0
154
226
GM MELODIC TOM
117
0
155 227
GM
SYNTH-DRUM
118
0
156
228
GM REVERSE CYMBAL
119
0
157
229
GM GT FRET NOISE
120
0
158
230
GM BREATH NOISE
121
0
159 231
GM
SEASHORE
122
0
160
232
GM BIRD
123
0
161 233
GM
TELEPHONE
124
0
162
234
GM HELICOPTER
125
0
163 235
GM
APPLAUSE
126
0
164
236
GM GUNSHOT
127
0
165
237
STANDARD SET 1
0
120
166
238
STANDARD SET 2
1
120
167
239
STANDARD SET 3
2
120
168
240
STANDARD SET 4
3
120
169 241
ROOM
SET
8
120
170
242
HIP-HOP SET
9
120
171 243
POWER
SET
16
120
172
244
ELECTRONIC SET
24
120
173
245
SYNTH SET 1
25
120
174
246
SYNTH SET 2
30
120
175 247
TRANCE
SET
31
120
176
248
JAZZ SET
32
120
177 249
BRUSH
SET
40
120
178
250
ORCHESTRA SET
48
120
Group
Name/
Nombre
del
grupo
Group
Number/
Número
de
grupo
Sequential
Number/
Número
secuencial
Tone Name/
Nombre del tono
Program
Change/
Cambio
de
programa
Bank
Select
MSB/
MSB de
Selección
de banco
Acoustic
Resonance/
Resonancia
acústica
NOTA


