Casio PRIVIA PX-330 User Manual Download Page 62

A-1

Appendix/Apéndice

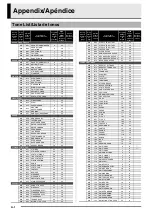
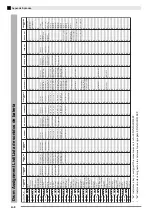
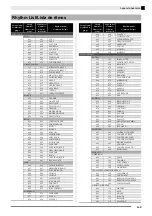
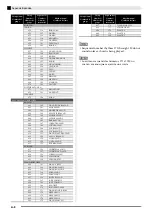
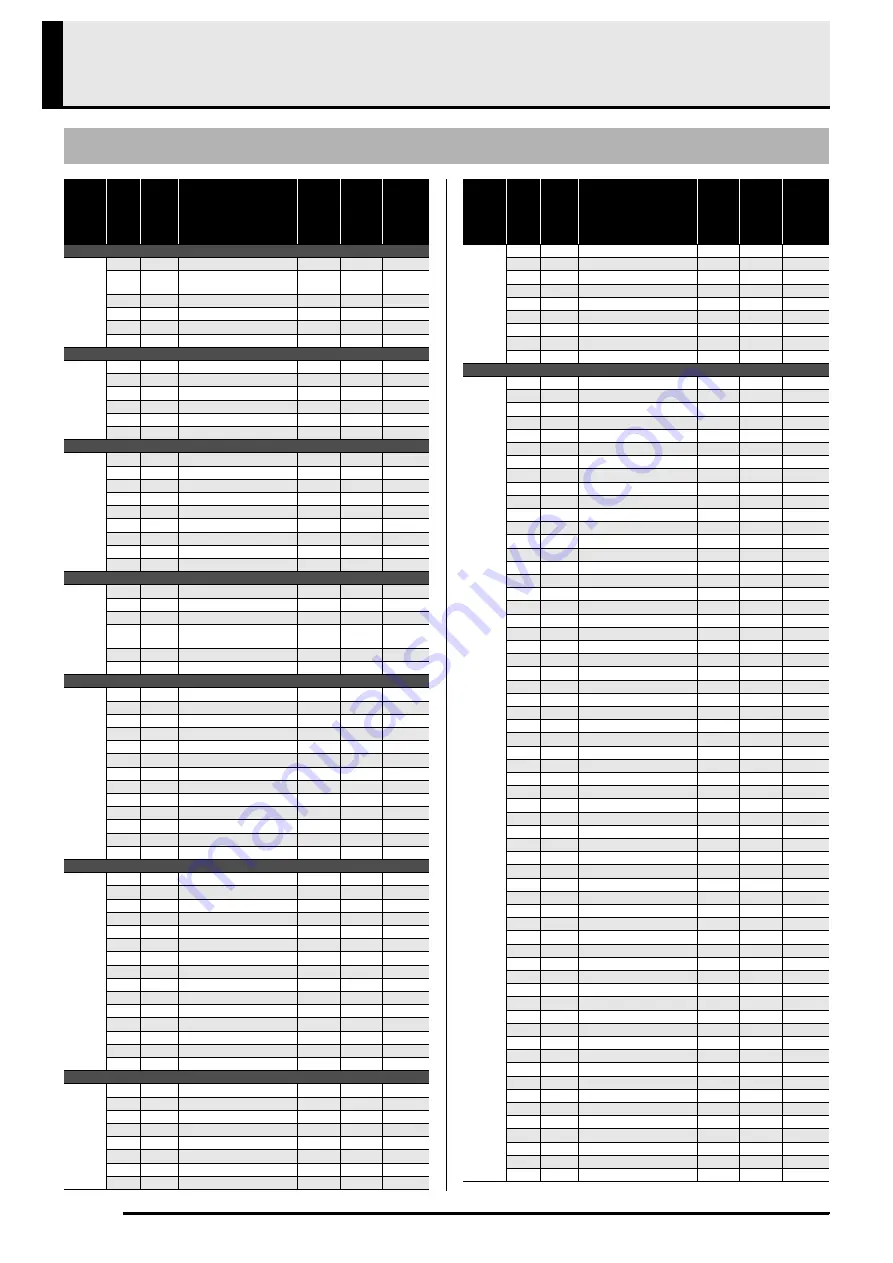
Tone List/Lista de tonos

Group 
Name/

Nombre 

del 

grupo

Group 

Number/
Número 

de 

grupo

Sequential 

Number/

Número 

secuencial

Tone Name/

Nombre del tono

Program 

Change/

Cambio 

de 

programa

Bank 

Select 

MSB/

MSB de 

Selección 

de banco

Acoustic 

Resonance/
Resonancia 

acústica

GRAND PIANO MODERN

001

001

GRAND PIANO MODERN

48 

O

002

002

GRAND PIANO 
VARIATION

0 50 

O

003

003 

ROCK PIANO

48 

O

004

004

LA PIANO

49 

O

005

005

MODERN PIANO

50 

O

006

006

DANCE PIANO

51 

O

GRAND PIANO CLASSIC

001

007

GRAND PIANO CLASSIC

49 

O

002

008

MELLOW PIANO

51 

O

003

009

HONKY-TONK

3 48 

O

004

010

OCTAVE PIANO

49 

O

005

011

STRINGS PIANO

52 

O

006

012

PIANO PAD

53 

O

ELEC PIANO

001

013

ELEC.PIANO 1

48

002

014

ELEC.PIANO 2

48

003

015

60’S E.PIANO

51

004

016

E.GRAND 80

48

005

017

DYNO ELEC.PIANO

49

006

018

FM ELEC.PIANO

49

007

019

MELLOW E.PIANO

50

008

020

POP ELEC.PIANO

50

009

021

SYNTH-STR.E.PIANO

52

VIBES/CLAVI

001

022

VIBRAPHONE

11 

48

002

023

CLAVI

7 48

003

024

HARPSICHORD

48

004

025

COUPLED 
HARPSICHORD

6 49

005

026

MARIMBA

12 

48

006

027

CHORUS VIBRAPHONE

11 

49

ORGAN

001 

028 

ROCK ORGAN 1

16 

49

002 

029 

JAZZ ORGAN 

17 

48

003 030 

DRAWBAR 

ORGAN 

16 

48

004 

031 

ROTARY DRAWBAR 

16 

50

005 032 

ROTARY 

ORGAN 

16 

51

006 

033 

PERC.ORGAN 

17 

49

007 034 

70’S 

ORGAN 

17 

50

008 

035 

OVERDRIVE ORGAN 

16 

52

009 036 

TREMOLO 

ORGAN 

16 

53

010 

037 

ROCK ORGAN 2 

18 

48

011 038 

ELEC.ORGAN 

16 

54

012 

039 

CHURCH ORGAN 

19 

48

013 040 

CHAPEL 

ORGAN 

19 

49

STRINGS/SYNTH-PAD

001 041 

STRINGS 

49 

48

002 

042 

STRING ENSEMBLE 

48 

48

003 043 

SYNTH-STRINGS 

50 

48

004 

044 

70’S SYNTH-STR. 

50 

49

005 045 

80’S 

SYNTH-STR. 

50 

50

006 

046 

VIOLIN SECTION 

40 

48

007 047 

CHOIR

52 

48

008 

048 

SYNTH-VOICE 

54 

48 

009 049 

SYNTH-PAD 

90 

48

010 

050 

FANTASY 

88 

48

011 051 

NEW 

AGE 

88 

49

012 

052 

WARM PAD 

89 

48

013 053 

WARM 

VOX 

89 

49

014 

054 

POLYSYNTH PAD 

90 

49

015 055 

ATMOSPHERE 

PAD 

99 

48

BASS/GUITAR

001 056 

ACOUSTIC 

BASS 

32 

48

002 

057 

RIDE BASS 

32 

49

003 058 

FINGERED 

BASS 

33 

48

004 

059 

FINGERED BASS 2 

33 

49

005 060 

FINGERED 

BASS 

33 

50

006 

061 

PICKED BASS 

34 

48

007 062 

TRANCE 

BASS 

38 

48

008 

063 

NYLON STR.GUITAR 

24 

48

009 

064 

STEEL STR.GUITAR 1 

25 

48

010 

065 

STEEL STR.GUITAR 2 

25 

49

011 

066 

STEEL STR.GUITAR 3 

25 

50

012 

067 

JAZZ GUITAR 

26 

48

013 068 

CLEAN 

GUITAR 

27 

49

014 

069 

CHORUS CLEAN GUITAR 

27 

48

015 

070 

CRUNCH ELEC.GUITAR 1 

27 

50

016 

071 

CRUNCH ELEC.GUITAR 2 

27 

51

017 072 

OVERDRIVE 

GUITAR 

29 

48

VARIOUS/GM TONES

001 

073 

BREATHY ALTO SAX 

65 

49

002 

074 

BREATHY TENOR SAX 

66 

49

003 075 

ALTO 

SAX 

65 

48

004 

076 

TENOR SAX 

66 

48

005 077 

CLARINET 

71 

48

006 

078 

FLUTE 

73 

48

007 079 

TRUMPET 

56 

48

008 

080 

TROMBONE 

57 

48

009 081 

STEREO 

BRASS 

61 

48

010 

082 

BRASS SECTION 

61 

49

011 083 

SYNTH-BRASS 

62 

48

012 

084 

80’S SYNTH-BRASS 

62 

49

013 085 

SAW 

LEAD

81 

48

014 

086 

MELLOW SAW LEAD 

81 

49

015 087 

SQUARE 

LEAD 

80 

48

016 

088 

ER HU 

110 

56

017 

089 

YANG QIN 1 

15 

56

018 

090 

YANG QIN 2 

15 

57

019 091 

DI 

ZI 

72 

56

020 

092 

ZHENG 

107 

56

021 093 

SHENG 

109 

56

022 

094 

SUO NA 

111 

57

023 095 

XIAO 

77 

56

024 

096 

PI PA 1 

105 

56

025 097 

PI 

PA 

105 

57

026 

098 

SITAR 

104 

56

027 099 

TANPURA 

104 

57

028 

100 

HARMONIUM 

20 

56

029 101 

SANTUR 

15 

58

030 

102 

SAROD 

105 

58

031 103 

SHANAI 

111 

56

032 

104 

SARANGI 

110 

57

033 105 

KANUN 

15 

59 

034 

106 

OUD 

105 

59 

035 107 

NEY 

72 

57 

036 

108 

ARABIC ORGAN 

16 

56 

037 

109 

GM PIANO 1 

O

038 

110 

GM PIANO 2 

O

039 

111 

GM PIANO 3 

040 

112 

GM HONKY-TONK 

041 

113 

GM E.PIANO 1 

042 

114 

GM E.PIANO 2 

043 115 

GM 

HARPSICHORD 

044 

116 

GM CLAVI 

045 117 

GM 

CELESTA 

046 

118 

GM GLOCKENSPIEL

047 

119 

GM MUSIC BOX 

10 

048 

120 

GM VIBRAPHONE 

11 

049 121 

GM 

MARIMBA 

12 

050 

122 

GM XYLOPHONE 

13 

051 

123 

GM TUBULAR BELL

14 

052 

124 

GM DULCIMER 

15 

053 125 

GM 

ORGAN 

16 

054 

126 

GM ORGAN 2 

17 

055 127

GM 

ORGAN 

18 

056 

128 

GM PIPE ORGAN 

19 

057 129 

GM 

REED 

ORGAN 

20 

058 

130 

GM ACCORDION 

21 

059 131 

GM 

HARMONICA 

22 

060 

132 

GM BANDONEON 

23 

061 

133 

GM NYLON STR.GUITAR 

24 

Group 
Name/

Nombre 

del 

grupo

Group 

Number/
Número 

de 

grupo

Sequential 

Number/

Número 

secuencial

Tone Name/

Nombre del tono

Program 

Change/

Cambio 

de 

programa

Bank 

Select 

MSB/

MSB de 

Selección 

de banco

Acoustic 

Resonance/
Resonancia 

acústica

Summary of Contents for PRIVIA PX-330

Page 1: ...ference Guarde toda documentación para futuras consultas Safety Precautions Before trying to use the piano be sure to read the separate Safety Precautions Precauciones de seguridad Antes de intentar usar el piano asegúrese de leer las Precauciones de seguridad separadas English Español ...

Page 2: ...xposed to rain or moisture does not operate normally or has been dropped The apparatus shall not be exposed to dripping or splashing and that no objects filled with liquids such as vases shall be placed on the apparatus The power indicator being unlit does not mean the apparatus is completely disconnected from the MAINS When you need to have the apparatus completely disconnected from the MAINS you...

Page 3: ...ng Tone and Rhythm Setups E 32 Saving Registration Data E 33 Recalling a Registration E 33 Recording Your Keyboard Play E 34 Recording or Playing Back a Single Song E 34 Recording or Playing Back Multiple Songs E 35 Recording to a Specific Track Part E 35 Deleting Recorder Data E 37 Re recording Part of a Recorder Song Punch in Recording E 37 Other Settings E 40 Configuring Settings E 40 Using a M...

Page 4: ...E 2 General Guide 2 1 do 3 4 5 6 bm bn bo bp 7 bk 8 9 bl ck cl cm cn co cp cq cr dm br bs cs ct dk dl dn bt bq dp ds dq dr dt ek el em en Bottom Left Side Back ...

Page 5: ... button LATIN WORLD MUSIC PRESET button BALLAD PIANO RHYTHMS RHYTHM EDITOR button USER RHYTHMS RHYTHM EDITOR button Display TONE REGISTRATION button FUNCTION button w NO q YES buttons GRAND PIANO MODERN button GRAND PIANO CLASSIC button ELEC PIANO button VIBES CLAVI button ORGAN button STRINGS SYNTH PAD button BASS GUITAR button VARIOUS GM TONES button REVERB REV TYPE EXIT button CHORUS CHOR TYPE ...

Page 6: ...ings to their initial factory defaults 1 Turn off the Digital Piano 2 While holding down both the TONE and FUNCTION buttons press the POWER button The Digital Piano will turn on and initialize its internal system You will be able to use the Digital Piano in a short while NOTE See Turning on the Digital Piano and Playing Something page E 9 for information about turning digital power on and off Savi...

Page 7: ...igital Piano is turned off before plugging in or unplugging the AC adaptor The AC adaptor will become warm to the touch after very long use This is normal and does not indicate malfunction AC Plug Configurations Depending on the geographic area your Digital Piano may come with a second AC plug Use the AC plug that matches the configuration of the wall outlet in your area The AC adaptor is shipped ...

Page 8: ...ither to the Digital Piano s DAMPER PEDAL jack or SOFT SOSTENUTO PEDAL jack If you want to use both operations jacks at the same time you need to purchase another optionally available pedal Back NOTE You can connect a pedal to the SOFT SOSTENUTO PEDAL jack and apply either a soft or sostenuto effect to the notes you play For details see Soft Sostenuto Pedal Jack Setting page E 43 Pedal Functions D...

Page 9: ...for more powerful volume and better sound quality IMPORTANT The Digital Piano automatically adjusts sound output to optimize for headphone output when headphones are connected or built in speaker output when headphones are not connected This also will cause a change in the output quality from the Digital Piano s LINE OUT R and L MONO jacks Whenever connecting a device to the Digital Piano first us...

Page 10: ...onfiguration you must set the audio equipment s input selector to the setting that specifies the terminal such as AUX IN to which the piano is connected Use the piano s VOLUME controller to adjust the volume level Connecting to a Musical Instrument Amplifier Use commercially available cables to connect the amplifier to the piano s LINE OUT jacks as shown in Figure LINE OUT R jack output is right c...

Page 11: ...istics of tones For more information see Playing Tone Demo Songs page E 24 1 Press the TONE button so its upper lamp is lit Each press of the button toggles between the upper and lower lamps IMPORTANT Continuing on to the next step while the REGISTRATION lamp is lit will perform a registration recall operation page E 32 which will change the setup of the Digital Piano Make sure that the TONE lamp ...

Page 12: ... press the CLASSIC button and then use the w q buttons to select 002 Mellow Piano 2 Hold down the button of the group that contains the tone you want to select as the layered tone until LAYER ON appears on the display as shown below for a few moments This will layer the tones currently selected in the two groups The button you held down in step 2 will light to indicate that it is selected Example ...

Page 13: ...dicating that the keyboard is no longer split NOTE If the keyboard is set up with layered tones page E 10 when you perform the above split operation the layered tones will play on the right upper range side of the keyboard Moving the Keyboard Split Point You can use the procedure below to specify the location on the keyboard where it splits between the left side and the right side That location is...

Page 14: ...tave shift also can be performed as described for Octave Shift page E 41 1 Press the FUNCTION button The FUNCTION lamp will light and the function screen will appear on the display 2 Use the i and u buttons to select the Tmpr Effect screen 3 Press the ENTER button This will display a screen for selecting settings in the Tmpr Effect group 4 Use the i or u button to select the brilliance screen show...

Page 15: ... 3 Press the REVERB button to exit the reverb type screen 1 Press the CHORUS button to toggle chorus which adds depth to a tone on and off Selecting the Chorus Type You can select from among the following four chorus types 1 LightChorus 2 Chorus 3 Deep Chorus 4 Flanger 1 Hold down the CHORUS button until the chorus type selection screen shown below appears on the display 2 Use the w q buttons to s...

Page 16: ... use to change the tempo setting by pressing q faster and w slower buttons or by tapping a beat with a button To adjust the tempo using q and w buttons 1 Use the TEMPO w q buttons to adjust the tempo setting Each press of a button increases or decreases the beats per minute value by one Holding down either button changes the value at high speed You can specify a tempo value in the range of 20 to 2...

Page 17: ...heel operation by specifying the amount of pitch change at maximum rotation in either direction See Pitch Bend Range page E 43 for more information You can use the Duet Mode to split the Digital Piano s keyboard in the center so two people can play a duet This makes it possible to configure the keyboard so for example the teacher can play on the left and the student can follow along on the right O...

Page 18: ...e the octave of the left and right Duet Mode keyboards 1 While holding down the FUNCTION button press the SPLIT button This displays the Duet Mode on off screen shown in step 2 under Configuring the Digital Piano for Duet Play page E 16 If the Duet Mode is currently turned off press the q button to turn it on 2 Of the four C keys in the left keyboard press the one that you want to have located at ...

Page 19: ...niment Each press of the button toggles between the RHYTHM and USER SONGS lamps 2 Use the Rhythm List page A 4 to look up the group and the number of the rhythm you want to select 3 Use the to rhythm groups buttons to select the group you want Example When the LATIN WORLD group is selected 4 Use the w q buttons to select the rhythm you want Example When 005 Samba 2 is selected 5 Use the TEMPO w q ...

Page 20: ...P button Example To play a C chord 9 Play other chords with left hand as you play the melody with your right hand You can use CASIO Chord or other simplified chord fingering modes to play chords For details see Selecting a Chord Fingering Mode in the following section You can use the NORMAL and VARIATION buttons to modify accompaniment patterns For details see Modifying Auto Accompaniment Patterns...

Page 21: ...and the melody For information about the types of chords you can finger and their fingerings see the Fingering Guide page A 8 Fingered 1 Play the component notes of the chord on the keyboard Fingered 2 Unlike Fingered 1 6th input is not possible with this mode Fingered 3 Unlike Fingered 1 this mode allows input of fraction chords with the lowest keyboard note as the bass note Chord fingering mode ...

Page 22: ...one touch access to tone and tempo settings that go well with the currently selected Auto Accompaniment rhythm pattern 1 Hold down the RHYTHM button for at least two seconds This will configure tone tempo and other settings to match the currently selected rhythm pattern At this time Auto Accompaniment play also will go into synchro standby which means that Auto Accompaniment will start to play aut...

Page 23: ...ll light indicating that the pattern is being edited Each press of NORMAL FILL IN toggles between NORMAL and FILL IN and each press of VARIATION FILL IN toggles between VARIATION and FILL IN The applicable button flashes while the fill in pattern is selected Example When intro is selected Type Number Type Name Description 00 Off Turns off Auto Harmonize 01 Duet 1 Adds close separated by two to fou...

Page 24: ...rum bass etc accompaniment data with that of the specified rhythm number 1 001 to 190 Rhythm number 2 3 Tone Select Tone Switches the part tone instrument to that of the specified tone number 001 to 250 Tone Numbers 2 4 Prt Part on off Toggles each part on or off OFF Mutes the part ON Sounds the part Vol Volume level Controls the volume level of each part 000 to 127 Pan Panning position Controls w...

Page 25: ...rhythm number and rhythm name character you want to change Use the w q buttons to select the number or character you want The rhythm name characters you can select are shown below To input a space press both of the w and q buttons at the same time 11 Press the ENTER button This saves the data If the rhythm number where you are saving the data already has data saved to it a message Replace will app...

Page 26: ...y with the w q buttons 2 Press the PLAY STOP button This stops demo song playback Playback of the demo songs will continue in an endless loop until you press the PLAY STOP button to stop it NOTE Only the operations described above can be performed while demo song playback is in progress btw q blUSER SONGS 7PART 6PLAY STOP 2REPEAT Playing Tone Demo Songs No Tone Group Name Tune Name 01 GRAND PIANO ...

Page 27: ...hile holding down a button scrolls at high speed Pressing the PAUSE button pauses playback Press again to resume song playback 5 Press the PLAY STOP button again This stops song playback Song playback also will stop automatically when the end of the song is reached To configure the Digital Piano to loop song playback without stopping turn on Song Repeat page E 42 Changing the Song Tempo You can ch...

Page 28: ...nt at the Beginning of a Song You can configure the Digital Piano to sound a count before playback of a song starts which helps to get the timing right when you are playing along on the keyboard For details see Pre count page E 42 Repeating Playback of a Specific Section Repeat You can configure the Digital Piano to repeat the section of a song you want to practice You could for example specify re...

Page 29: ...RT STOP button again Pressing the ACCOMP ON OFF button so the ACCOMP ON OFF lamp is lit not flashing or unlit will turn off the chord progression of the Music Preset and play the normal Auto Accompaniment pattern Each press of the ACCOMP ON OFF button cycles in the sequence shown below You can use the following steps to change the rhythm after selecting a Music Preset To change the tone use the th...

Page 30: ...et number and name for storing the edited data If you do not want to save the edited data press the NO button in place of the YES button 7 Use the w q buttons to select the Music Preset number where you want to store the edited data Creating an Original User Preset Editing operation type 4 1 To edit the chord progression Press the w down button to display CHORD and then press the ENTER button to a...

Page 31: ...lons such as 001 1 00 indicating measure 1 001 beat 1 and tick 00 2 This series of three values is referred to collectively as a step The screen shot above shows the first two steps 001 002 of the Music Preset Use the REW and FF buttons to scroll and view other steps 1 Up to 999 measures 2 There are 12 ticks per beat as shown below 2 Cursor Specifies the step that is currently selected for editing...

Page 32: ...p without chord that is equal to the time of the resolution will be inserted temporarily into the Music Preset Fingering a chord for the new step will cause the step to be registered as part of the Music Preset and the cursor will advance to the next step You can use this operation to insert a new step between the current and following step Using the REW and FF buttons to move the cursor without i...

Page 33: ...ounds the part 5 9 CHORD1 5 ON OFF Chord 1 5 on off Toggles the Chord 1 through 5 parts page E 22 on or off OFF Mutes the parts ON Sounds the parts 10 INTRO CHORD Intro chord Selects from among major 12 keys and minor 12 keys for the intro chords C B Major C to B Cm Bm Minor Cm to Bm 11 ENDING CHORD Ending chord Selects from among major 12 keys and minor 12 keys for the ending chords C B Major C t...

Page 34: ...on off Split point Octave shift Brightness Reverb Chorus Transpose Touch response Soft sostenuto pedal setting Damper pedal adjustment Pitch bend range Auto Accompaniment Settings Areas A through D only Rhythm number Accomp on off Chord fingering mode Synchro standby Tempo Auto Accompaniment volume Auto harmonize brREGISTRATION btw q dmSTORE Tone and accompaniment areas Tone areas 1 2 3 4 5 6 7 8 ...

Page 35: ...l be saved to the bank and area you specify Example Bank 4 Area C 1 Press the REGISTRATION button so its lower lamp is lit This enters the registration recall mode 2 Use the w q buttons to select the bank where the registration you want to recall is located 3 Use the rhythm group buttons through or instrument part buttons through to specify the area This will configure the Digital Piano with the r...

Page 36: ...e finished press the START STOP button This will cause the RECORDER lamp to flash and then light indicating the playback mode If you are using Auto Accompaniment you also can end the recording session by pressing the ENDING button 5 To play back what you have recorded press START STOP again Each press of starts and stops playback 6 To turn off the recorder press the RECORDER button so its lamp goe...

Page 37: ...laying Back a Single Song page E 34 You can record specific instruments the left hand and right hand or other parts of a song individually and then combine them into a final song What is a track A track is a separate recorded part of a song The recorder of this Digital Piano supports a total of 17 tracks which are divided between two types described below System Track In addition to notes you play...

Page 38: ...nt to record to the track 5 Press the START STOP button This will start playback of what you recorded to the system track and start recording to the currently selected track Play what you want to record to the current track along with the playback from the system track 6 To stop recording press the START STOP button again This enters the playback mode Press the START STOP button again to play back...

Page 39: ...te operation press the NO button You can use punch in recording to re record a specific part of recorder song that you want to improve or correct 1 Turn on the recorder enter the record mode and select the track that contains the section you want to re record See step 3 under Recording to a Specific Track Part page E 35 2 Hold down the RECORDER button until the punch in recording screen appears on...

Page 40: ... and display the recording setup screen While holding down the FUNCTION button press the RECORDER button 2 Use the u and i buttons to display AutoPu IN and then use the w q buttons to select the start measure 3 Use the u and i buttons to display AutoPu OUT and then use the w q buttons to select the end measure After selecting the start and end measures press the EXIT button to exit the recording s...

Page 41: ...ss the START STOP button to stop playback 5 Turn on the recorder and select the track that contains the section you want to re record For information about selecting a track see step 3 under Recording to a Specific Track Part page E 35 6 Hold down the RECORDER button until the punch in recording screen appears on the display 7 Press the q button to turn on auto punch in recording 8 Press the REPEA...

Page 42: ...lable for accessing a parameter directly after you press the FUNCTION button without going through the menu See the Shortcut Button column in the table below for the applicable shortcut button of each parameter 3 Use the w q buttons to change the setting of the currently selected parameter To return to the function screen press the EXIT or FUNCTION button NOTE Holding down the FUNCTION button whil...

Page 43: ...rom the standard equal temperament to another tuning more suitable for playing classics etc Pressing a keyboard key while the temperament screen is displayed will make the pressed key the base note of the temperament Temperaments 00 Equal 01 PureMajor 02 Pure Minor 03 Pythagorean 04 Kirnberger 3 05 Werckmeister 06 Mean Tone 07 Rast 08 Bayati 09 Hijaz 10 Saba 11 Dashti 12 Chahargah 13 Segah 14 Gurj...

Page 44: ... Keyboard Channel KeyboardCh Selects the keyboard channel which is the channel used to send MIDI data corresponding to Digital Piano keyboard play to an external device 01 to 16 7 2 Accomp MIDI Out AccompOut Turn on this setting to send MIDI data corresponding to Auto Accompaniment to an external device Off On 7 3 MIDI In Chord Judge ChordJudge Select whether chord input should be performed when a...

Page 45: ... 8 4 Pitch Bend Range BendRange Specifies the amount of pitch bend applied when the pitch bend wheel is rotated all the way up or down 00 to 12 semitones 8 5 Panel Lock PanelLock Turn on to lock the Digital Piano s control panel to prevent unauthorized or accidental operation This setting is disabled in the Duet Mode while the recorder is on or while Auto Accompaniment a song or the metronome is p...

Page 46: ...as Areas subjected to strong electrostatic charge and digital noise Never touch the contacts of a memory card when loading it or removing it from the Digital Piano Never eject the memory card while data is being written to or loaded from it Doing so can corrupt the data on the memory card and damage the memory card slot Never insert anything besides a memory card into the card slot Doing so create...

Page 47: ...mat operation performed by this Digital Piano is a quick format If you want to completely delete all of the data on the memory card format it on your computer or some other device 1 Insert the memory card you want to format into the Digital Piano s memory card slot Make sure the write protect switch of the memory card is not in the write protect position so writing is enabled 2 While holding down ...

Page 48: ...on the display while the save operation is being performed Do not perform any Digital Piano operation while this message is on the display Complete appears on the display after data save is complete If there already is a file with the same name on the memory card a message Replace will appear asking if you want to replace it with the new data Press the YES button to overwrite or the NO button to c...

Page 49: ... the new data Press the YES button to overwrite or the NO button to cancel the load operation Use the following procedure to delete memory card data files 1 Insert the memory card into the Digital Piano s memory card slot 2 While holding down the FUNCTION button press the CARD INTERNAL button This displays the memory card format screen page E 45 3 Press the i button This displays the file delete s...

Page 50: ... card without loading the song into Digital Piano memory Memory Card Folders Formatting a memory card on the Digital Piano will automatically create the four folders shown below You put playback song data into any one of the folders You can use the four folders to group your music data by family member genre or some other categories Use buttons through A through D to select a folder 1 Store the mu...

Page 51: ...eps 6 through 8 of the procedure under Renaming a Memory Card File page E 48 to rename the folder Even when you do not have a memory card loaded in the Digital Piano s memory card slot you can save up to about 16MB of data in the Digital Piano s internal memory area You also can load and delete internal memory area data using the same procedures that you use with a memory card 1 Remove the memory ...

Page 52: ...moved while some operation was in progress 2 Do not remove the memory card while any operation is in progress No Data You tried to save a Digital Piano user area user rhythm user rhythm song etc that does not contain any data to the memory card Select a user area that contains data No File 1 There is no MUSICDAT folder page E 46 on the memory card 1 Create a MUSICDAT folder on the memory card or f...

Page 53: ... Digital Piano and then start up your computer Do not start up the music software on your computer yet 2 After starting up your computer use a commercially available USB cable to connect it to the Digital Piano 3 Turn on the Digital Piano If this is the first time you are connecting the Digital Piano to your computer the driver software required to send and receive data will be installed on your c...

Page 54: ...instrument for exchange of MIDI data You can use the procedure below to transfer edited Auto Accompaniment data recorder data and other data from the Digital Piano to a computer for storage You also can transfer standard MIDI files SMF as well as Auto Accompaniment data you downloaded from the CASIO website from your computer to Digital Piano memory Data Types Supported for Data Transfer The types...

Page 55: ...iano memory or the memory card loaded in the Digital Piano see below Windows Vista Double click Computer Mac OS Skip step 4 and double click PIANO on your Mac desktop 5 Double click PIANO You now should see five data folders one for each data type 6 Referring to the table below open the folder that corresponds to the type of data you want to transfer Data types and contents are the same as those w...

Page 56: ...oid it 1 Open any one of the folders shown above 2 Perform one of the following operations to display folder information Windows XP On the Tools menu at the top of the folder window select Folder Options Windows Vista On the left side of the folder window click Organize and then select Folder and Search Options 3 On the Folder Information window click the View tab 4 Under Advanced Settings clear t...

Page 57: ... Piano s card slot and perform copy delete and other card operations from your computer 1 Insert the memory card into the Digital Piano s memory card slot 2 Perform the procedure starting from step 2 on page E 52 In step 4 of the procedure SD_MMC will appear in place of PIANO You can double click SD_MMC to display the contents of the card loaded in the Digital Piano card slot and change it as you ...

Page 58: ...data from a memory card See Error Messages on page E 50 Playback stops part way through while transferring song data from my computer Digital noise from the USB cable or power cord caused data communication your computer and Digital Piano to be interrupted Stop song playback disconnect the USB cable from the Digital Piano and then reconnect it Next try playing back the song again If this does not ...

Page 59: ...umber of Songs 5 Number of Tracks 17 System Track Tracks 01 through 16 Capacity Approximately 50 000 notes total Up to approximately 10 000 notes per song Punch in recording Pedals Damper Soft Sostenuto switchable Other Functions Transpose 1 octave 12 to 00 to 12 Tuning A4 440 0 Hz 99 cents Octave Shift 2 octaves Temperaments 17 types Stretch Tune Panel Lock MIDI 16 multi timbre received GM Level ...

Page 60: ...ate at night are closing windows and using headphones Any reproduction of the contents of this manual either in part or its entirety is prohibited Except for your own personal use any other use of the contents of this manual without the consent of CASIO is prohibited under copyright laws IN NO EVENT SHALL CASIO BE LIABLE FOR ANY DAMAGES WHATSOEVER INCLUDING WITHOUT LIMITATION DAMAGES FOR LOSS OF P...

Page 61: ...uct 11 Do not allow the electrical load output to exceed the label rating 12 Make sure the surrounding area is dry before plugging into a power source 13 Make sure the product is oriented correctly 14 Unplug the product during lightning storms or when you do not plan to use it for a long time 15 Do not allow product ventilation openings to become blocked Install the product in accordance with the ...

Page 62: ...RED BASS 2 33 49 005 060 FINGERED BASS 3 33 50 006 061 PICKED BASS 34 48 007 062 TRANCE BASS 38 48 008 063 NYLON STR GUITAR 24 48 009 064 STEEL STR GUITAR 1 25 48 010 065 STEEL STR GUITAR 2 25 49 011 066 STEEL STR GUITAR 3 25 50 012 067 JAZZ GUITAR 26 48 013 068 CLEAN GUITAR 27 49 014 069 CHORUS CLEAN GUITAR 27 48 015 070 CRUNCH ELEC GUITAR 1 27 50 016 071 CRUNCH ELEC GUITAR 2 27 51 017 072 OVERDR...

Page 63: ... 177 GM OBOE 68 0 106 178 GM ENGLISH HORN 69 0 107 179 GM BASSOON 70 0 108 180 GM CLARINET 71 0 109 181 GM PICCOLO 72 0 110 182 GM FLUTE 73 0 111 183 GM RECORDER 74 0 112 184 GM PAN FLUTE 75 0 113 185 GM BOTTLE BLOW 76 0 114 186 GM SHAKUHACHI 77 0 115 187 GM WHISTLE 78 0 116 188 GM OCARINA 79 0 117 189 GM SQUARE LEAD 80 0 118 190 GM SAW LEAD 81 0 119 191 GM CALLIOPE 82 0 120 192 GM CHIFF LEAD 83 0...

Page 64: ... Elec Low Tom 1 Elec Mid Tom 2 Elec Mid Tom 1 Elec High Tom 2 Elec High Tom 1 Reverse Cymbal Synth1 Kick 2 Synth1 Kick 1 Synth1 Rim Shot Synth1 Snare 1 Synth1 Hand Clap Synth1 Snare 2 Synth1 Low Tom 2 Synth1 Closed Hi Hat 1 Synth1 Low Tom 1 Synth1 Closed Hi Hat 2 Synth1 Mid Tom 2 Synth1 Open Hi Hat Synth1 Mid Tom 1 Synth1 High Tom 2 Synth1 Crash Cymbal Synth1 High Tom 1 Synth1 Ride Cymbal Synth1 T...

Page 65: ...W SWING 052 052 JAZZ WALTZ 053 053 FOX TROT 054 054 QUICKSTEP 055 055 JAZZ COMBO 1 EUROPEAN 056 056 SCHLAGER 057 057 POLKA 058 058 WALTZ 1 059 059 WALTZ 2 060 060 SLOW WALTZ 061 061 VIENNESE WALTZ 062 062 FRENCH WALTZ 063 063 SERENADE 064 064 TANGO 065 065 MARCH 1 066 066 MARCH 2 LATIN WORLD LATIN I 001 067 BOSSA NOVA 002 068 SLOW BOSSA NOVA 003 069 BEGUINE 004 070 SAMBA 1 005 071 SAMBA 2 006 072 ...

Page 66: ... 007 146 R B BALLAD 008 147 16 BEAT BALLAD 009 148 SOUL BALLAD 010 149 POP BALLAD 1 011 150 POP BALLAD 2 012 151 PIANO WALTZ BALLAD 013 152 90 S 6 8 BALLAD 014 153 6 8 BALLAD 1 015 154 6 8 BALLAD 2 016 155 ROCK BALLAD VARIOUS 017 156 CHRISTMAS SONG 018 157 CHRISTMAS WALTZ 019 158 SCREEN SWING 020 159 SYMPHONY 021 160 STR QUARTET PIANO RHYTHMS 022 161 PIANO 8 BEAT 023 162 PIANO BALLAD 1 024 163 PIA...

Page 67: ...lues 70 70 8 Bars Blues 71 71 Riff Rock 1 72 72 Riff Rock 2 73 73 Riff Rock 3 DANCE 74 74 Disco Freak 75 75 Funky Clavi 76 76 Earth Disco 77 77 70 s Disco 78 78 Disco Lady 79 79 Staying 80 80 Upside 81 81 80 s Disco 82 82 Give You Up 83 83 Bb Girl 84 84 Blv Disco 85 85 Lady M 86 86 Out Of My H 87 87 Euro Pop 88 88 Don t Funk 89 89 Trance 90 90 The Escape JAZZ 91 91 Wonderland 92 92 My Swing 93 93 ...

Page 68: ...Ballad1 6 226 MovieBallad2 Group Name Nombre del grupo Group Number Númerode grupo Sequential Number Número secuencial Preset Name Nombre de preajuste 7 227 Xmas Ballad 8 228 Love Me 9 229 Oldies Bld 1 10 230 Oldies Bld 2 11 231 Oldies Bld 3 12 232 Oldies Bld 4 13 233 E World 14 234 Tears 15 235 Moon Waltz 16 236 A s Theme 17 237 Paradise 18 238 60 s Ballad1 19 239 60 s Ballad2 20 240 Whiter Shade...

Page 69: ... keys to form a chord Con Fingered 3 la nota más baja digitada se interpreta como nota base No se pueden usar formas invertidas Con Full Range Chord cuando la nota digitada más baja se encuentre a cierta distancia de la nota adyacente el acorde se interpreta como un acorde bitonal A diferencia de Fingered 1 2 y 3 Full Range Chord requiere la pulsación de tres teclas como mínimo para formar un acor...

Page 70: ...7 b 5 7 b 5 7sus4 add9 madd9 mM7 dim7 69 6 m6 A B b B F G b G G A b A F C C D b D D E b E Since the chord input range is limited this model may not support some of the chords shown above Debido a que el rango de entrada de acordes es limitado es posible que este modelo no admita algunos de los acordes mostrados arriba ...

Page 71: ...elect Modulation Portamento Time Data entry LSB MSB 2 Volume Pan Expression DSP Parameter0 2 DSP Parameter1 2 DSP Parameter2 2 DSP Parameter3 2 Damper Portamento Switch Sostenuto Soft pedal Vibrato rate Vibrato depth Vibrato delay DSP Parameter4 2 DSP Parameter5 2 DSP Parameter6 2 DSP Parameter7 2 Portamento Control Reverb send Chorus send RPN LSB MSB 2 All sound off Reset all controller Model PX ...

Page 72: ...at the packaging conforms to the environmental protection legislation in Germany Esta marca de reciclaje indica que el empaquetado se ajusta a la legislación de protección ambiental en Alemania MA0906 A Printed in China PX330ES1A C ...

Reviews: