background image

E-19

• There are no sounds assigned to any keyboard keys from B4 onward when the “99

PERCUSSION” tone is selected.

Digital Sampling

A number of the tones that are available with this keyboard have been recorded and
processed using a technique called digital sampling. To ensure a high level of total
quality, samples are taken in the low, mid, and high ranges and then combined to
provide you with sounds that are amazingly close to the originals. You may notice
very slight differences in volume or sound quality for some tones when you play
them at different positions on the keyboard. This is an unavoidable result of multiple
sampling, and it is not a sign of malfunction.

Polyphony

The term polyphony refers to the maximum number of notes you can play at the
same time. This keyboard has 12-note polyphony, which includes the notes you play
as well as the rhythms and auto-accompaniment patterns that are played by the
keyboard. This means that when a rhythm or auto-accompaniment pattern is being
played by the keyboard, the number of notes (polyphony) available for keyboard
play is reduced. Also note that some of the tones offer only 6-note polyphony.

• When rhythm or auto accompaniment is playing, the number of sounds simultane-

ously played is reduced.

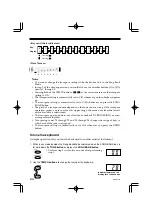
• Though you can sound up to 12 notes at one time, only the last four keyboard keys

pressed light up.

Other Useful Functions

To change the key of the keyboard

The transpose feature of this keyboard lets you raise or lower its key in semitone
increments. This means you can easily match to suit someone’s voice, and you can
eliminate sharps and flats from music making it easier to play.

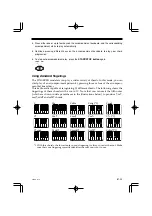
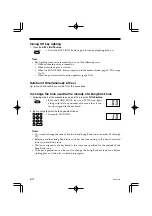
1. While in any mode besides the Song Bank Mode (indicated when the SONG BANK icon is

lit), hold down the 

TONE button

 and press the 

RHYTHM button

.

• Perform step 2 within five seconds after performing

step 1.

2. Use the 

TEMPO buttons

 to change the key of the keyboard.

• Example: To change the tuning to B (indicated by -1

since it is one tone below C, which is the normal
tuning of the keyboard).

• See page E-20 for the indicator that appears for each

key.

I n d i c a t o r   r e -
mains on the dis-
play for a few
seconds.

478B-E-021A

D

F G A

B

C

B

C

E

C D E F G A B C

B (-1) tuning

Normal tuning

TEMPO

Summary of Contents for LK-40

Page 1: ...LK40 42 ES 1 P USER S GUIDE GU A DEL USUARIO...

Page 2: ...ion If this equipment does cause harmful interference to radio or television reception which can be determined by turning the equipment off and on the user is encouraged to try to correct the interfer...

Page 3: ...tic tones Enhanced auto accompaniment function for greater versatility 100 built in auto accompaniment patterns 100 Built in Song Bank tunes A total of 100 built in Song Bank tunes comes built in for...

Page 4: ...on CAUTION This indication stipulates matters that have the risk of causing injury as well as matters for which there is the likelihood of occurrence of physical damage only if the product is operated...

Page 5: ...lities such as the presence of smoke or abnormal odor Also do not use the instrument if there appear to be malfunctions such as the power not coming on or sound not being produced Use under such condi...

Page 6: ...t possible leakage of battery fluid always make sure to remove batteries from the instrument when you do not plan to use it for a long time Always make sure that the batteries making up a set are all...

Page 7: ...ects on the instrument This may cause the instrument to tip over or break resulting in injury Volume Very high volume levels can damage hearing Avoid using the instrument at very high volume settings...

Page 8: ...y Information E 14 Using the AC Adaptor E 15 Auto Power Off E 16 Power On Alert E 16 To disable Auto Power Off and power on alert E 16 Basic Operations E 17 To switch power on and off E 17 To change t...

Page 9: ...on System with Song Bank Tunes E 30 How the Three Step Lesson System operates in Steps 1 through 3 E 31 Turning Off Key Lighting E 32 Number of Simultaneously Lit Keys E 32 To change the tone used for...

Page 10: ...TRANSPOSE SONG BANK TEMPO TEMPO NUMBER 3 STEP LESSON DEMO STEP 2 STEP 1 STEP 3 RHYTHM TONE TUNE 0 1 4 7 2 5 8 3 6 9 VALUE UP VALUE DOWN TRANSPOSE SONG BANK TEMPO TEMPO POWER MODE VOLUME FILL IN SYNCHR...

Page 11: ...ECT button F F F F F TONE button G G G G G RHYTHM button H H H H H ONE KEY PLAY buttons I I I I I SONG BANK button 478B E 011A J J J J J Number buttons K K K K K DEMO button L L L L L 3 STEP LESSON bu...

Page 12: ...o play along with your melody If you pressed Play the notes o Keep the key d If you selected goes out as soo The key that co you need to pla After you press accompanimen Press the SONG BANK button 3 F...

Page 13: ...on as you press it The key that corresponds to the next note you need to play will flash After you press the correct melody key accompaniment proceeds to the next note 4 Press the STEP 1 button or STE...

Page 14: ...e at night without disturbing anyone Audio Equipment Figure 2 Connect the keyboard to an audio equipment using a commercially available con necting cord with a standard plug on one end and two PIN plu...

Page 15: ...oard s PHONES OUTPUT jack Standard plug INPUT Connection Example Accessories and Options Use only the accessories and options specified for this keyboard Use of non author ized items creates the dange...

Page 16: ...he following shows the approximate battery life provided by different battery types Standard battery life Approximately 1 hour SUM3 R6P Approximately 4 hours AM3 LR6 Both of the above values are stand...

Page 17: ...ir poles to be shorted connected to each other never take batteries apart and do not expose batteries to direct heat Replace batteries as soon as possible after any sign they are getting weak Never at...

Page 18: ...or FINGERED to turn power back on Note Auto Power Off is disabled it does not function when you are using the AC adaptor to power the keyboard Power On Alert Keyboard keys light to alert you if you l...

Page 19: ...ons Pressing the and buttons simultaneously sets the volume to level 7 Numeric values can be entered directly with the number buttons after the VOLUME button has been pressed in step 3 The amount that...

Page 20: ...e of the preset tones split the keyboard and assign two or more sounds With such a preset tone the sound produced depends on what position of the keyboard you play For example BASS PIANO tone 90 puts...

Page 21: ...by the keyboard the number of notes polyphony available for keyboard play is reduced Also note that some of the tones offer only 6 note polyphony When rhythm or auto accompaniment is playing the numbe...

Page 22: ...from the lowest octave available is substituted The transpose operation does not affect tone number 99 PERCUSSION or auto accompaniment rhythms Transposing tones 75 through 79 and 90 through 96 change...

Page 23: ...ht to indicate the melody notes of the demo tune as it plays To start demo tune play 1 Switch power on and adjust the volume level 2 Press the DEMO button Demo tune play continues in a sequential endl...

Page 24: ...THM button to return to the previously set rhythm number You can change to another rhythm even while the current rhythm is sounding 5 Press the START STOP button to start play of the rhythm When you d...

Page 25: ...re reserved for use as an accompaniment keyboard whenever you select CASIO CHORD or FINGERED with the POWER MODE selec tor The panel above the accompaniment keyboard keys is marked with the names of t...

Page 26: ...selector to select CASIO CHORD 2 Select an auto rhythm as described under To select and play a rhythm on page E 22 3 Start play of the rhythm If you want start play of the normal rhythm pattern press...

Page 27: ...ations below to produce 7 m7 maj7 add9 and mM7 chords 478B E 027A 4 Press either one or up to four keys on the accompaniment keyboard and the corresponding accompaniment starts to play automatically 5...

Page 28: ...gression 6 To stop auto accompaniment play press the START STOP button again Important If you play one or two notes only in the left hand or three notes that do not make up a recognizable chord format...

Page 29: ...animent keyboard To do this follow the steps below 1 Set the POWER MODE selector to the CASIO CHORD or FINGERED position 2 Select an auto rhythm 3 Press the SYNCHRO FILL IN button 4 Press the accompan...

Page 30: ...he case of two hand tunes is played automatically by the keyboard In place of the ONE KEY PLAY buttons you can also press any key of the keyboard to play the melody or right hand part The purpose of t...

Page 31: ...L IN SYNCHRO STOP START FILL IN SYNCHRO STOP START Three Step Lesson System Tempo Setting You can use the procedure in step 6 of the procedure on page E 22 to set the tempo of the left hand part for S...

Page 32: ...ou use a Song Bank tune with melody guide the Three Step Lesson System teaches you which melody notes to play Auto accompaniment Song Bank Tune Chord and melody part keys light Chord Melody note light...

Page 33: ...lights goes out momentarily and then lights again it indicates that the same note should be played in succession 1 2 Release Lights Press Flashes 3 4 Press Goes out Lights Goes out Release Flashes Fir...

Page 34: ...e 1 Following step 3 of the procedure on page E 29 press the TONE button Both the SONG BANK icon and TONE icon light along with the tone number of the tone that is cur rently assigned to the keyboard...

Page 35: ...board keys in place of the ONE KEY PLAY buttons Pressing any keyboard key plays the correct melody right hand part note Pressing more than one up to four keyboard keys plays the corresponding number o...

Page 36: ...t normal speed no matter what you play or don t play on the keyboard 1 Press the STEP 3 button When you do the STEP 3 icon lights Play starts after a count sounds 2 Play along on the keyboard followin...

Page 37: ...pt play of the melody press the START STOP button When you do the STEP 1 STEP 2 or STEP 3 icon goes out Note The PART SELECT button is operational only while STEP 1 STEP 2 or STEP 3 is playing or paus...

Page 38: ...th an overview of MIDI that will help to get you going MIDI Connections MIDI messages are send out through the MIDI OUT terminal of one machine to the MIDI IN terminal of another machine over a MIDI c...

Page 39: ...evices over MIDI Channel 1 General MIDI General MIDI standardizes MIDI data for all sound source types regardless of manufacturer General MIDI specifies such factors as tone numbering drum sounds and...

Page 40: ...n external machine changes the tone setting of this keyboard This keyboard can send tone data within the range of 00 to 99 and receive tone data within the range of 0 to 127 When GM mapping is turned...

Page 41: ...internal sound source Turn LO CAL CONTROL off whenever you are using the MIDI THRU function of a computer or other external device Also note that no sound is produced by the keyboard if LOCAL CONTROL...

Page 42: ...button This turns off GM mapping Note that LOCAL CONTROL is also turned on automatically when any of the following buttons are pressed POWER to turn on power START STOP to start rhythm or Song Bank tu...

Page 43: ...h volumes Dimming of the display when playing at high vol ume Abnormal rhythm pattern and demo tune play Dimming of keyboard lights when notes sound Loss of power sound distor tion or low volume when...

Page 44: ...More than one key is being pressed at the same time which causes accompani ment to advance the corre sponding number of notes up to four MIDI cables are not con nected properly The computer s MIDI TH...

Page 45: ...value A4 Approx 440 Hz MIDI 5 multi timbre receive Speakers 10 cm diameter x 2 Output 2W 2W Digital Volume Control Main volume 10 steps 0 to 9 initial value 7 I O Terminals MIDI Terminals IN OUT Power...

Page 46: ...YLON STR GT 21 STEEL STR GT 22 JAZZ GUITAR 23 CLEAN GUITAR 24 MUTE GUITAR 25 DIST GUITAR 26 ACOUSTIC BASS 27 ELEC BASS 28 SLAP BASS 29 BANJO 30 VIOLIN 31 CELLO 32 HARP 33 STRINGS 1 34 STRINGS 2 35 STR...

Page 47: ...ACE 78 INVADER 79 FUNNY 80 STRINGS PIANO 81 STRINGS EP 82 CHOIR EP 83 CHOIR ORGAN 84 STRINGS GUITAR 85 STRINGS HARP 86 BRASS STRINGS 87 VIB PAD 88 12STR GUITAR 89 CHOIR STRINGS 90 BASS PIANO 91 BASS E...

Page 48: ...O BLUES 39 R B JAZZ FUSION 40 BIG BAND 41 SLOW SWING 42 SWING 43 FOX TROT 44 JAZZ WALTZ 45 MODERN JAZZ 46 COOL 47 HARD BOP 48 ACID JAZZ 49 LATIN FUSION DANCE FUNK 50 TECHNO POP 51 RAVE 52 CLUB GROOVE...

Page 49: ...A 4 478B E 094A Fingered Chord Charts Cuadros de acordes digitados Ackord typ Rot M m 7 m7 dim7 C C D D D E E F F G G G A A A B B M7 m7 5 dim aug sus4 C C D D D E E F F G G G A A A B B Ackord typ Rot...

Page 50: ...ith same component notes as B aug D aug F aug Chords with same component notes as B aug E aug G aug No puede especificarse en el ajuste FINGERED debido a las limitaciones del teclado de acompa amiento...

Page 51: ...478B E 096A...

Page 52: ...478B E 097A...

Page 53: ...478B E 098A...

Page 54: ...478B E 099A...

Page 55: ...478B E 100A...

Page 56: ...478B E 101A...

Page 57: ...4 100 101 120 121 1 1 Mode 3 X 36 96 O 9nH v 75 100 2 X 9nH v 0 X X X X X X X X X X X X 1 4 10 1 4 10 Mode 3 X 0 127 36 96 1 O 9nH v 1 127 X 9nH v 0 8nH v 3 X X O O X O X X O X X X 1 Depends on tone 3...

Page 58: ...X X X X X X O 0 99 X X X X X X X X X X O X O X X O X X X O 0 127 0 99 4 X X X X X X X X X X Modulation Data entry Volume Pan Expression Hold1 RPN LSB MSB All sound off Reset all controller 4 Depends o...

Page 59: ...that the packaging conforms to the environmental protection legislation in Germany Esta marca de reciclaje indica que el embalaje se ajusta a la legislaci n de protecci n ambiental en Alemania P CASIO...

Reviews: