background image

E-9

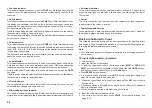
About the CODE key…

The CODE key makes it possible to input punctuation needed for a number of
different languages. The following shows the key operations you should use for
each of the characters formed using the CODE key.

* Lower case only.

Example: To input á.

CODE 1 A

Special Symbols

You can also access a menu of special symbols by pressing SYMBOL.

To input special symbols

Example: To input the special symbol #.

1. With the cursor at the location where you want

to input a special symbol, press SYMBOL.

The symbol that is underlined on the display is
the one that is currently selected.

2. Use the 

H

 and 

J

 cursor keys to move the underlining to the symbol you

want.

Not all of the available symbols fit on the display. The menu will scroll when
you press the cursor keys.

In this example, underline #.

3. After you underline the symbol you want, press

SET.

This returns to the input screen, with the symbol
you selected input at the location where the cur-
sor was located when you displayed the symbol
list.

Part 4

Deleting and Inserting Characters

This section describes everything you need to know about deleting and editing
characters you have already input.

Moving the Cursor

Use the cursor keys to move the cursor around the display and position it for
deleting and editing characters.

To move the cursor

Press 

H

 to move the cursor to the left, and 

J

 to move the cursor to the right.

Press FUNC and then 

H

 to make the cursor jump to the beginning (far left) of

the characters on the display.

Press FUNC and then 

J

 to make the cursor jump to the end (far right) of the

characters on the display.

Holding down the 

H

 or 

J

 cursor key moves the cursor at high speed.

Deleting Individual Characters

You can delete individual characters with either the BS key or the DEL key. The
only difference between the operation of these two keys is the location of the
cursor.

To delete characters using the BS key

Example: To change the word “commmputer” to “computer”.

1. Use 

H

 and 

J

 to move the cursor under “p”.

2. Press BS twice to delete the two m’s to the left of the cursor, shifting “puter”

to the left as you do.

3. Press FUNC and then 

J

 to jump back to the end of the characters for more

input.

.: ;

,

Key Operation

Input

Key Operation

Input

Key Operation

Input

CODE U

Ü

CODE O

Œ

CODE P

Å

CODE A

Æ

CODE S*

ß

CODE J

Ö

CODE K

Ä

CODE L

J

CODE Z

W

CODE C

Ç

CODE N

Ñ

CODE 1

´

CODE 2

`

CODE 3

¨

CODE 4

˜

CODE 5

ˆ

CODE 6

ˇ

CODE 7

°

CODE 8

/

CODE 9

˝

CODE 0

˛

IO#

pute

Summary of Contents for KL-60 - Label Printer

Page 1: ...KL 60 ESGFISw User s Guide...

Page 2: ...a humidifier or in any other area where it might come into contact with oil vapors or steam Such conditions create the danger of fire and electrical shock Never place heavy objects on the unit Doing s...

Page 3: ...s Introduction Congratulations on your selection of the CASIO KL 60 Label Printer This CASIO Label Printer makes it possible for you to print adhesive labels for a wide variety of applications such as...

Page 4: ...the BS key E 9 To delete characters using the DEL key E 10 Clearing the Display E 10 To clear the display E 10 Text Editing E 10 To insert new characters E 10 To change existing characters to differen...

Page 5: ...he cloth out until all excess moisture is removed A dirty printer head can cause printing to become smudged When this hap pens clean off the printer head by wiping it with a cotton swab moistened with...

Page 6: ...of different types Never leave dead batteries in the Label Printer Remove the batteries if you do not plan to use the Label Printer for a long time Replace the batteries in accordance with the batter...

Page 7: ...f Function If you do not perform any key operation for about six minutes the Label Printer automatically turns power off To restore power press ON OFF Tape Cartridges Use the procedures described belo...

Page 8: ...m tape using certain character sizes can cause characters to run off the top or bottom of the tape Be sure to use the following procedure to tell the Label Printer when you are using 6mm tape a To spe...

Page 9: ...You can select between shading underline and box Mirror image printing indicator This indicator appears when the Label Printer is set up for mirror image printing Normal non mirror image printing is p...

Page 10: ...bout deleting and editing characters you have already input Moving the Cursor Use the cursor keys to move the cursor around the display and position it for deleting and editing characters To move the...

Page 11: ...With the original text on the display use either the BS key or DEL key to delete the characters to be changed ABC Remember to use the correct cursor location for the key you plan to use to delete the...

Page 12: ...is located under the effect you want to specify press SET to select it and re turn to the text display Note You could also perform the above procedure in reverse specifying the text effect first and...

Page 13: ...Never turn power off while printing is being performed Make sure that the tape outlet is not blocked before you start printing Never operate the tape cutter while printing is being performed indicated...

Page 14: ...replaces anything that is currently on the input display Memory text cannot be appended To adjust the print density 1 Press FUNC and then SIZE DENSITY 2 Use H and J to move the underlining to the dens...

Page 15: ...The following table shows the initial settings Part 8 Reference This section contains information about the Label Printer that you can use as reference when you need it Cleaning the Printer Head and R...

Page 16: ...essed but nothing is printed on it Possible Cause Action Only blank spaces were input Input the text you want to print Tape does not come out when PRINT is pressed Possible Causes Action Printing is b...

Page 17: ...ttempt to input two B marks within the same text Attempt to input B mark while 6mm is specified as the tape width Label text containing a B mark was input and then tape width specifica tion was change...

Page 18: ...E 17 Alpha Characters Symbols...

Page 19: ...underline box Character sizes 1 1 1 2 1 3 6mm tape 1 1 1 2 1 3 2 1 2 2 2 3 other tapes Number of lines 1 6mm tape 1 or 2 other tapes Memory Text One block up to 63 characters General Power supply Six...

Page 20: ...CASIO COMPUTER CO LTD 6 2 Hon machi 1 chome Shibuya ku Tokyo 151 8543 Japan MO0105 A Printed in China Imprim en Chine A344043 1...

Reviews: