— 3 —
To measure lap and split times
1. Press
L
to start the stopwatch.
2. Press
L
, the split time and lap time for the lap whose time you just measured
appears for about five seconds in the display. Stopwatch timing continues inter-
nally.
•
After the above, the display automatically switches back to the normal stopwatch
(elapsed time) display. You can repeat the above step as many times as you like,
until 500 records are stored.
•
When memory becomes full (after 500 records are stored), the next store operation
causes the message “FULL” to appear on the display. The watch does not record
the new data. Always check how much memory capacity you have left before you
start recording important time data.
(Though there are no way to display how much memory is left.)
3. Press
B
to stop elapsed time measurement. The time on the display is stored as
the final lap time.
4. Press
B
again to reset the stopwatch to all zeros.
❈
What you should do after you complete a RUN depends on what you want to do
with the data from the just-completed RUN, as described below.
To save the data of a just-completed RUN
After resetting the stopwatch to all zeros, hold down
B
until the RUN number in-
creases by one. This indicates that the next stopwatch operation will be stored as a
different RUN, leaving the data of the previous RUN in memory as well.
To delete the data of a just-completed RUN
You do not need to do anything. The next time you start a stopwatch operation, the
new RUN data will replace the data of the currently displayed RUN number.
To delete the data of a just-completed RUN and one RUN before it
While the stopwatch is reset to all zeros, hold down
A
until the RUN number de-
creases by one. The next time you start a stopwatch operation, the new RUN data
will replace the data of the currently displayed RUN number.
Deleting Data
Note that you can delete the data for the newest RUN only. If there is data for five
RUN in memory, for example, you could delete the data for RUN 5 only. Then you
could delete the data for RUN 4, RUN 3, and so on. You can use the Recall Mode to
delete all RUN data.
•
Holding down
A
in the Stopwatch Mode causes the RUN number to decrease by
one. The next time you start a stopwatch operation, the new RUN data will replace
the data of the currently displayed RUN number.
It may take a rather long time to perform delete or recall operations in the
Stopwatch Mode or Recall Mode when there is a lot of data stored in memory.
RECALL MODE
The Recall Mode is used to recall and delete data that is
stored by Stopwatch Mode operations.
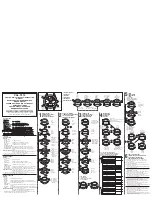
Recalling Laps and Splits
1. In the Recall Mode, press
B
to scroll through RUN num-
bers, from the newest to the oldest (number 1). The
data includes the measurement date. (If the elapsed
time operation extends over two different days, only the
start date is recorded.)
Next
newest
RUN
Newest
RUN
RUN 1
•
RUN numbers are assigned automatically to each RUN,
in sequence with the oldest RUN being 1, the next old-
est 2, etc.
2. When the RUN number for the data you want to see is on the display, press
D
to
switch to its Best Lap display. Now, each press of
D
scrolls the data in lap/split
number sequence. Holding down
D
scrolls at high speed.
Lap 2
Lap 1
Best
Lap
Final
Lap
RUN No.
& date
•
The watch can record up to 341 best laps. The data for any RUN after the 341st is
displayed without best lap data.
To delete all RUN data
Hold down
A
until the watch emits a beep and the message “CLR” flashes on the
display. That indicate the all of data is cleared.
•
You cannot delete data for a particular record or RUN in the Recall Mode. You only
can delete all data currently stored in memory.
Important!
•
You cannot delete data in the Recall Mode unless the stopwatch is reset to all
zeros. If it isn’t, enter the Stopwatch Mode, reset to all zeros, and then return to the
Recall Mode to delete the data.
ERROR Message
The message ERROR flashing on the display indicates that the battery is about
to go dead. When this happens, request battery replacement from your origi-
nal retailer or from an authorized CASIO distributor. You will not be able to
enter the Stopwatch Mode and Recall Mode while ERROR is flashing on the
display.
Mode indicator
RUN number
Measurement date
WORLD TIME MODE
The World Time Mode shows you the current time in 27
cities (30 time zones) around the world.
•
For full information on city codes, see the “CITY CODE
TABLE”.
•
The time setting of the Timekeeping Mode and the World
Time Mode are synchronized. Whenever you change
the time setting for any city in the Timekeeping Mode,
the settings of all World Time cities are changed ac-
cordingly.
The DST on/off setting, however, must be specified in-
dividually for each World Time city.
•
The format (12-hour and 24-hour) of the World Time
matches the format you select for Timekeeping Mode.
To select a World Time City and view its time
In the World Time Mode, press
D
(+) or
B
(–) to scroll through the city codes (time
zones). Holding down either button scrolls at high speed.
Daylight Saving Time (DST)
Daylight Saving Time automatically advances the time setting by one hour from Stan-
dard Time. You can make individual Daylight Saving Time settings for each city code
(time zone). Remember that not all countries or even local areas use Daylight Saving
Time.
To switch between Standard Time and Daylight Saving Time
1. In the World Time Mode, use
D
(+) or
B
(–) to display the city code (time zone)
whose standard time/daylight saving time setting you want to change.
2. Hold down
A
to toggle between Daylight Saving Time and Standard Time.
•
The DST indicator appears on the display whenever you display a city code for
which daylight saving time is turned on.
ALARM MODE
Mode indicator
Hour : Minutes
Alarm on indicator
Hourly time signal
on indicator
Current time
DST on indicator
When the Daily Alarm is turned on, the alarm sounds for 20 seconds at the preset
time each day. Press any button to stop the alarm after it starts to sound. When the
Hourly Time Signal is turned on, the watch beeps every hour on the hour.
To set the alarm time
1. Hold down
A
until the hour digits flash on the display, indicating the setting screen.
•
At this time, the alarm is turned on automatically.
2. Press
C
to move the flashing in the sequence shown below.
Hour
Minutes
3. Use
D
(+) and
B
(–) to change the setting. Holding down either button changes
the setting at high speed.
4. After you set the alarm time, press
A
to exit the setting screen.
•
The format (12-hour and 24-hour) of the alarm time matches the format you select
in the Timekeeping Mode.
•
When setting the alarm time using the 12-hour format, take care to set the time
correctly as morning or afternoon.
To stop the alarm
Press any button to stop the alarm after it starts to sound.
To turn the Daily Alarm or the Hourly Time Signal on and off
Press
D
while in the Alarm Mode to change the status of the Daily Alarm and Hourly
Time Signal in the following sequence.
Hourly Time
Signal only
Daily Alarm
only
Both OFF
Both ON
To test the alarm
In the Alarm Mode, hold down
D
to sound the alarm.
•
Holding down
D
to test the alarm also changes the Daily Alarm and Hourly Time
Signal on/off settings.
City code
World time
Current time of
your home time
DST on indicator