background image

A-1

Appendix/Apéndice

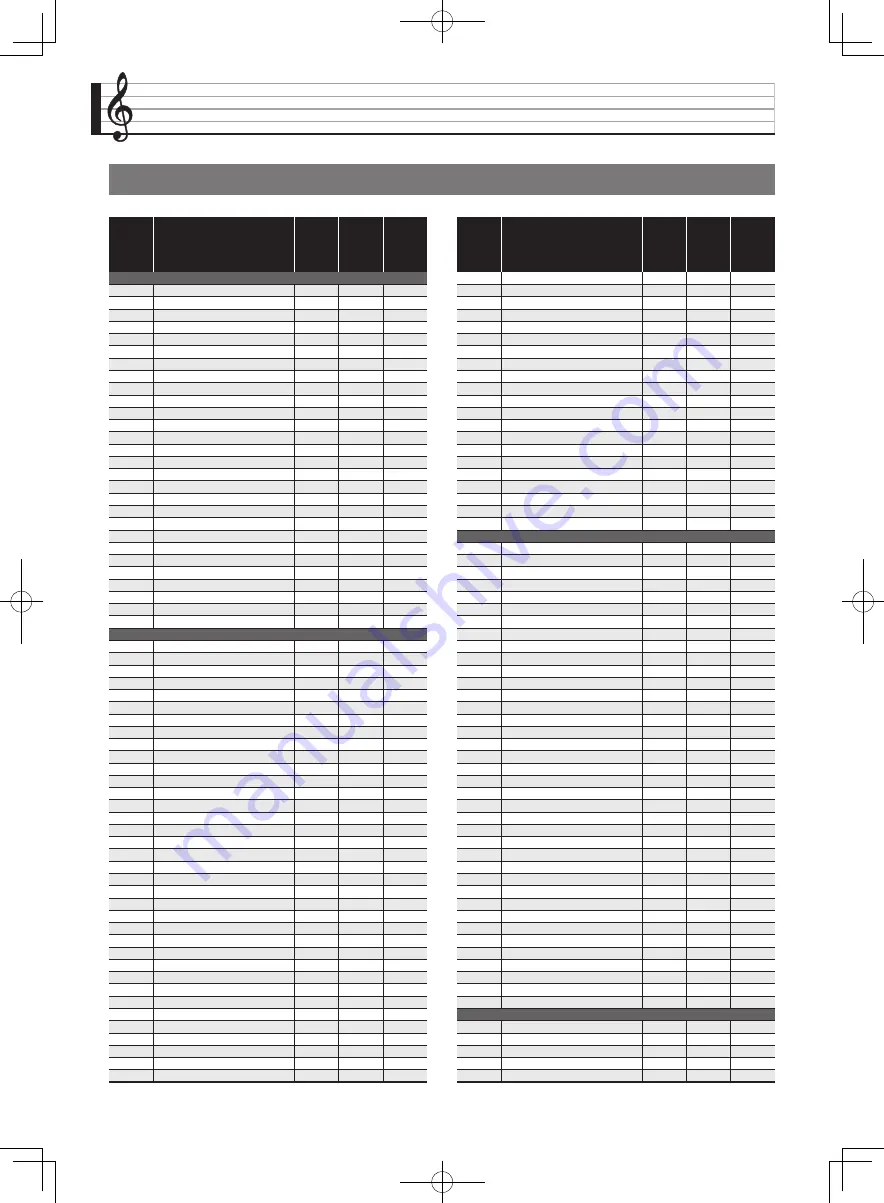
Tone List/Lista de tonos

Group 

Number/

Número 

de grupo

Tone Name/

Nombre del tono

Program 

Change/

Cambio 

de 

programa

Bank 

Select 

MSB/

MSB de 

selección 

de banco

DSP

Piano

001

GRAND PIANO CONCERT

0

2

O

002

GRAND PIANO BRIGHT

1

2

003

GRAND PIANO STUDIO

0

3

O

004

GRAND PIANO MODERN

0

4

O

005

ROCK PIANO

1

3

O

006

LA PIANO

1

4

O

007

DANCE PIANO 1

1

5

008

DANCE PIANO 2

1

6

O

009

GRAND PIANO MELLOW

0

5

O

010

MONO PIANO 1

0

6

011

MONO PIANO 2

0

7

O

012

TACK PIANO

0

8

O

013

GRAND PIANO CLASSIC

0

9

014

GRAND PIANO DOLCE

0

10

O

015

HONKY-TONK

3

2

016

OCTAVE PIANO

3

3

017

STRINGS PIANO

0

11

O

018

SYNTH-STR.PIANO

0

12

019

PIANO PAD

0

13

020

CHOIR PIANO

0

14

021

PIANO CHIME

0

15

022

ELEC.GRAND PIANO

2

2

023

MODERN E.G.PIANO

2

3

024

CHORUS E.G.PIANO

2

4

O

025

OFF VELO.HARPSICHORD

6

2

O

026

HARPSICHORD

6

3

027

COUPLED HARPSICHORD

6

4

O

028

HARPSICHORD & STRINGS

6

5

Elec.Piano

001

ELEC.PIANO 1

4

2

002

ELEC.PIANO 2

4

3

003

ELEC.PIANO 3

4

4

004

ELEC.PIANO 4

4

5

O

005

ELEC.PIANO 5

4

6

O

006

60'S E.PIANO 1

4

7

007

60'S E.PIANO 2

4

8

008

60'S E.PIANO 3

4

9

O

009

60'S E.PIANO 4

4

10

O

010

ELEC.PIANO 6

4

11

011

ELEC.PIANO 7

4

12

012

ELEC.PIANO 8

4

13

013

ELEC.PIANO 9

4

14

014

ELEC.PIANO 10

4

15

015

DIGITAL E.PIANO 1

5

2

016

DIGITAL E.PIANO 2

5

3

017

DIGITAL E.PIANO 3

5

4

018

DIGITAL E.PIANO 4

5

5

019

DIGITAL E.PIANO 5

5

6

020

DIGITAL E.PIANO 6

5

7

021

DIGITAL E.PIANO 7

5

8

022

DIGITAL E.PIANO 8

5

9

023

DIGITAL E.PIANO 9

5

10

024

DYNO ELEC.PIANO 1

4

16

025

DYNO ELEC.PIANO 2

4

17

O

026

60'S ELEC.PIANO 5

4

18

O

027

60'S ELEC.PIANO 6

4

19

O

028

CHORUS E.PIANO 1

4

20

029

CHORUS E.PIANO 2

4

21

030

PHASER E.PIANO 1

4

22

O

031

PHASER E.PIANO 2

4

23

O

032

AMP E.PIANO 1

4

24

O

033

AMP E.PIANO 2

4

25

O

034

CRUNCH E.PIANO

4

26

O

035

DIZZY E.PIANO

4

27

O

036

ANALOG E.PIANO 1

5

11

O

037

ANALOG E.PIANO 2

5

12

O

038

OFF VELO.CLAVI 1

7

2

039

OFF VELO.CLAVI 2

7

3

040

CLAVI 1

7

4

041

CLAVI 2

7

5

042

CLAVI 3

7

6

043

CLAVI 4

7

7

044

WAH CLAVI 1

7

8

O

045

WAH CLAVI 2

7

9

O

046

CRUNCH CLAVI

7

10

O

047

VIBRAPHONE 1

11

2

O

048

VIBRAPHONE 2

11

3

049

MARIMBA

12

2

050

CELESTA

8

2

051

BRIGHT CELESTA

8

3

O

052

GLOCKENSPIEL

9

2

053

MUSIC BOX 1

10

2

054

MUSIC BOX 2

10

3

O

055

XYLOPHONE

13

2

056

TUBULAR BELL

14

2

057

DULCIMER

15

2

Organ

001

DRAWBAR ORGAN 1

16

2

O

002

DRAWBAR ORGAN 2

16

3

003

DRAWBAR ORGAN 3

16

4

004

DRAWBAR ORGAN 4

16

5

005

JAZZ ORGAN 1

17

2

006

JAZZ ORGAN 2

17

3

O

007

JAZZ ORGAN 3

17

4

008

PERC.ORGAN 1

17

5

O

009

PERC.ORGAN 2

17

6

O

010

PERC.ORGAN 3

17

7

O

011

ROCK ORGAN 1

18

2

O

012

ROCK ORGAN 2

18

3

013

ROCK ORGAN 3

18

4

014

ELEC.ORGAN 1

16

6

O

015

ELEC.ORGAN 2

16

7

O

016

ELEC.ORGAN 3

16

8

017

70'S ORGAN

17

8

O

018

OVERDRIVE ORGAN 1

16

9

O

019

OVERDRIVE ORGAN 2

16

10

O

020

TREMOLO ORGAN

16

11

O

021

FULL DRAWBAR

16

12

022

ROTARY ORGAN

17

9

023

CLICK ORGAN

17

10

O

024

SEQUENCE ORGAN

17

11

025

GOSPEL ORGAN

17

12

O

026

PIPE ORGAN 1

19

2

027

PIPE ORGAN 2

19

3

028

CHAPEL ORGAN

19

4

029

THEATER ORGAN

16

13

030

REED ORGAN

20

2

031

ACCORDION 1

21

2

032

ACCORDION 2

21

3

033

ACCORDION 3

21

4

034

BANDONEON SOLO

23

4

035

BANDONEON 1

23

2

036

BANDONEON 2

23

3

037

HARMONICA 1

22

2

038

HARMONICA 2

22

3

Guitar

001

NYLON STR.GUITAR 1

24

2

002

NYLON STR.GUITAR 2

24

3

003

NYLON STR.GUITAR 3

24

4

O

004

STEEL STR.GUITAR 1

25

2

005

STEEL STR.GUITAR 2

25

3

Group 

Number/

Número 

de grupo

Tone Name/

Nombre del tono

Program 

Change/

Cambio 

de 

programa

Bank 

Select 

MSB/

MSB de 

selección 

de banco

DSP

B

CGP700-ES-1B.indd   135

2017/09/08   12:54:34

Summary of Contents for CGP-700

Page 1: ...e seguridad Antes de intentar usar el piano digital asegúrese de leer las Precauciones de seguridad separadas USER S GUIDE GUÍA DEL USUARIO Please keep all information for future reference Guarde toda información para tener como referencia futura English Español CGP 700 MA1709 B Printed in China C CGP700 ES 1B indd 1 2017 09 08 12 54 22 B ...

Page 2: ...e normally or has been dropped The apparatus shall not be exposed to dripping or splashing and that no objects filled with liquids such as vases shall be placed on the apparatus The P POWER indicator being unlit does not mean the apparatus is completely disconnected from the MAINS When you need to have the apparatus completely disconnected from the MAINS you must unplug the power cord For that pur...

Page 3: ...s EN 23 Adding Harmony to Melody Notes Auto Harmonize EN 24 Demo Song EN 25 Playing the Demo Tunes EN 25 Music Presets EN 26 Recalling Preset Data EN 26 Registering Tone and Rhythm Setups EN 27 Recording and Playback EN 29 Recording to Digital Piano Memory MIDI Recorder EN 31 Recording to a USB Flash Drive Audio Recorder EN 38 Configuring Digital Piano Settings EN 41 Configuring Digital Piano Sett...

Page 4: ...st A 8 Music Preset List A 10 Fingering Guide A 12 Parameter List A 14 Chord Example List A 15 Part and MIDI Channel Assignments A 17 MIDI Implementation Chart Company and product names used in this manual may be registered trademarks of others CGP700 ES 1B indd 5 2017 09 08 12 54 22 ...

Page 5: ...r dk 2 bo bp bq 7 8 9 bk bl bm bs 5 3 1 4 bn dl 6 cl Bottom Back PHONES jacks Front AUDIO IN jack Pedal connector USB port AUDIO VOLUME controller DAMPER jack DC 24V terminal SPEAKER jack LINE OUT R L MONO jacks CGP700 ES 1B indd 6 2017 09 08 12 54 22 ...

Page 6: ... button 9VARIATION FILL IN button bkSYNCHRO ENDING button bla button bmACCOMP ON OFF button bnDisplay boMENU bpMAIN bqEXIT brDial bsw NO q YES buttons btTONE button ckRHYTHM button clTEMPO buttons cmMETRONOME button cnGRAND PIANO button coBANK button cpREGISTRATION 1 button cqREGISTRATION 2 button crREGISTRATION 3 button csREGISTRATION 4 button ctSTORE button dkUSB flash drive port dlPITCH BEND wh...

Page 7: ...etails see Auto Resume page EN 46 and Operation Lock page EN 46 Perform the following procedure when you want to return the Digital Piano s stored data and settings to their initial factory defaults 1 Turn off the Digital Piano 2 While holding down the cl TEMPO w q buttons press the 1 P button The Digital Piano will turn on and initialize its internal system You will be able to use the Digital Pia...

Page 8: ... downwards The AC adaptor becomes prone to emitting electromagnetic waves when the label surface is facing upwards 1 Press the 1 P button to turn on power Do not touch the keyboard pedals or buttons while the startup screen is on the display Doing so will cause malfunction Use the Digital Piano s VOLUME controller 2 to adjust the volume 2 To turn off the Digital Piano hold down the 1 P button unti...

Page 9: ... sound from only one side of the headphones If the plug of the headphones you are using does not match the PHONES jacks use the applicable commercially available adaptor plug If you are using headphones that require an adaptor plug make sure you do not leave the adaptor plugged in when you unplug the headphones If you do nothing will sound from the speakers when you play Connecting the provided pe...

Page 10: ...ayer Digital Piano built in effects reverb chorus DSP are not applied to AUDIO IN terminal input AUDIO IN input cannot be recorded with the Audio Recorder Use commercially available cables to connect the external audio equipment to the Digital Piano s LINE OUT jacks as shown in Figure 2 LINE OUT R jack output is right channel sound while LINE OUT L MONO jack output is left channel sound It is up t...

Page 11: ... LINE OUT output to appropriate sound quality If you are using the Digital Piano in a stand alone configuration not mounted on its stand be sure to change the External Speaker SYSTEM SETTING to Off For details see SYSTEM SETTING Screen under Configuring Digital Piano Settings pages EN 41 through EN 48 Use only accessories that are specified for use with this Digital Piano Use of unauthorized acces...

Page 12: ...rs off 3Chord 4Tempo 5Measure 6Beat 7Transpose 8Split point 9Registration bank Quick Palette The Quick Palette is always displayed along the right side of the screen Touch the Quick Palette icons to navigate between screens You can tell the currently selected items and operation enabled icons by their colors Red Currently selected or turned on Blue Operation enabled Example Soft Rock selected in t...

Page 13: ...ur finger Swiping a MENU screen changes to another page of menu items You can touch the keys of an on screen touch keyboard to input data file names The Digital Piano supports input of alpha characters and symbols 1Shows the letters you input 2Selects the character type 3Moves the cursor forward and back 4Deletes the letter to the left at the cursor 5Input letters at the cursor position 6Inputs a ...

Page 14: ...setting value that can be changed is indicated by a icon 1 Touch the item whose setting you want to change 2 Use the br Dial or the bs w q buttons to change setting value Holding down either of the bs w q buttons scrolls through values at high speed To toggle a function between on or off touch its item or icon To select an item in a list To change a setting value To toggle a function on or off CGP...

Page 15: ... or II 4 Touch the tone you want to use You can navigate between tone list pages by touching or 5 On the screen touch bp MAIN to return to the MAIN screen Touching the Upper 1 icon to turn it off will deselect the keyboard tone so nothing will sound on the keyboard Pressing the cn GRAND PIANO button will switch to the grand piano tone and reconfigure Digital Piano settings so they are optimized fo...

Page 16: ...plit tone with another by turning on layer page EN 16 You can also configure the layer setting after turning on the split Turning off Upper 1 Upper 2 Lower 1 or Lower 2 by touching its icon will mute the applicable tone When tones with DSP are assigned as both the main tone and the split tone the effect of one of the tones becomes disabled You can use the procedure below to specify the location on...

Page 17: ... the Upper 1 or Upper 2 icon will turn off the applicable tone so it does not sound When tones with DSP are assigned as both the main tone and the layered tone the effect of one of the tones becomes disabled You can split the keyboard in the center for duet play so the left and right sides have the same ranges The left outer pedal operates as the left side damper pedal while the right outer pedal ...

Page 18: ...ing to 1 affects the left keyboard octave 3 Touch Right Octave and then use the bs w q buttons to change the octave of the right keyboard Turning off duet play clears octave shift settings and returns the keyboard to its initial default octave settings Use this procedure to adjust the volume balance between the main tone and the layered tone 1 On the screen touch bp MAIN This displays the MAIN scr...

Page 19: ...rent methods you can use to change the tempo setting using the cl TEMPO w q buttons for gradual change or by tapping a beat with the cl TEMPO TAP button tap input Method 1 To adjust the tempo setting using the cl TEMPO w q buttons 1 Use the cl TEMPO w q buttons to adjust the tempo setting Each press of a button increases or decreases the tempo value beats per minute by one Holding down either butt...

Page 20: ...he amount of pitch change at maximum rotation in either direction See CONTROLLER Screen page EN 46 for more information The transpose feature lets you raise or lower the overall pitch of the Digital Piano in semitone steps You can use this feature to adjust keyboard tuning to a key that better matches a vocalist another musical instrument etc 1 Use the 6 TRANSPOSE w q buttons to change the setting...

Page 21: ...1 On the screen touch bp MAIN This displays the MAIN screen 2 Touch the Rhythm rhythm name 3 Touch the group that contains the rhythm you want to use You can navigate between groups by touching UU or II 4 Touch the rhythm you want to use You can navigate between rhythm list pages by touching or 5 Use the cl TEMPO w q buttons to adjust the tempo setting For information about the tempo adjustment me...

Page 22: ... press the bl a button Example To play a C chord 9 Play other chords with your left hand as you play the melody with your right hand You can use CASIO Chord or other simplified chord fingering modes to play chords For details see To select a chord fingering mode in the following section You can use the 8 NORMAL and 9 VARIATION buttons to modify accompaniment patterns For details see Modifying Auto...

Page 23: ... see the Fingering Guide page A 12 To select a chord fingering mode Fingered 1 Play the component notes of the chord on the keyboard Fingered 2 Unlike Fingered 1 6th input is not possible with this mode Fingered 3 Unlike Fingered 1 this mode allows input of fraction chords with the lowest keyboard note as the bass note Chord keyboard Chord Type Example Major Chords Press one key whose note corresp...

Page 24: ...s will play an ending pattern and then stop Auto Accompaniment One Touch Preset gives you one touch access to tone and tempo settings that go well with the currently selected Auto Accompaniment rhythm pattern 1 On the MENU screen touch RHYTHM This displays the RHYTHM screen You can also display the RHYTHM screen by pressing the ck RHYTHM button 2 Touch One Touch This configures tone tempo and othe...

Page 25: ... Notes Auto Harmonize Type Name Description Duet 1 Adds close separated by two to four degrees 1 note harmony below the melody note Duet 2 Adds open separated by more than 4 to 6 degrees 1 note harmony below the melody note Country Adds country style harmony Octave Adds the note from the next lower octave 5th Adds the fifth degree note 3 Way Open Adds 2 note open harmony for a total of three notes...

Page 26: ...n use the bs w q buttons to change to another demo song 2 Press the bl a button This stops demo song playback Playback of the demo songs will continue in an endless loop until you press the bl a button to stop it Only the operations described above can be performed while demo song playback is in progress bs bl bm Playing the Demo Tunes CGP700 ES 1B indd 27 2017 09 08 12 54 24 ...

Page 27: ...al Piano with the settings tone rhythm etc of the selected preset 4 Press the bl a button to start Auto Accompaniment with the preset chord progression Play the melody on the keyboard The preset chord progression repeats until you stop it by pressing the bl a button again Touching Auto Chord to turn it off turns off the preset chord progression which enables play of the normal Auto Accompaniment p...

Page 28: ...a in the currently selected bank For details about these settings see Parameter List page A 14 1 Configure the Digital Piano with the tone rhythm and other settings you want to save 2 While holding down the ct STORE button perform the operation below Use the bs w q buttons to select the bank where you want to store the data and then press a REGISTRATION button cp through cs to specify an area The ...

Page 29: ... memory setup and automatically configure the Digital Piano settings accordingly Example When recalling the registration data in Bank 4 Area 1 You can use Accomp Freeze to specify accompaniment settings that should be left unchanged whenever a registration setup is applied For details see SYSTEM SETTING Screen under Configuring Digital Piano Settings pages EN 41 through EN 48 Saving Setup Registra...

Page 30: ...eyboard performance data in Digital Piano memory Keyboard performance information is recorded to a USB flash drive as audio data Keyboard performance information keyboard keys press release touch pressure etc is recorded as MIDI data The size of MIDI data is much smaller when compared with audio data making it easier to edit later on a computer etc Supported recording capacity 100 songs approximat...

Page 31: ... MIDI data You can play back audio data from a USB flash drive The Audio Recorder plays back the waveform of sound recorded as audio data MIDI Recorder Audio Recorder What you can do Record to one track while playing back from the other track System Track Keyboard play 3 While playing back Track 1 Keyboard play What you can do Record performance while playing back a song recorded with the MIDI Rec...

Page 32: ...orded data The 4 MIDI a button is lit while recording is in progress 6 After you finish recording touch Y This causes the 3 REC MODE button and 4 MIDI a button lamps to become unlit and enters the playback mode You can also enter the recording mode by pressing the 3 REC MODE button and then touching MIDI RECORDER This method can be used to enter the recording mode only for making a new recording R...

Page 33: ...rack Data The following describes the data that can be recorded to each type of track System Track Tracks 01 through 16 Keyboard performance 1 the keyboard tone setting 1 pedal and pitch bend wheel operation mixer settings except for part on off System Track only Rhythm balance setting effect setting reverb chorus delay tempo Auto Accompaniment performance setting one touch preset music preset per...

Page 34: ...corded with punch in recording touch Punch Out Erase 4 Touch X This will start playback of the selected track 5 When playback reaches the point you want to re record play the desired note s on the keyboard This starts punch in recording so continue to play Performing a pedal or pitch bend wheel operation also will start punch in recording Besides keyboard play you can also start punch in recording...

Page 35: ...an one measure Use the procedure below to specify a punch in recording area that includes a part of a measure Example To re record from beat 3 of measure 2 up to beat 1 of measure 4 1 Use the MIDI Recorder to start playback of the song that contains the section you want to re record 2 When playback reaches the point where you want to start punch in recording touch Set A After touching Measure Beat...

Page 36: ... Piano Memory page EN 51 1 On the MENU screen touch MIDI RECORDER This displays a MIDI RECORDER screen 2 Touch the file name 3 Touch the User tab to play back MIDI data stored in Digital Piano memory or the Media tab to play back from a USB flash drive 4 Touch the MIDI data you want to play 5 Touch X This starts playback You can also start playback by pressing the 4 MIDI a button The operations be...

Page 37: ...ter touching Measure Beat or Tick for Point A you can then use the bs w q buttons to adjust 3 When play reaches the end of the section you want to repeat touch Set B This makes the measure where you touched Set B the end measure You can also make fine adjustments to the end point After touching Measure Beat or Tick for Point B you can then use the bs w q buttons to adjust 4 Touch A B Repeat to ena...

Page 38: ...ancel the copy operation touch No 1 On the MENU screen touch MIDI RECORDER 2 Touch the data name 3 Touch User Data Edit 4 Touch Delete 5 Touch the data you want to delete 6 Touch Execute 7 Touch Yes This deletes the MIDI data you selected To cancel the delete operation touch No 1 On the MENU screen touch MIDI RECORDER 2 Touch Monitor 3 Touch Edit 4 Touch Rename 5 Touch the track you want to rename...

Page 39: ...rrupt the data on the USB flash drive and damage the USB flash drive port PREPARATION Be sure to format the USB flash drive on the Digital Piano before using it See USB Flash Drive on page EN 49 for more information 1 Insert the USB flash drive into the Digital Piano s USB flash drive port When you perform a USB flash drive operation or turn on the Digital Piano while a USB flash drive is plugged ...

Page 40: ...SB flash drive port while the 5 AUDIO a button lamp is lit or flashing Doing so will interrupt recording and may corrupt data 5 To stop recording touch Y You can also enter the recording mode by pressing the 3 REC MODE button and then touching AUDIO RECORDER 1 On the MENU screen touch AUDIO RECORDER 2 Touch 0 to enter the recording mode 3 Touch X 4 Press the 4 MIDI a button This starts playback of...

Page 41: ... selected song Note that the delete operation cannot be undone Check to make sure you really do not need the data in Digital Piano memory before you perform the following steps 1 On the MENU screen touch AUDIO RECORDER 2 Touch the file name 3 Touch Delete 4 Touch the data you want to delete 5 Touch Execute 6 Touch Yes This deletes the audio data you selected To cancel the delete operation touch No...

Page 42: ... MIDI settings and more This means you can tailor Digital Piano operation to suit your particular needs 1 On the MENU screen touch the menu for the settings you want to configure 2 Touch the item whose setting you want to change 3 Use the br Dial or the bs w q buttons to change the setting br bs bt Configuring Digital Piano Settings CGP700 ES 1B indd 43 2017 09 08 12 54 26 ...

Page 43: ... to configure Auto Accompaniment settings See Using Auto Accompaniment page EN 20 for more information Item Description Setting Upper 1 Upper 2 Lower 1 Lower 2 Turns each part on or off and specifies its tone Off On Octave Change the range of each part in octave units 2 to 0 to 2 Auto Harmonize See page EN 24 Off On Duet See page EN 16 Off On Split See page EN 15 Off On CGP700 ES 1B indd 44 2017 0...

Page 44: ... 17 0 to 127 Keyboard Volume Adjusts the volume levels of all parts that are controlled by the keyboard 0 to 127 Accomp Volume Adjusts the volume level of the Auto Accompaniment without changing the keyboard tone volume level 0 to 127 MIDI Volume Adjusts the volume level of the MIDI data without changing the keyboard tone volume level 0 to 127 Audio Volume Adjusts the volume level of audio data st...

Page 45: ...gs For more information see Music Presets page EN 26 Item Description Setting Brilliance Controls the brilliance of the tone 3 to 0 to 3 Reverb Type Specifies the type of reverb to be applied Room1 Room2 Room3 Hall1 Hall2 Hall3 Plate1 Plate2 Plate3 Delay Pan Delay Large Room1 Large Room2 Stadium1 Stadium2 Long Delay1 Long Delay2 Chorus Type Specifies the type of chorus to be applied Chorus1 Chorus...

Page 46: ...use Accomp Freeze to specify accompaniment settings that should be left unchanged whenever a registration setup is applied For details see Parameter List page A 14 Off On Tuning Raises or lowers the overall pitch of the Digital Piano from the standard pitch of A4 440 Hz in 0 1Hz units 415 5Hz to 440 0Hz to 465 9Hz Temperament Changes the temperament of the keyboard and Auto Accompaniment from the ...

Page 47: ...ff Specifies if Auto Power Off page EN 7 is enabled On or disabled Off Off On Factory Reset Use this screen to return the piano s stored data and settings to their initial factory defaults Item Description Setting Upper1 Pedal Turn on to apply the pedal effect to the main tone when the pedal is depressed Off On Upper2 Pedal Turn on to apply the pedal effect to the layered tone when the pedal is de...

Page 48: ... 24 Fine Tune Specifies in cent steps the pitch of the notes of each part 99 to 0 to 99 Bend Range Adjusts in semitone steps the bend range of each part 0 to 24 Reverb Send Specifies how much reverb is applied to each part No reverb is applied at all when this setting is 0 while maximum reverb is applied when it is 127 0 to 127 Chorus Send Specifies how much chorus is applied to each part No choru...

Page 49: ...ing keyboard play MIDI data to an external device keyboard channel 01 to 16 Accomp Out Turn on this setting to send MIDI data corresponding to Auto Accompaniment to an external device Off On Chord Judge Select whether chord input should be performed when a MIDI note on message to the Auto Accompaniment chord keyboard is received Off On Hi Res Vel Out Turns high resolution velocity MIDI out on or o...

Page 50: ...I recorder is stored on a USB flash drive as is or stored as a MIDI file SMF format 0 Standard audio data from a computer WAV files can also be stored on a USB flash drive and played back on the Digital Piano Digital Piano play can be recorded directly to a USB flash drive For details see Recording to a USB Flash Drive Audio Recorder page EN 38 MIDI files and CASIO format files stored on a USB fla...

Page 51: ... have any valuable data stored on it The format operation performed by this Digital Piano is a quick format If you want to completely delete all of the data in USB flash drive format it on your computer or some other device Supported USB Flash Drives This Digital Piano supports USB flash drives formatted to FAT32 If your USB flash drive is formatted to a different file system use the Windows forma...

Page 52: ...ete To cancel the save operation touch No You can use the procedure below to load data from a USB flash drive into Digital Piano memory Place the data file you want to load into the MUSICDAT folder on the USB flash drive 1 Insert the USB flash drive into the Digital Piano s USB flash drive port 2 On the MENU screen touch MEDIA 3 Touch Load 4 Touch the data type of the data you want to import 5 On ...

Page 53: ...to delete 5 Touch the data you want to delete 6 Touch Execute This displays a delete confirmation message Sure 7 Touch Yes The message Please Wait remains on the display while the operation is being performed Do not perform any operation while this message is on the display Complete appears on the display after data delete is complete To cancel the delete operation touch No Deleting Data from a US...

Page 54: ...g incorrectly can make data send and receive impossible 1 Turn off the Digital Piano and then start up your computer Do not start up the music software on your computer yet 2 After starting up your computer use a commercially available USB cable to connect it to the Digital Piano 3 Turn on the Digital Piano If this is the first time you are connecting the Digital Piano to your computer the driver ...

Page 55: ...m The letters MIDI stand for Musical Instrument Digital Interface which is the name of a worldwide standard for digital signals and connectors that makes it possible to exchange musical data between musical instruments and computers machines produced by different manufacturers For details about the MIDI specifications of this Digital Piano see the MIDI Implementation document at the website locate...

Page 56: ...TION Assembly of the stand should be performed by at least two people working together The Digital Piano unit is particularly heavy When moving it get at least one other person to help you and handle with care This stand should be assembled on a flat surface Take care that you do not pinch your fingers between parts when assembling them Be sure to insert felt or other material between the rubber f...

Page 57: ...rew heads with the caps G 5 Place the piano onto the stand In order to ensure you do not get your fingers pinched between the piano and the stand grasp the piano on its sides not its ends at the locations marked with stars in the illustration 6 First use the two butterfly screws H to secure the back of the piano to the stand Next use the two screws I to secure the front of the piano To prevent the...

Page 58: ...o into a household power outlet as shown in the illustration below Use the anti tipping brackets to protect the stand from tipping over when it is in a location that is not against a wall etc 1 Remove the bracket screws from the inside surfaces of the side panels two screws each panel four total and then shift the position of the brackets as shown in the figure 2 Replace the screws you removed in ...

Page 59: ...otect them during shipment Remove the protective tape before using the Digital Piano Insert the bottom of the music stand into the groove on the top of the Digital Piano s console Removing the Protective Tape from the Keyboard Installing the Music Stand CGP700 ES 1B indd 60 2017 09 08 12 54 27 ...

Page 60: ...ny files on the USB flash drive 1 Delete some of the files on the USB flash drive to make room for new data 2 There is a file named TAKE99 WAV in the MUSICDAT folder 2 Delete the WAV file in the MUSICDAT folder Not SMF01 You are attempting to play back SMF Format 2 song data This Digital Piano supports playback of SMF Format 0 or Format 1 only Size Over 1 The MIDI recording data on the USB flash d...

Page 61: ...computer 1 Check to make sure that the USB cable is connected to the Digital Piano and computer and that the correct device is selected with your computer s music software EN 53 2 Turn off the Digital Piano and then exit the music software on your computer Next turn the Digital Piano back on and then restart the music software on your computer I cannot record chord accompaniment data on my compute...

Page 62: ...ay on different ranges of the keyboard the notes do not change octaves The ranges of certain tones are limited which means that octaves change normally up to a certain low note or high note With such a tone the notes of the lowest octave will be repeated to the left of the lowest possible note and the highest octave will be repeated to the right of the highest possible note This is due do limitati...

Page 63: ...der Volume Level Adjustable Audio Recorder Real time recording and playback to USB flash drive Linear PCM 16bit 44 1 kHz stereo WAV format Songs 100 files Approximately 74 minutes maximum recording per file Audio Recorder Volume Level Adjustable Registration 96 4 setups 24 banks Metronome Beats 0 to 9 Tempo Range 20 to 255 Metronome Volume Level Adjustable Pedals Damper with half pedal operation S...

Page 64: ...20W 20W Power Requirements AC Adaptor AD E24250LW Auto Power Off Approximately 4 hours after last operation Auto Power Off can be disabled Power Consumption 24V 20W Dimensions Digital Piano and Stand 132 2 W 29 3 D 76 3 H cm 52 1 16 11 9 16 30 1 16 inch Weight Digital Piano and Stand Approximately 25 7kg 56 7 lbs CGP700 ES 1B indd 65 2017 09 08 12 54 27 ...

Page 65: ...en playing late at night to keep the volume at levels that do not disturb others Other steps you can take when playing late at night are closing windows and using headphones Any reproduction of the contents of this manual either in part or its entirety is prohibited Except for your own personal use any other use of the contents of this manual without the consent of CASIO is prohibited under copyri...

Page 66: ...the electrical load output to exceed the label rating 12 Make sure the surrounding area is dry before plugging into a power source 13 Make sure the product is oriented correctly 14 Unplug the product during lightning storms or when you do not plan to use it for a long time 15 Do not allow product ventilation openings to become blocked Install the product in accordance with the manufacturer s instr...

Page 67: ... and its documentation for any purpose is hereby granted without fee provided that the above copyright notice appear in all copies and that both that copyright notice and this permission notice appear in supporting documentation Silicon Graphics makes no representations about the suitability of this software for any purpose It is provided as is without express or implied warranty Permission to use...

Page 68: ...icen un adaptador de CA seriamente dañado El producto no es para ser usado por niños menores de 3 años Utilice solamente el adaptador de CA CASIO AD E24250LW El adaptador de CA no es un juguete Asegúrese de desconectar el adaptador de CA antes de limpiar el producto Manufacturer CASIO COMPUTER CO LTD 6 2 Hon machi 1 chome Shibuya ku Tokyo 151 8543 Japan Responsible within the European Union Casio ...

Page 69: ...de armonía a las notas de la melodía Armonización automática ES 24 Canción de demostración ES 25 Reproducir las canciones de demostración ES 25 Preajustes musicales ES 26 Llamar los datos de preajuste ES 26 Para registrar las configuraciones de tono y ritmo ES 27 Grabación y reproducción ES 29 Grabación en la memoria del piano digital Grabador MIDI ES 31 Grabación en una unidad flash USB Grabadora...

Page 70: ...ustes musicales A 10 Guía de digitación A 12 Lista de parámetros A 14 Lista de ejemplos de acordes A 15 Asignaciones de las partes y de los canales MIDI A 17 MIDI Implementation Chart Los nombres de compañías y productos usados en este manual pueden ser marcas registradas de terceros CGP700 ES 1B indd 71 2017 09 08 12 54 28 ...

Page 71: ...8 9 bk bl bm bs 5 3 1 4 bn dl 6 cl Parte inferior Parte posterior Tomas PHONES Parte delantera Tomas AUDIO IN Conector de pedal Puerto USB Toma DAMPER Controlador AUDIO VOLUME Tomas LINE OUT R L MONO Terminal DC 24V Toma SPEAKER CGP700 ES 1B indd 72 2017 09 08 12 54 28 ...

Page 72: ...HRO ENDING Sincronización final blBotón a bmBotón ACCOMP ON OFF Activación desactivación de acompañamiento bnPantalla boMENU bpMAIN bqEXIT brDial bsBotones w NO q YES btBotón TONE Tono ckBotón RHYTHM Ritmo clBotones TEMPO Tempo cmBotón METRONOME Metrónomo cnBotón GRAND PIANO Piano de cola coBotón BANK Banco cpBotón REGISTRATION 1 Registro cqBotón REGISTRATION 2 Registro crBotón REGISTRATION 3 Regi...

Page 73: ...onsulte Auto Resume página ES 46 y Operation Lock página ES 46 Ejecute el siguiente procedimiento cuando desee reposicionar los datos y ajustes guardados en el piano digital a sus ajustes predeterminados de fábrica 1 Apague el piano digital 2 Mientras mantiene presionado los botones cl TEMPO w q presione el botón 1 P El piano digital se enciende y se inicializa su sistema interno En unos instantes...

Page 74: ...uperficie de su etiqueta dirigida hacia abajo El adaptador de CA tiende a emitir ondas electromagnéticas cuando la superficie de la etiqueta está dirigida hacia arriba 1 Utilice el botón 1 P para encender la unidad No toque el teclado los pedales ni los botones mientras se está visualizando la pantalla de inicio Podría producirse un mal funcionamiento Utilice el controlador VOLUME 2 del piano digi...

Page 75: ...as tomas PHONES De lo contrario puede suceder que se pueda escuchar solamente el sonido de un solo lado de los auriculares Si la clavija de los auriculares que utiliza no coincide con las tomas PHONES utilice una clavija adaptadora adecuada disponible en el mercado Si utiliza auriculares que requieren una clavija adaptadora asegúrese de no dejarla insertada cuando desenchufe los auriculares Si lo ...

Page 76: ...rados al piano digital reverberación coro DSP no se aplican a la entrada del terminal AUDIO IN La entrada de AUDIO IN no se podrá grabar con el grabador de audio Utilice cables disponibles en el mercado para conectar el equipo de audio externo a las tomas LINE OUT del piano digital tal como se muestra en la Figura 2 La salida de la toma LINE OUT R es el sonido del canal derecho mientras que la sal...

Page 77: ...S La salida LINE OUT se ajustará a una calidad de sonido apropiada Si está utilizando el piano digital en una configuración autónoma no montado en su soporte asegúrese de cambiar External Speaker SYSTEM SETTING a Desactivado Para obtener información detallada consulte Pantalla SYSTEM SETTING en Configuración de los ajustes del piano digital páginas ES 41 a ES 48 Utilice sólo los accesorios especif...

Page 78: ...mpo 7Transposición 8Punto de división 9Banco de registro Paleta rápida La Paleta rápida siempre se visualiza en el lado derecho de la pantalla Toque los iconos de la Paleta rápida para desplazarse entre las pantallas Los elementos seleccionados y las operaciones habilitadas actualmente se pueden determinar según los colores de los iconos Rojo seleccionado o activado actualmente Azul operación habi...

Page 79: ...a MENU se pasa a otra página de elementos de menú Para ingresar los nombres de archivos de datos puede tocar las teclas del teclado en pantalla táctil El piano digital permite la entrada de caracteres alfabéticos y símbolos 1Muestra las letras introducidas por usted 2Selecciona el tipo de caracteres 3Mueve el cursor hacia adelante y hacia atrás 4Borra la letra situada a la izquierda del cursor 5In...

Page 80: ...e cambiar se indica mediante el icono 1 Toque el elemento cuyo ajuste desea cambiar 2 Utilice el dial br o los botones bs w q para cambiar el valor de ajuste Si mantiene presionado uno u otro botón bs w q los valores se desplazarán rápidamente Para activar o desactivar una función toque su respectivo elemento o icono Para seleccionar un elemento de una lista Para cambiar un valor de ajuste Para ac...

Page 81: ...ar o para desplazarse entre las páginas de las listas de tonos 5 En la pantalla toque bp MAIN para volver a la pantalla MAIN Si toca el icono Upper 1 para desactivarlo se cancelará la selección del tono del teclado y por consiguiente no se escuchará ningún sonido Si presiona el botón cn GRAND PIANO se cambia al tono de piano de cola y los ajustes del piano de cola se vuelven a configurar para que ...

Page 82: ... ambos tonos principal y dividido con otro tono También es posible configurar el ajuste de estratificación después de activar la división Si desactiva Upper 1 Upper 2 Lower 1 o Lower 2 tocando su icono se silenciará el tono aplicable Cuando los tonos con DSP se asignan como tono principal y como tono de división se deshabilitará el efecto de uno de los dos tonos Puede utilizar el siguiente procedi...

Page 83: ... tono aplicable se desactiva y por lo tanto no sonará Cuando los tonos con DSP se asignan como tono principal y como tono estratificado se deshabilitará el efecto de uno de ellos El teclado puede dividirse en el centro para una ejecución a dúo de manera que los lados izquierdo y derecho posean el mismo rango El pedal exterior izquierdo funciona como pedal apagador para el lado izquierdo mientras q...

Page 84: ...ava del teclado izquierdo 3 Toque Right Octave y utilice los botones bs w q para cambiar la octava del teclado derecho Cuando se desactiva el modo dúo se borrarán los ajustes de desplazamiento de octava realizados y el teclado se restablecerá a los ajustes de octava predeterminados Este procedimiento le permite ajustar el balance de volumen entre el tono principal y el tono estratificado 1 En la p...

Page 85: ...os métodos diferentes utilizando los botones cl TEMPO w q para el cambio gradual o tocando un tiempo con el botón cl TEMPO TAP entrada por pulsación Método 1 Para ajustar el tempo mediante los botones cl TEMPO w q 1 Utilice los botones cl TEMPO w q para realizar el ajuste de tempo El valor de tempo tiempos por minuto aumenta o disminuye en uno con cada presión del botón El valor cambiará rápidamen...

Page 86: ...icando el grado de cambio de altura tonal mediante una rotación máxima en una u otra dirección Para obtener más información consulte Pantalla CONTROLLER página ES 46 La función de transposición le permite subir o bajar la altura tonal general del piano digital en pasos de semitono Puede utilizar esta función para afinar el teclado a la clave que mejor corresponda con la voz del cantante otro instr...

Page 87: ...gina A 8 1 En la pantalla toque bp MAIN Aparecerá la pantalla MAIN 2 Toque el nombre de ritmo Rhythm 3 Toque el grupo al que pertenece el ritmo que desea usar Toque UU o II para desplazarse entre los grupos 4 Toque el ritmo que desea usar Podrá tocar o para desplazarse entre las páginas de las listas de ritmos 5 Utilice los botones cl TEMPO w q para realizar el ajuste de tempo Para obtener informa...

Page 88: ... a Ejemplo Para ejecutar un acorde C 9 Ejecute otros acordes con la mano izquierda mientras toca la melodía con la mano derecha Para ejecutar los acordes utilice CASIO Chord u otros modos de digitación simplificada de acordes Si desea información detallada consulte Para seleccionar un modo de digitación de los acordes en la siguiente sección Puede utilizar los botones 8 NORMAL y 9 VARIATION para m...

Page 89: ...seleccionar un modo de digitación de los acordes Fingered 1 Toca las notas componentes del acorde en el teclado Fingered 2 A diferencia de Fingered 1 la 6ta entrada no es posible con este modo Fingered 3 A diferencia de Fingered 1 este modo permite la entrada de acordes fraccionados con la nota más baja del teclado como nota de bajos Teclado de acordes Tipo de acorde Ejemplo Acordes mayores Presio...

Page 90: ... de fin y se detiene el acompañamiento automático Con el preajuste de un toque podrá acceder con un toque a los ajustes de tono y tempo que armonizan con el patrón de ritmo de acompañamiento automático actualmente seleccionado 1 En la pantalla MENU toque RHYTHM Aparecerá la pantalla RHYTHM La pantalla RHYTHM se puede visualizar presionando el botón ck RHYTHM 2 Toque One Touch Esto configura automá...

Page 91: ...n automática Nombre del tipo Descripción Duet 1 Añade una armonía de 1 nota cerrada separada por dos a cuatro grados por debajo de la nota de la melodía Duet 2 Añade una armonía abierta de 1 nota separada por más de 4 a 6 grados por debajo de la nota de la melodía Country Añade una armonía al estilo country Octave Añade la nota de la próxima octava más baja 5th Añade la nota de quinto grado 3 Way ...

Page 92: ...r a otra canción de demostración 2 Presione el botón bl a La reproducción de la canción de demostración se detiene Las canciones de demostración continuarán reproduciéndose en un bucle sin fin hasta que usted presione el botón bl a para detenerlas Sólo las operaciones descritas anteriormente se pueden realizar mientras se están reproduciendo las canciones de demostración bs bl bm Reproducir las ca...

Page 93: ... etc del preajuste seleccionado 4 Presione el botón bl a para iniciar el acompañamiento automático con la progresión de acordes preajustada Ejecute la melodía en el teclado La progresión de acordes preajustada se repite hasta que usted la detenga presionando nuevamente el botón bl a Si toca Auto Chord para desactivarla se desactivará la progresión de acordes preajustada y se habilitará la ejecució...

Page 94: ...e seleccionado Para obtener detalles acerca de estos ajustes consulte Lista de parámetros página A 14 1 Configure el piano digital con el tono ritmo y otros ajustes que desee guardar 2 Mientras mantiene presionado el botón ct STORE realice la siguiente operación Utilice los botones bs w q para seleccionar el banco en donde desea almacenar los datos y a continuación presione el botón REGISTRATION c...

Page 95: ...rarán los ajustes del piano digital de manera automática Ejemplo Cuando se llaman los datos de registro del banco 4 área 1 La función de acompañamiento congelado le permite especificar los ajustes de acompañamiento que deben permanecer sin alterar cada vez que se aplica una configuración de registro Para obtener detalles consulte Pantalla SYSTEM SETTING en Configuración de los ajustes del piano di...

Page 96: ... datos de ejecución en el teclado Los datos de ejecución en el teclado se graban en la unidad flash USB como datos de audio Los datos de ejecución en el teclado pulsación liberación de las teclas presión de pulsación etc se graban como datos MIDI El tamaño de los datos MIDI es mucho más pequeño que los datos de audio facilitando su posterior edición en un PC etc Capacidad de grabación admisible ap...

Page 97: ...adora de audio reproduce la forma de onda del sonido grabado como datos de audio Grabador MIDI Grabadora de audio Lo que puede hacer Grabar en una pista mientras se está reproduciendo la otra pista Pista del sistema Ejecución en el teclado 3 Mientras se está reproduciendo Pista 1 Ejecución en el teclado Lo que puede hacer Grabar la interpretación mientras se reproduce una canción grabada con el gr...

Page 98: ...n los datos grabados El botón 4 MIDI a se ilumina mientras la grabación está en curso 6 Una vez completada la grabación toque Y Esto hace que las luces de los botones 3 REC MODE y 4 MIDI a se apaguen y se accederá al modo de reproducción También podrá ingresar al modo de grabación presionando el botón 3 REC MODE y tocando a continuación MIDI RECORDER Si ingresa al modo de grabación mediante este m...

Page 99: ...atos de pista compatibles A continuación se describen los datos que podrán grabarse en cada tipo de pista Pista del sistema pistas 01 a 16 Ejecución en el teclado 1 ajuste del tono del teclado 1 operación del pedal y de la rueda de inflexión de altura tonal ajustes del mezclador excepto activación desactivación de parte Pista del sistema solamente Ritmo ajuste de balance ajuste de efecto reverbera...

Page 100: ... la grabación punch in toque Punch Out Erase 4 Toque X Se iniciará la reproducción de la pista seleccionada 5 Cuando la reproducción llegue al punto en el cual desea volver a grabar toque en el teclado la s nota s que desea Con esto se inicia la grabación punch in y por lo tanto continúe tocando Si realiza una operación de pedal o de la rueda de inflexión de altura tonal se iniciará la grabación p...

Page 101: ...te procedimiento para especificar un área de grabación punch in que incluya una parte de un compás Ejemplo Para volver a grabar desde el tiempo 3 del compás 2 hasta el tiempo 1 del compás 4 1 Utilice el grabador MIDI para comenzar a reproducir la canción que contiene la sección que desea volver a grabar 2 Cuando la reproducción llegue al punto en el que desea iniciar la grabación punch in toque Se...

Page 102: ...RDER Con esto se visualizará la pantalla MIDI RECORDER 2 Toque el nombre del archivo 3 Toque la pestaña User para reproducir los datos MIDI guardados en la memoria del piano digital o la pestaña Media para reproducir desde una unidad flash USB 4 Toque los datos MIDI que desea reproducir 5 Toque X Con esto se iniciará la reproducción También es posible iniciar la reproducción presionando el botón 4...

Page 103: ...Beat o Tick para el punto A podrá utilizar los botones bs w q para realizar el ajuste 3 Cuando la reproducción llegue al fin de la sección que se desea repetir toque Set B De esta forma el compás que se estaba reproduciendo al tocar Set B quedará como compás de fin También puede realizar ajustes finos en el punto de fin Después de tocar Measure Beat o Tick para el punto B podrá utilizar los botone...

Page 104: ...copia toque No 1 En la pantalla MENU toque MIDI RECORDER 2 Toque el nombre de los datos 3 Toque User Data Edit 4 Toque Delete 5 Toque los datos que desea borrar 6 Toque Execute 7 Toque Yes Se borrarán los datos MIDI seleccionados Para cancelar la operación de borrar toque No 1 En la pantalla MENU toque MIDI RECORDER 2 Toque Monitor 3 Toque Edit 4 Toque Rename 5 Toque la pista cuyo nombre desea cam...

Page 105: ...ad flash USB e incluso se podría dañar el puerto de la unidad flash USB PREPARACIÓN Asegúrese de formatear la unidad flash USB en el piano digital antes del uso Si desea más información consulte Unidad flash USB en la página ES 49 1 Inserte la unidad flash USB en el puerto de la unidad flash USB del piano digital Cuando se realiza una operación con la unidad flash USB o se enciende el piano digita...

Page 106: ...ón 5 AUDIO a esté parpadeando o esté iluminada Si lo hiciese se interrumpirá la grabación y se podrán dañar los datos 5 Para detener la grabación toque Y También se puede ingresar al modo de grabación presionando el botón 3 REC MODE y tocando a continuación AUDIO RECORDER 1 En la pantalla MENU toque AUDIO RECORDER 2 Toque 0 para ingresar al modo de grabación 3 Toque X 4 Presione el botón 4 MIDI a ...

Page 107: ...a en cuenta que la operación de borrado no puede revertirse Cerciórese de que ya no necesita los datos contenidos en la memoria del piano digital antes de realizar los siguientes pasos 1 En la pantalla MENU toque AUDIO RECORDER 2 Toque el nombre del archivo 3 Toque Delete 4 Toque los datos que desea borrar 5 Toque Execute 6 Toque Yes Se borrarán los datos de audio seleccionados Para cancelar la op...

Page 108: ... pedal y de MIDI y otros Esto significa que puede ajustar la operación del piano digital a sus necesidades específicas 1 En la pantalla MENU toque el menú de los ajustes que desee configurar 2 Toque el elemento cuyo ajuste desea cambiar 3 Utilice el dial br o los botones bs w q para cambiar el ajuste br bs bt Configuración de los ajustes del piano digital CGP700 ES 1B indd 109 2017 09 08 12 54 32 ...

Page 109: ...amiento automático Para obtener más información consulte Uso del acompañamiento automático página ES 20 Elemento Descripción Ajuste Upper 1 Upper 2 Lower 1 Lower 2 Activa o desactiva cada parte y especifica su tono Off On Octave Cambia el rango de cada parte en unidades de octavas 2 a 0 a 2 Auto Harmonize Consulte la página ES 24 Desactivar Activar Duet Consulte la página ES 16 Desactivar Activar ...

Page 110: ...a página ES 17 0 a 127 Keyboard Volume Ajusta el nivel de volumen de todas las partes que se controlan mediante el teclado 0 a 127 Accomp Volume Ajusta el nivel de volumen del acompañamiento automático sin cambiar el nivel de volumen del tono del teclado 0 a 127 MIDI Volume Ajusta el nivel de volumen de los datos MIDI sin cambiar el nivel de volumen del tono del teclado 0 a 127 Audio Volume Ajusta...

Page 111: ...eros y temas musicales Para obtener más información consulte Preajustes musicales página ES 26 Elemento Descripción Ajuste Brilliance Permite controlar la brillantez del tono 3 a 0 a 3 Reverb Type Especifica el tipo de reverberación a aplicar Room1 Room2 Room3 Hall1 Hall2 Hall3 Plate1 Plate2 Plate3 Delay Pan Delay Large Room1 Large Room2 Stadium1 Stadium2 Long Delay1 Long Delay2 Chorus Type Especi...

Page 112: ...h Response está desactivado 0 a 127 Metronome Beat Especifica el número de tiempos por compás del metrónomo 0 a 9 Accomp Freeze Puede utilizar Accomp Freeze para especificar los ajustes de acompañamiento que deben permanecer sin alterar cada vez que se aplica una configuración de registro Para obtener detalles consulte Lista de parámetros página A 14 Off On Tuning Aumenta o disminuye la altura ton...

Page 113: ...r a encenderlo Cuando se selecciona Off los ajustes vuelven a sus ajustes iniciales predeterminados cada vez que se enciende el piano digital Off On Auto Power Off Especifica si se habilita On o deshabilita Off el Apagado automático página ES 7 Off On Factory Reset Esta pantalla le permite restaurar los ajustes y datos almacenados del piano a sus valores predeterminados de fábrica Elemento Descrip...

Page 114: ...entésimas la altura tonal de las notas de cada parte 99 a 0 a 99 Bend Range Ajusta el rango de inflexión de cada parte en pasos de semitonos 0 a 24 Reverb Send Determina el grado de reverberación que se aplicará a cada parte Cuando este ajuste es 0 no se aplica ninguna reverberación mientras que cuando es 127 se aplica el máximo de la reverberación 0 a 127 Chorus Send Determina el grado de coro qu...

Page 115: ...s MIDI de ejecución del teclado a un dispositivo externo canal del teclado 01 a 16 Accomp Out Active este ajuste para enviar a un dispositivo externo los datos MIDI correspondientes al acompañamiento automático Off On Chord Judge Selecciona si se realizará o no la entrada de acordes al recibir un mensaje de activación de nota MIDI para el teclado de acordes de acompañamiento automático Off On Hi R...

Page 116: ...ital se guardan tal como están en un unidad flash USB como un archivo MIDI SMF Formato 0 Los datos estándar de audio archivos WAV de un PC también pueden guardarse en una unidad flash USB y reproducirse en el piano digital Las interpretaciones en el piano digital pueden grabarse directamente en una unidad flash USB Para obtener detalles consulte Grabación en una unidad flash USB Grabadora de audio...

Page 117: ...os El piano digital realiza el formateo con una operación de formateo rápido Si desea borrar completamente todos los datos de la unidad flash USB formatéela en su PC o mediante algún otro dispositivo Unidades flash USB compatibles Este piano digital es compatible con unidades flash USB en formato FAT32 Si su unidad flash USB está formateada para un sistema de archivos diferentes utilice la función...

Page 118: ... Complete en la pantalla Para cancelar la operación de almacenamiento toque No Puede utilizar el siguiente procedimiento para cargar los datos de una unidad flash USB en la memoria del piano digital Ponga los datos archivo de datos que desea cargar en la carpeta MUSICDAT de la unidad flash USB 1 Inserte la unidad flash USB en el puerto de la unidad flash USB del piano digital 2 En la pantalla MENU...

Page 119: ... 5 Toque los datos que desea borrar 6 Toque Execute Se visualizará el mensaje de confirmación de borrado Sure 7 Toque Yes El mensaje Please Wait permanece visualizado en la pantalla mientras se está ejecutando la operación No ejecute ninguna operación mientras se está visualizando este mensaje Una vez completado el borrado de los datos aparecerá Complete en la pantalla Para cancelar la operación d...

Page 120: ...onexión incorrecta puede imposibilitar la transmisión y recepción de datos 1 Apague el piano digital y luego arranque su PC No inicie aún el software musical en su PC 2 Luego de iniciar su PC utilice un cable USB disponible comercialmente para conectarlo al piano digital 3 Encienda el piano digital Si es la primera vez que conecta el piano digital a su PC el software de controlador requerido para ...

Page 121: ...al Instrument Digital Interface Interfaz Digital de Instrumentos Musicales una norma utilizada mundialmente para las señales digitales y conectores que hacen posible el intercambio de datos musicales entre instrumentos musicales y PC producidos por distintos fabricantes Para obtener más información sobre las especificaciones MIDI de este piano digital consulte el documento Implementación MIDI en e...

Page 122: ...armado del soporte requiere por lo menos dos personas que trabajen en equipo Tenga en cuenta que el piano digital es bastante pesado Para trasladarlo pida por lo menos a una persona que le ayude y proceda con cuidado El armado de este soporte debe realizarse sobre una superficie plana Durante el armado tenga la precaución de no pillarse los dedos entre las piezas Asegúrese de insertar un trozo de ...

Page 123: ...e los tornillos con las tapas G 5 Monte el piano sobre el soporte A fin de no pillarse los dedos entre el piano y el soporte tome el piano por sus laterales no por sus extremos en los lugares marcados con estrellas en la ilustración 6 En primer lugar utilice los dos tornillos de mariposa H para asegurar el respaldo del piano al soporte A continuación utilice los dos tornillos I para asegurar la pa...

Page 124: ...iente doméstico tal como se muestra en la siguiente ilustración Utilice los anclajes antivuelco para evitar el vuelco del soporte cuando no esté colocado contra una pared etc 1 Quite los tornillos de anclaje de la superficie interior de los paneles laterales dos tornillos por cada panel cuatro en total y a continuación cambie la posición de los anclajes como se muestra en la ilustración 2 Vuelva a...

Page 125: ...frecer protección durante el embarque Retire la cinta protectora antes de utilizar el piano digital Inserte la base del atril en la ranura situada en la parte superior de la consola del piano digital Extracción de la cinta protectora del teclado Instalación del atril CGP700 ES 1B indd 126 2017 09 08 12 54 33 ...

Page 126: ...ny Files 1 Hay demasiados archivos en la unidad flash USB 1 Borre algunos de los archivos de la unidad flash USB para dejar espacio para los datos nuevos 2 Hay un archivo con el nombre TAKE99 WAV en la carpeta MUSICDAT 2 Borre el archivo WAV de la carpeta MUSICDAT Not SMF01 Está intentando reproducir datos de canciones en Formato 2 de SMF Este piano digital solo permite la reproducción en formato ...

Page 127: ...e las notas no cambia aún después de alterar la presión aplicada a las teclas Está activada la función Auto Resume Desactive Auto Resume A continuación apague el teclado y vuelva a encenderlo ES 46 No puedo transferir los datos después de conectar el piano digital a un PC 1 Compruebe que el cable USB esté conectado al piano digital y al PC y que se haya seleccionado el dispositivo correcto con el ...

Page 128: ...ealiza una operación de botón durante la ejecución en el modo Dúo acompañamiento automático grabador u otras funciones cuando el piano digital cambia los efectos de tono internos Esto no es ningún signo de anomalía Aunque toque en diferentes rangos del teclado las notas no cambian de octavas Las gamas de ciertos tonos están limitadas o sea que las octavas cambian de manera normal hasta una cierta ...

Page 129: ...abadora de audio Grabación y reproducción en tiempo real con la unidad flash USB PCM lineal 16 bits 44 1 kHz formato WAV estéreo Canciones 100 archivos El tiempo de grabación máximo por archivo es de aproximadamente 74 minutos Nivel de volumen del grabador de audio Ajustable Registro 96 4 configuraciones 24 bancos Metrónomo Tiempos 0 a 9 Rango de tempo 20 a 255 Nivel de volumen del metrónomo Ajust...

Page 130: ... Salida 20 W 20 W Requisitos de alimentación Adaptador de CA AD E24250LW Apagado automático Aproximadamente 4 horas después de la última operación Es posible deshabilitar el apagado automático Consumo de energía 24 V 20 W Dimensiones Piano digital y soporte 132 2 An 29 3 Pr 76 3 Al cm Peso Piano digital y soporte Aproximadamente 25 7 kg CGP700 ES 1B indd 131 2017 09 08 12 54 34 ...

Page 131: ...do toque de noche para mantener el volumen a niveles que no molesten a los vecinos Otras medidas que podría tomar cuando toque en horas avanzadas de la noche serían cerrar las ventanas y utilizar auriculares Se prohibe la reproducción del contenido de este manual ya sea de forma íntegra o parcial Según las leyes de los derechos de autor queda prohibido el uso del contenido de este manual sin el co...

Page 132: ... salida de carga eléctrica exceda de la carga nominal indicada en la etiqueta 12 Asegúrese de que el área circundante esté seca antes de conectar a una fuente de alimentación 13 Asegúrese de que el producto esté correctamente orientado 14 Desenchufe el producto durante tormentas eléctricas o cuando no vaya a utilizarse por un período de tiempo prolongado 15 No bloquee ninguna de las aberturas de v...

Page 133: ... and its documentation for any purpose is hereby granted without fee provided that the above copyright notice appear in all copies and that both that copyright notice and this permission notice appear in supporting documentation Silicon Graphics makes no representations about the suitability of this software for any purpose It is provided as is without express or implied warranty Permission to use...

Page 134: ... 1 4 22 O 031 PHASER E PIANO 2 4 23 O 032 AMP E PIANO 1 4 24 O 033 AMP E PIANO 2 4 25 O 034 CRUNCH E PIANO 4 26 O 035 DIZZY E PIANO 4 27 O 036 ANALOG E PIANO 1 5 11 O 037 ANALOG E PIANO 2 5 12 O 038 OFF VELO CLAVI 1 7 2 039 OFF VELO CLAVI 2 7 3 040 CLAVI 1 7 4 041 CLAVI 2 7 5 042 CLAVI 3 7 6 043 CLAVI 4 7 7 044 WAH CLAVI 1 7 8 O 045 WAH CLAVI 2 7 9 O 046 CRUNCH CLAVI 7 10 O 047 VIBRAPHONE 1 11 2 O...

Page 135: ...1 PIZZICATO STRINGS 45 2 012 CHAMBER 48 10 013 OCTAVE STRINGS 48 11 014 ORCHESTRA PAD 48 12 Group Number Número de grupo Tone Name Nombre del tono Program Change Cambio de programa Bank Select MSB MSB de selección de banco DSP 015 SYNTH STRINGS 1 50 2 O 016 SYNTH STRINGS 2 50 3 017 SYNTH STRINGS 3 51 2 018 70 S SYNTH STR 50 4 019 80 S SYNTH STR 50 5 020 FAST SYNTH STRINGS 50 6 021 SLOW SYNTH STRIN...

Page 136: ... VA SYNTH PAD 3 90 8 O 060 POLY SAW 90 9 Group Number Número de grupo Tone Name Nombre del tono Program Change Cambio de programa Bank Select MSB MSB de selección de banco DSP 061 BRIGHT SAW PAD 1 90 10 062 BRIGHT SAW PAD 2 90 11 063 SPACE CHOIR 91 2 064 STAR VOICE 91 3 O 065 GLASS PAD 92 2 066 BOTTLE PAD 92 3 067 ETHNIC PAD 93 2 068 METAL PAD 93 3 069 HALO PAD 94 2 070 SWEEP PAD 95 2 071 RAIN DRO...

Page 137: ... 78 0 080 GM OCARINA 79 0 081 GM SQUARE LEAD 80 0 082 GM SAW LEAD 81 0 Group Number Número de grupo Tone Name Nombre del tono Program Change Cambio de programa Bank Select MSB MSB de selección de banco DSP 083 GM CALLIOPE 82 0 084 GM CHIFF LEAD 83 0 085 GM CHARANG 84 0 086 GM VOICE LEAD 85 0 087 GM FIFTH LEAD 86 0 088 GM BASS LEAD 87 0 089 GM FANTASY 88 0 090 GM WARM PAD 89 0 091 GM POLYSYNTH 90 0...

Page 138: ...signed to each keyboard key when a drum set is selected Con algunos tonos de guitarra si toca en el rango más bajo extremo izquierdo o más alto extremo derecho podrían escucharse sonidos de rasgueo de armónicos u otros sonidos de ejecución característicos incluidos en las notas Consulte Lista de asignación de batería de la página A 6 para obtener información acerca de los instrumentos de percusión...

Page 139: ...t Hip Hop Pedal Hi Hat Hip Hop Open Hi Hat Room Kick 2 Room Kick 1 Room Snare 1 Room Snare 2 Room Low Tom 2 Room Low Tom 1 Room Mid Tom 2 Room Mid Tom 1 Room High Tom 2 Room High Tom 1 Power Kick 2 Power Kick 1 Power Snare 1 Power Snare 2 Room Low Tom 2 Room Low Tom 1 Room Mid Tom 2 Room Mid Tom 1 Room High Tom 2 Room High Tom 1 Rock Kick 2 Rock Kick 1 Rock Side Stick Rock Snare 1 Rock Snare 2 Roc...

Page 140: ...g Gu High Tang Gu C6 D6 E6 F6 G6 A6 B6 C7 D7 E7 F7 G7 A7 B7 C8 D8 E8 F8 G8 A8 B8 C9 D9 E9 F9 G9 85 87 89 90 92 94 96 97 99 101 102 104 106 108 109 111 113 114 116 118 120 121 123 125 126 128 C 6 E 6 F 6 A 6 B 6 C 7 E 7 F 7 A 7 B 7 C 8 E 8 F 8 A 8 B 8 C 9 E 9 F 9 86 88 91 93 95 98 100 103 105 107 110 112 115 117 119 122 124 127 STANDARD SET 1 STANDARD SET 2 STANDARD SET 3 STANDARD SET 4 DANCE SET T...

Page 141: ...ROLL 020 50 s PIANO ROCK 021 50 s ROCK 022 NEW ORLNS R R Dance 001 PIANO HIP HOP 002 HIP HOP 003 DANCE POP 004 DISCO POP 005 TECHNO POP 006 TRANCE 007 MODERN R B 008 MODERN DANCE 009 DISCO SOUL Jazz 001 SLOW BIG BAND 002 MIDDLE BIG BAND 003 FAST BIG BAND 004 ORCHESTRA SWING 005 SWING 006 SLOW SWING 007 JAZZ WALTZ 008 FOX TROT 009 QUICKSTEP 010 JAZZ COMBO 1 European 001 SCHLAGER 002 POLKA 003 WALTZ...

Page 142: ...UFFLE 2 007 FINGER PICKING COUNTRY 008 COUNTRY WALTZ 009 BLUEGRASS Various 001 CHRISTMAS SONG 002 CHRISTMAS WALTZ 003 SCREEN SWING 004 SYMPHONY 005 STR QUARTET Ballad 001 PIANO ROCK BALLAD 002 90 s BALLAD 003 MODERN BALLAD 004 ELECTRIC BALLAD 005 SLOW BALLAD 1 Group Number Número de grupo Rhythm name Nombre del ritmo 006 SLOW BALLAD 2 007 R B BALLAD 008 16 BEAT BALLAD 009 BRUSH BALLAD 010 POP BALL...

Page 143: ...006 60 s Rock 1 007 60 s Rock 2 008 60 s Rock 3 009 60 s Rock 4 010 60 s Rock 5 011 Get Rock 012 Honky Rock 013 Wild Rock 014 Alligator 015 Movie Rock 016 Pop Rock 017 16Bt Shuffle 018 Heat Up 019 Hard Rock 020 Grunge Rock 021 Modern Rock 022 R R 023 Piano R R 024 Blues 025 8 Bars Blues 026 Riff Rock 1 027 Riff Rock 2 028 Riff Rock 3 Jazz 001 My Swing 002 Your Things 003 Angel 004 Time Passes 005 ...

Page 144: ...50 s Country Group Number Número de grupo Preset Name Nombre de preajuste 004 70 s Country 005 60 s Folk 006 Tree 007 A Friend 008 Cowboy 009 Country Bld1 010 Country Bld2 011 Country Bld3 012 CountryWaltz 013 Mdrn Country Ballad 001 Love Ballad 002 R B Ballad 003 Soul Ballad 004 Blues Ballad 005 MovieBallad1 006 MovieBallad2 007 MovieBallad3 008 Xmas Ballad 009 Love Me 010 Oldies Bld 1 011 Oldies...

Page 145: ...Fingered 2 se interpreta como Am7b5 3En algunos casos no se puede usar de forma invertida 4No es compatible con Full Range Chord C Cm Cdim Caug 3 C 5 Csus4 3 Csus2 3 C7 Cm7 3 CM7 CmM7 Cdim7 3 CdimM7 C7 5 3 Cm7 5 3 CM7 5 Caug7 CaugM7 C7sus4 C6 1 3 Cm6 2 3 Cadd9 Cmadd9 C69 3 Cm69 3 C7 9 C7 9 C7 9 C7 11 C7 13 C7 13 Cm7 9 Cm7 11 3 CM7 9 CmM7 9 C5 C8 Root and 5th only 4 La raíz y la 5ta solamente 4 Roo...

Page 146: ...ange Chord requires pressing of at least three keys to form a chord Con Fingered 3 la nota más baja digitada se interpreta como nota base No se pueden usar formas invertidas Con Full Range Chord cuando la nota digitada más baja se encuentre a cierta distancia de la nota adyacente el acorde se interpreta como un acorde bitonal A diferencia de Fingered 1 2 y 3 Full Range Chord requiere la pulsación ...

Page 147: ...ment O Stretch Tuning O Brightness O Operation Lock O Auto Resume O N Gate Thrash O Duet On Off O O O O O 3 Octave O O Duet Pan O O Controller Upper 1 Pedal O O Upper 2 Pedal O O Lower 1 Pedal O O Lower 2 Pedal O O Bend Range O O MIDI Keyboard Channel O Accomp Out O Chord Judge O Hi Res Vel Out O Local Control MIDI In Port O Main Tone Setting Split Point O O Transpose O O Part On Off O O O O O Par...

Page 148: ... 15 Chord Example List Lista de ejemplos de acordes A B B F G G G A A F C C D D D E E Root Chord Type M m dim aug 5 sus4 sus2 7 m7 M7 mM7 dim7 dimM7 7 5 m7 5 M7 5 aug7 augM7 7sus4 CGP700 ES 1B indd 149 2017 09 08 12 54 39 ...

Page 149: ... 11 7 13 7 13 m7 9 m7 11 M7 9 mM7 9 5 8 Since the chord input range is limited this model may not support some of the chords shown above Debido a que el rango de entrada de acordes es limitado es posible que este modelo no admita algunos de los acordes mostrados arriba CGP700 ES 1B indd 150 2017 09 08 12 54 41 ...

Page 150: ...to Harmonize 6 In 6 7 In 7 8 In 8 9 In 9 10 In 10 11 In 11 12 In 12 13 In 13 14 In 14 15 In 15 16 In 16 Part No Nº de la parte MIDI Channel Canal MIDI 1 Function Función 1 In 1 MIDI Recorder Solo Track 1 2 In 2 MIDI Recorder Solo Track 2 3 In 3 MIDI Recorder Solo Track 3 4 In 4 MIDI Recorder Solo Track 4 5 In 5 MIDI Recorder Solo Track 5 6 In 6 MIDI Recorder Solo Track 6 7 In 7 MIDI Recorder Solo ...

Page 151: ... as you read the contents of the manual Recorte esta página por la línea de puntos para tenerla a mano mientras continúa leyendo este manual CGP 700 br bt ck cm cn cr cs ct co cp 3 1 7 2 8 9 bo bp bq bk bl bm cq 4 5 6 cl bs CGP700 ES 1B indd 153 2017 09 08 12 54 41 ...

Page 152: ...ON Note OFF Mode Mode 3 X Mode 3 X Default Messages Altered 0 32 1 5 6 38 7 10 11 16 17 18 19 64 65 66 Bank select Modulation Portamento Time Data entry LSB MSB 2 Volume Pan Expression DSP Parameter0 2 DSP Parameter1 2 DSP Parameter2 2 DSP Parameter3 2 Damper Portamento Switch Sostenuto S f O O O O O O O O O O O O O O O X X O O X X X X X X O X O Model CGP 700 Version 1 0 no relation sin relación M...

Page 153: ...elect Modulation Portamento Time Data entry LSB MSB 2 Volume Pan Expression DSP Parameter0 2 DSP Parameter1 2 DSP Parameter2 2 DSP Parameter3 2 Damper Portamento Switch Sostenuto Soft pedal Vibrato rate Vibrato depth Vibrato delay DSP Parameter4 2 DSP Parameter5 2 DSP Parameter6 2 DSP Parameter7 2 Portamento Control High resolution velocity prefix 3 Reverb send Chorus send Delay send RPN LSB MSB 2...

Page 154: ...e seguridad Antes de intentar usar el piano digital asegúrese de leer las Precauciones de seguridad separadas USER S GUIDE GUÍA DEL USUARIO Please keep all information for future reference Guarde toda información para tener como referencia futura English Español CGP 700 MA1709 B Printed in China C CGP700 ES 1B indd 1 2017 09 08 12 54 22 B ...

Reviews: