background image

EN-3

Overview and Setup

*

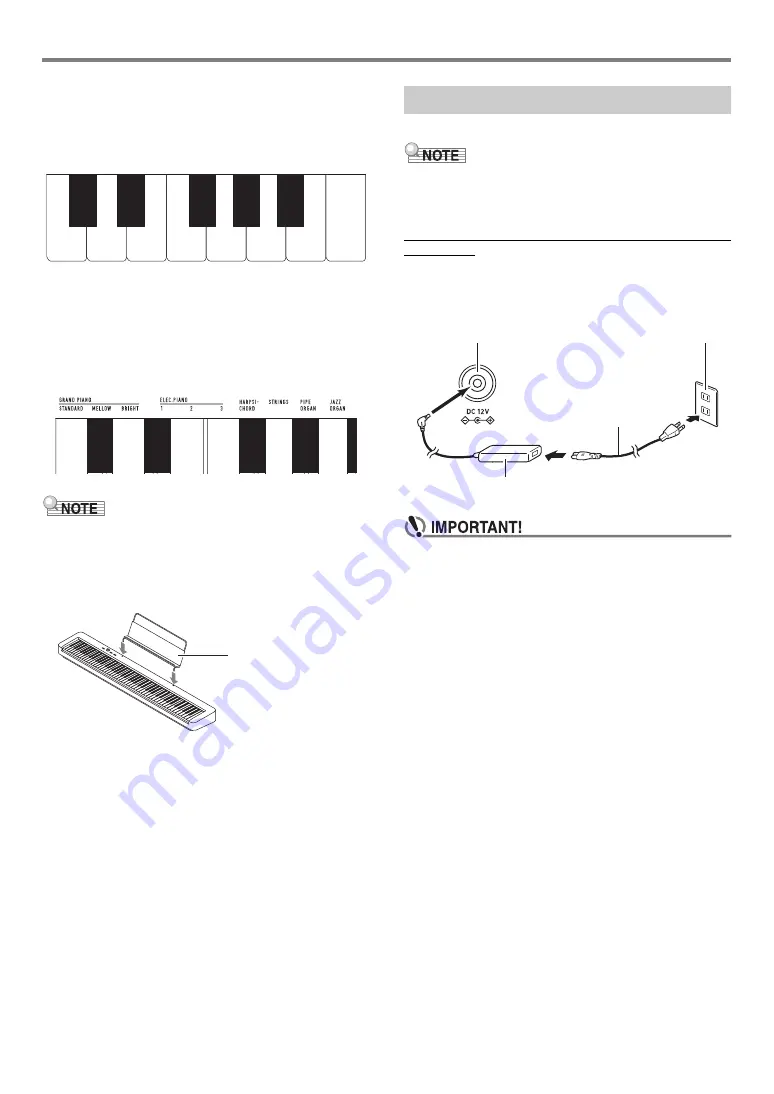
1 Keyboard note names and pitches

The keyboard note names and pitches used in this manual 
follow the international standard. Middle C is C4, the lowest C 
is C1, and the highest C is C8. The illustration below (C4 
through C5) shows keyboard key note names.

*

2 Functions assigned to keys

While holding down the 

3

FUNCTION

 button, you can use 

these keys to change settings, such as the currently selected 
tone, etc. Most of the functions that can be changed using 
keyboard keys are marked above the keyboard. For example, 
tone names assigned to the TONE setting keys (C3 to A3) are 
marked above the keys.

• Note that some assigned functions are not marked above 

the keys. For information about all of the functions that are 
assigned to keyboard keys, refer to the “

Keyboard Function 

List

” (page 

EN-28

).

Preparing the Music Stand

Your Digital Piano uses an AC adaptor for power.

• Though this Digital Piano supports battery operation, use of 

an AC adaptor is generally recommended.

Using the AC Adaptor

Make sure that you use only the AC adaptor specified for this 
Digital Piano. Use of a different type AC adaptor can cause 
smoking or malfunction.

• Never connect the AC adaptor (JEITA Standard, with 

unified polarity plug) that comes with this Digital Piano 
to any other device besides this Digital Piano. Doing so 
creates the risk of malfunction.

• Be sure to turn off Digital Piano power before 

connecting or disconnecting the AC adaptor.

• The AC adaptor will become warm to the touch after 

very long use. This is normal and does not indicate 
malfunction.

C4

D4

E4

F4

G4

A4

B4

C5

C

4

E

D

4

F

4

A

D

4

B

D

4

Music stand

Preparing a Power Supply

Specified AC Adaptor:  AD-A12150LW

(JEITA Standard plug)

Household power outlet

AC adaptor

bk

DC 12V

Power cord

Summary of Contents for CDP-S160

Page 1: ...ing Power On or Off Connecting a Pedal Using Headphones Selecting a Tone Splitting the Keyboard for Duet Play Changing the Pitch in Semitone Steps Transpose Fine Tuning a Pitch Tuning Listening to Dem...

Page 2: ...onal Accessories Use only accessories that are specified for use with this Digital Piano Use of unauthorized accessories creates the risk of fire electric shock and personal injury You can get informa...

Page 3: ...s operation Overview and Setup General Guide 1 P Power button 2 VOLUME knob 3 GRAND PIANO FUNCTION button 4 a RECORD button 5 USB Type B port 6 DAMPER PEDAL jack 7 PEDAL UNIT jack 8 PHONES OUTPUT jack...

Page 4: ...he Keyboard Function List page EN 28 Preparing the Music Stand Your Digital Piano uses an AC adaptor for power Though this Digital Piano supports battery operation use of an AC adaptor is generally re...

Page 5: ...ptor does not become covered with a newspaper table cloth curtain or any other type of fabric If you do not plan to use the Digital Piano for a long time unplug the AC adaptor from the power outlet Th...

Page 6: ...long time or if there is a lightning storm in your area be sure to unplug the AC adaptor from the power outlet Turning off power causes the Digital Piano settings to return to their initial defaults T...

Page 7: ...rent function see To change the functions assigned to pedals page EN 7 You can connect the optionally available 3 Pedal Unit SP 34 to the 7 PEDAL UNIT jack on the back of the Digital Piano You can the...

Page 8: ...ting was not changed 2 Release 3 FUNCTION Using headphones cuts off output from the built in speakers which means you can practice playing even late at night without disturbing others Be sure to turn...

Page 9: ...nable or disable Auto Power Off page EN 5 The Digital Piano has 10 built in tones In addition to using a single tone you can also select two different tones and sound them together Use the Tone keyboa...

Page 10: ...F 3 and then the STRINGS key G3 Pressing the first keyboard key for the first tone will cause a short beep to sound and press the key for the second tone will cause a short and then long beep to soun...

Page 11: ...you pressed is now enabled Pressing a keyboard key outside the range of setting keys will cause a high and then low beep to sound indicating that the setting was not changed 2 Release 3 FUNCTION To ad...

Page 12: ...tempo You can specify a metronome tempo in the range of 20 to 255 beats per minute bpm Always input three digits To specify a two digit value input zero 0 for the unused leading digit 1 While holding...

Page 13: ...board E 4 and D4 keys at the same time until a long beep sounds 2 Release 3 FUNCTION You can split the keyboard in the center for duet play so the left and right sides have the same ranges The Duet Mo...

Page 14: ...egister of the left keyboard press the DUET L OCT keyboard key C6 2 Within the range of the left keyboard press the C key where you want middle C C4 to be located This will cause a short and then long...

Page 15: ...accidentally during recording operations CASIO COMPUTER CO LTD takes no responsibility for any damages lost profits or claims by third parties arising from the deletion of recorded data due to malfun...

Page 16: ...this point release 3 FUNCTION 2 Press the G7 Execute keyboard key This will cause a short and then long beep to sound indicating that the operation is complete 3 Release 3 FUNCTION To delete a record...

Page 17: ...a commercially available USB cable to connect the smart device s USB port with the Digital Piano s USB Type B port After connecting the smart device to the Digital Piano use the smart device app to pe...

Page 18: ...to adjust to a key that better matches a vocalist etc You can change the transpose setting within the range of 12 semitones to 0 to 12 semitones To change the transpose setting in semitone steps 1 Whi...

Page 19: ...e For example to specify a setting 8 semitones press keyboard keys in the following sequence 0 E4 3 8 C5 Inputting the second and final digit will cause a short and then long beep to sound indicating...

Page 20: ...ey A 5 to raise the pitch by 0 1 Hz Each press of the keyboard key causes a beep to sound The beep becomes higher whenever a key operation causes the setting value to become an integer You can specify...

Page 21: ...NOTE B 5 keyboard key 2 Play the keyboard key of the note you want to specify as the base note For example to specify F as the base note you would press keyboard key F5 or F4 or F6 Specifying a base n...

Page 22: ...ollowing sequence 0 E4 3 8 C5 Inputting the second and final digit will cause a short and then long beep to sound indicating that the value you input was applied You can also raise or lower the channe...

Page 23: ...on requires commercially available connecting cords supplied by you The connecting cords should have a 3 pole stereo mini plug on one end and a plug that matches the configuration of the external devi...

Page 24: ...Turn off the Digital Piano and then start up your computer Do not start up the music software on your computer yet 2 After starting up your computer use a commercially available USB cable to connect i...

Page 25: ...topping Turn power off and then back on to initialize all Digital Piano settings page EN 5 Replace the batteries with new ones or switch over to AC adaptor power page EN 3 Some notes are cut off while...

Page 26: ...cable is connected to the Digital Piano and computer and that the device is selected correctly with your computer s music software settings page EN 23 Turn off the Digital Piano and then exit the musi...

Page 27: ...to 12 semitones Tuning A4 415 5 Hz to 465 9 Hz Initial Default 440 0 Hz variable in 0 1 Hz steps Scale Tuning Temperament Equal 16 other types MIDI 16 channel multi timbre receive Inputs Outputs PHON...

Page 28: ...st Tone Name Program Change Bank Select MSB GRAND PIANO STANDARD 0 0 GRAND PIANO MELLOW 1 0 GRAND PIANO BRIGHT 2 0 ELEC PIANO 1 3 0 ELEC PIANO 2 4 0 ELEC PIANO 3 5 0 HARPSICHORD 6 0 STRINGS 7 0 PIPE O...

Page 29: ...N OFF B3 Tempo TEMPO C4 Beat BEAT C 4 Volume VOLUME D4 Tempo Beat Volume TEMPO BEAT VOLUME E 4 E4 0 F4 1 F 4 2 G4 3 A 4 4 A4 5 B 4 6 B4 7 C5 8 C 5 9 D5 Touch Response TOUCH RESPONSE E 5 Reverb REVERB...

Page 30: ...Ch s Velocity O 9nH v 1 127 O 9nH v 0 8nH v O 9nH v 1 127 O 8nH v 64 Note ON Note OFF Mode Mode 3 X Mode 3 X Default Messages Altered 0 1 5 6 38 7 10 11 64 65 66 Bank select Modulation Portamento Time...

Page 31: ...esonance Release time Attack time Brightness Portamento Control Reverb send level Chorus send level RPN LSB MSB Mode 1 OMNI ON POLY Mode 3 OMNI OFF POLY Mode 2 OMNI ON MONO Mode 4 OMNI OFF MONO O Yes...

Page 32: ...MA2106 A...

Reviews: