background image

Reference

EN-73

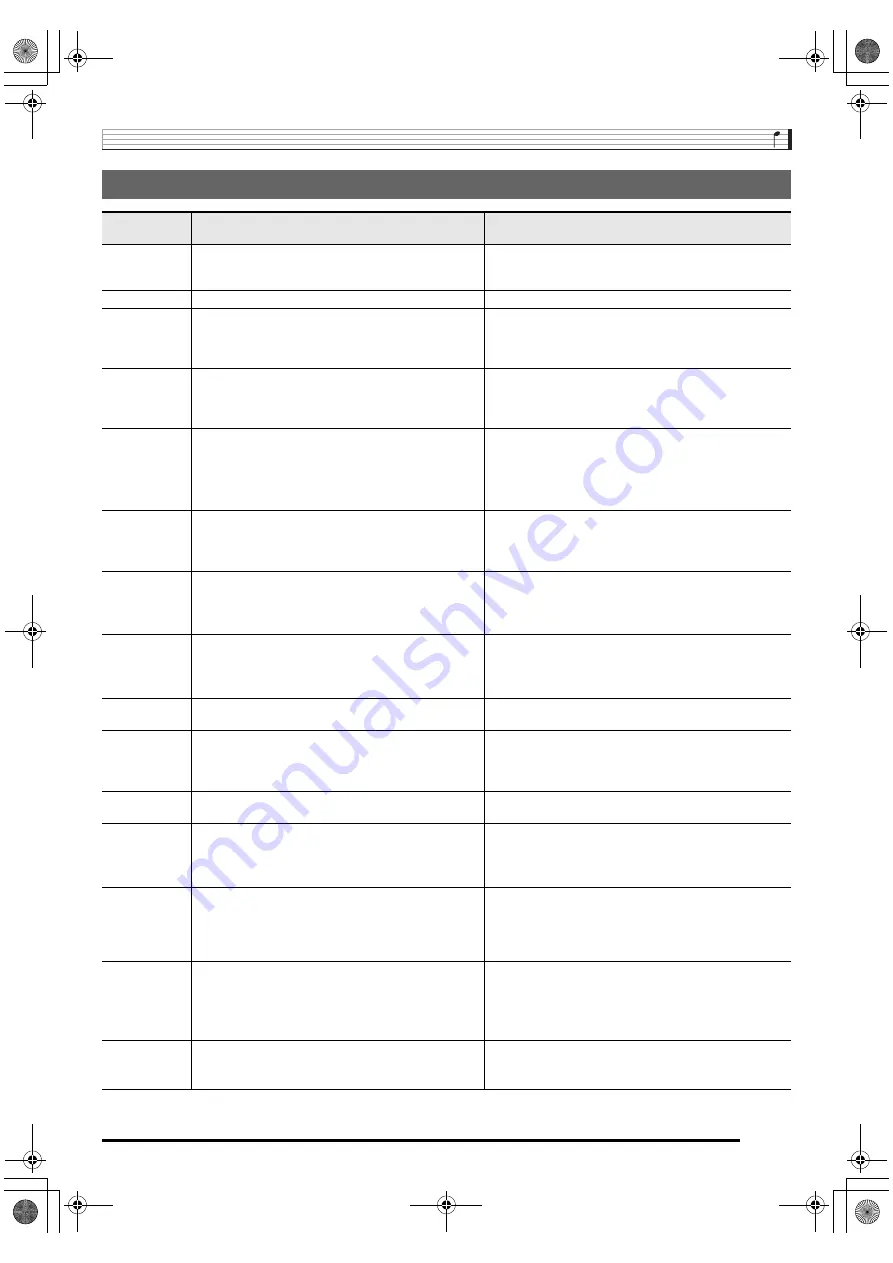
Error Messages

Display 

Message

Cause

Action

Err CardFull

There is not enough room available on the memory 
card.

• Delete some of the files on the memory card to make 

room for new data (page EN-62).

• Use a different memory card.

Err Card R/W

The memory card is damaged.

Use a different memory card.

Err Convert

There is not enough unused memory available to save 
recorded song data to a memory card as an SMF 0 
format file.

Delete some or all of the following user data from memory 
to make room for new data.
Sampled sounds (page EN-18), user rhythms (page 
EN-44), user songs (page EN-29)

Err Exist

A sampled drum set sound cannot be copied (page 
EN-23) to a keyboard key because the key already has 
a sampled sound assigned to it.

• Delete the sampled sound that is currently assigned to 

the key you are copying to (page EN-23).

• Copy the sampled sound to another key that does not 

yet have a sampled sound assigned to it.

Err Format

1. The format of the memory card is not compatible 

with this Digital Piano.

1. Format the memory card (page EN-59).

2. The memory card is damaged.

2. Use a different memory card.

3. You are trying to use an SDXC card.

3. SDXC cards are not supported. Use an SD or SDHC 

memory card.

Err Limit

The tone number you selected before starting sampling 
already has the allowable maximum of eight sampled 
sounds assigned to it.

• Delete the one or more of the sampled sounds 

currently assigned to the tone number (page EN-23).

• Select another tone number that has less than eight 

sampled sounds currently assigned to it (page EN-21).

Err Mem Full

1. There is not enough memory available to play back 

song data from a memory card.

Delete some or all of the following user data from memory 
to make room for new data.
Sampled sounds (page EN-18), user rhythms (page 
EN-44), user songs (page EN-29)

2. There is not enough memory available for sampling 

or Auto Accompaniment editing.

Err No Card

1. The memory card is not set correctly in the card slot. 1. Remove the memory card and reinsert it correctly 

(page EN-59).

2. The memory card was removed part way through a 

card access operation.

2. Never remove a memory card from the card slot while 

a card access operation is in progress.

Err No Data

There is no data in the selected user area (tone, 
rhythm, song number, etc.)

Select a Digital Piano user area that contains data.

Err No File

There is no folder named “MUSICDAT” on the memory 
card.

• Use a computer to create a folder named “MUSICDAT” 

on the memory card (page EN-61).

• Format the memory card on the Digital Piano (page 

EN-59).

Err NotSMF01

You are attempting to play back SMF Format 2 song 
data.

Playback of SMF Format 0 or 1 only is supported.

Err Protect

1. The memory card is write protected.

1. Adjust the memory card’s write protect switch to 

enable data storage.

2. Sampled sounds (Tone Numbers 701 to 708) are 

protected.

2. Unprotect one or more of the sampled sounds, which 

will allow it to be overwritten or deleted.

Err ReadOnly

You are attempting to save a file using the same name 
as an existing read-only file.

• Save the new file to a different card or use another 

name.

• Remove the read-only attribute of the exiting file on the 

memory card and try again.

• Use a different memory card.

Err SizeOver

1. The song data on the memory it too big to play back. 1. This Digital Piano can play back song data files with a 

maximum size of about 320Kbytes.

2. Auto Accompaniment editing cannot be performed 

because the accompaniment pattern or instrument 
part data is too large.

2. Select a different accompaniment pattern or 

instrument parts.

Err WrongDat

1. The data on the memory card is corrupted.

2. The data on the memory card is a type that is not 

supported by this Digital Piano.

CDP235R_e.book  73 ページ  2017年2月9日 木曜日 午後4時32分

Summary of Contents for CDP-235R

Page 1: ...nes de seguridad separadas Safety Precautions Before trying to use the Digital Piano be sure to read the separate Safety Precautions CDP235 ES 1A CDP 235R This recycle mark indicates that the packagin...

Page 2: ...allen into the apparatus the apparatus has been exposed to rain or moisture does not operate normally or has been dropped The apparatus shall not be exposed to dripping or splashing and that no object...

Page 3: ...8 Norderstedt Germany www casio europe com Declaration of Conformity According to EU Directive Any reproduction of the contents of this manual either in part or its entirety is prohibited Except for y...

Page 4: ...laying Them on the Digital Piano EN 18 Connection and Preparation EN 18 Sampling and Playing a Melody Sound Melody Sampling EN 19 Incorporating a Sampled Sound into a Drum Set Drum Sampling EN 21 Othe...

Page 5: ...rom a Memory Card into Digital Piano Memory EN 61 Deleting Data from a Memory Card EN 62 Playing Back Data from a Memory Card EN 63 Memory Card Error Messages EN 63 Connecting External Devices EN 64 C...

Page 6: ...m Digital Piano refers to the CDP 235R In this manual buttons and other controllers are identified using the numbers shown below 1 bo bn bp bq bs bt ck br 3 4 5 6 7 8 bk bl bm 9 2 cr cm dk dl dk dn do...

Page 7: ...29 38 9TEMPO buttons EN 12 28 41 bkRECORDER SAMPLING button EN 19 49 blRHYTHM EDITOR button EN 44 bmMETRONOME BEAT button EN 12 bnSONG BANK button EN 26 boRHYTHM ONE TOUCH PRESET button EN 37 41 bpTON...

Page 8: ...el em dt ds dpSD CARD SLOT EN 59 dqUSB port EN 64 drSUSTAIN ASSIGNABLE JACK EN 9 dsAUDIO IN jack EN 68 dtDC 12V terminal EN 9 ekPHONES OUTPUT jack EN 10 68 elMIC IN SAMPLING jack EN 18 emMIC VOLUME kn...

Page 9: ...the indicated pages for details about each function The tone and other parameters revert to their initial defaults whenever you turn on power page EN 10 Using the 10 key Pad br Number Buttons Example...

Page 10: ...e press 2 Keep bn SONG BANK and the 1 10 key br key depressed until the next step is complete 3 When the message Pls wait appears on the screen release bn SONG BANK and the 1 10 key br key You will be...

Page 11: ...ug or connector During Movement Before moving the Digital Piano be sure to unplug the AC adaptor from the power outlet During Storage Loop and bundle the power cord but never wind it around the AC ada...

Page 12: ...the Digital Piano in the standby state If you do not plan to use the Digital Piano for a long time or if there is a lightning storm in your area be sure to unplug the AC adaptor from the power outlet...

Page 13: ...n use the br 10 key 4 U and 6 I keys to display OTHER page EN 7 2 Press br 10 key 9 ENTER key 3 Use the br 10 key 4 U and 6 I keys to display Contrast 4 Use the br 10 key and keys to adjust the contra...

Page 14: ...are in each measure Use the following procedure to change the tempo of the metronome 1 Press 9 Use w slower and q faster to change the tempo setting Holding down either button changes the setting at...

Page 15: ...The tone of the instrument you selected will sound Pressing bt toggles between the piano and organ modes Each press of bt toggles the tone setting between a piano tone Tone Number 001 and an organ to...

Page 16: ...he procedure below to assign different tones to the right range and left range of the keyboard so it sounds like you are playing an ensemble between two instruments 1 Select the tone for the right sid...

Page 17: ...ou can change the duration of the reverb 1 Press ck FUNCTION and then use the br 10 key 4 U and 6 I keys to display Reverb page EN 7 2 Use the br 10 key and keys to select the reverb setting you want...

Page 18: ...te You can set a frequency within the range of 415 5 to 465 9 Hz The initial default setting is 440 0 Hz 1 Press ck FUNCTION and then use the br 10 key 4 U and 6 I keys to display Tune page EN 7 2 Use...

Page 19: ...left of the keyboard upwards or downwards The amount the note bends depends on how much you rotate the pitch bend wheel Do not have the pitch bend wheel rotated as you turn on the Digital Piano Use th...

Page 20: ...ng them 1 Connect a microphone Use a commercially available dynamic microphone You cannot sample sounds input from through the AUDIO IN jack 2 Turn the volume levels of the Digital Piano down 3 Turn o...

Page 21: ...u want to sample is finished press bk Sampling will stop Even if you do not press bk sampling will stop automatically whenever there is no more sound being input from the microphone Sampling also will...

Page 22: ...ess cl to return to the screen that was displayed before step 2 of this procedure You can use the following procedure to change the volume level of the looped playback of each sampled sound if you wan...

Page 23: ...set whose sounds you want to change 3 Hold down bk until the display changes to the screen shown below Applying Effects to a Sampled Sound Effect Type Display Description Original Orgnl Normal sampled...

Page 24: ...ally 10 seconds after it is started 7 Press the keyboard key You can repeat steps 3 through 6 to change other sounds that make up the currently selected drum set There are eight sounds per drum set Yo...

Page 25: ...While holding down the keyboard key whose sound you want to delete press bo RHYTHM In response to the DelSure message that appears press the br 10 key YES key to delete or NO to cancel the delete oper...

Page 26: ...e EN 21 Sampling starts when you press a keyboard key in step 4 of the sampling procedure to enter sampling standby and then press bk Normally the Digital Piano will stop sampling automatically whenev...

Page 27: ...um sounds in a drum sampling set see Editing Sampled Drum Set Sounds on page EN 23 You can use the following procedure to protect each sampled sound against accidental deletion 1 Press bp TONE and the...

Page 28: ...whose number you entered You cannot use br 10 key number buttons to select a song 3 To stop demo playback press 7 Demo playback continues until you stop it by pressing 7 If Auto Power Off page EN 10 i...

Page 29: ...is skips song playback back to the previous measure Each press of 4 skips back one measure Holding down 4 skips back at high speed until you release it Pressing 4 while song playback is stopped perfor...

Page 30: ...e it The tempo value will stop flashing if you do not perform any operation for a short while Changing the song number will return the song to its original default tempo Use the following procedure to...

Page 31: ...with one part turned off only the notes of the part that is turned off are shown on the display You can load song data from an external device and increase the selection of songs available on the keyb...

Page 32: ...the right hand part left hand part and both hand parts for each phrase of a song Master all of the phrases and you master the song cl cl cm cm cn cn co co cp cp 3 3 4 4 5 5 7 7 8 8 br br bn bn ck ck P...

Page 33: ...a lesson starts etc Note that certain phrases will cause Wait to appear instead of Phrase Wait Appears when the lesson starts with an intro or fill in phrase that is not included in the phrases to be...

Page 34: ...he instructions provided on the display and by voice fingering guide During this lesson the display shows the key you need to press next Voice fingering guide uses a simulate voice to announce which f...

Page 35: ...ssons 1 2 and 3 1 Press 3 This disables phrase repeat play Use the following procedure to turn off voice fingering guide which tells you which finger to use to play each note in Lesson 2 and Lesson 3...

Page 36: ...lect the OFF setting You can use the following procedure to change the length of lesson phrases or to configure the lesson feature so the song is played all the way through without being divided into...

Page 37: ...a lesson press cp or 7 You can change the step and phrase during Auto Step Up Lesson using 4 5 and cl to co Starting Auto Step Up Lesson automatically turns on phrase repeat page EN 33 and play evalu...

Page 38: ...d key after the on screen key lights appears on the display Unit 0 1 sec The shorter the time the higher your score Pressing a keyboard key before the on screen key goes from flashing to lit will not...

Page 39: ...beat and waltz Use the following procedure to play the basic rhythm part 1 Press bo RHYTHM 2 Use br 10 key to select the rhythm number you want See the separate Appendix for information about individu...

Page 40: ...yed see Using Synchro Start on page EN 41 You can use the split point to change the size of the accompaniment keyboard range page EN 15 You can select from among the following five chord input modes F...

Page 41: ...e supported Accompaniment keyboard Accompaniment keyboard Chord Type Example Major Chords Letters above the accompaniment keyboard indicate the chord assigned to each key Pressing a single accompanime...

Page 42: ...a performance A fill in is a short phrase played where you want to change the mood of a piece A fill in pattern can be used to create a link between two melodies or an accent Normal and variation patt...

Page 43: ...o can use br 10 key to change it If you do not perform any operation for a few seconds after the tempo setting screen appears the display will return to the screen displayed before you pressed 9 Use t...

Page 44: ...rough 102 are Arpeggiator types page EN 56 Do not select them when using the Auto Harmonize 4 Press ct to turn on Auto Harmonize If you play chords with your left hand and the melody with your right h...

Page 45: ...ng chord types To display inverted forms of the chord use br 10 key keys 0 through 4 as shown below 4 After you are finished looking up what you want press bt to exit the Chord Book You can also exit...

Page 46: ...pth reverb send Chorus depth chorus send 1 Select the number of the rhythm you want to edit 2 Press bl If the Err Mem Full message appears on the display see page EN 73 for information about what you...

Page 47: ...of ck FUNCTION will cycle through the settings shown below from 1 through 6 Use the br 10 key and keys to change the currently selected setting You can play the current settings of the editable part...

Page 48: ...new data You cannot change the tone assigned to the keyboard while an Auto Accompaniment editing rhythm edit operation is in progress Saving User Rhythm Data on an External Device Memory card page EN...

Page 49: ...d to Setup 1 1 Second melody setup saved to Setup 1 2 Third melody setup saved to Setup 1 3 Registration Memory Data The following is the complete list of data that is saved to a registration memory s...

Page 50: ...at contains the setup you want to recall 2 Use buttons cm to cp to select the area whose setup you want to recall This will recall the registration memory setup and automatically configure the Digital...

Page 51: ...r settings you want to use 5 Start playing Recording starts as soon as you play something on the keyboard You can use Auto Accompaniment while playing If you do Auto Accompaniment also will be recorde...

Page 52: ...can divide a song according to various types of parts instrument left and right hand etc and record each part to a specific track You can mix up to six tracks the original track plus five additional t...

Page 53: ...rd the other tracks 7 After you finish recording all of the tracks press 7 This will start playback of the recorded tracks Press 7 to stop or restart playback At this time you can turn off playback of...

Page 54: ...he display Press YES to delete the song or NO to cancel the delete operation This section explains how to play along and record along with one of the Digital Piano s built in songs The following opera...

Page 55: ...d stops playback 9 Press bk twice to exit the recorder mode To delete recorded data After step 2 of the above procedure do hold down bk until the message Song Del appears on the display Press YES to d...

Page 56: ...you want to use as the root key C to B 5 After you are finished press ck FUNCTION to assign the scale to the keyboard ct ct bp bp bo bo br br ck ck bn bn Changing the Scale of the Keyboard No Scale na...

Page 57: ...nd exactly the way you thought they should See the separate Appendix for a complete list of the 305 Music Presets that are available 1 Hold down bp TONE until the indicator shown below appears on the...

Page 58: ...again to turn off Arpeggiator The tempo setting of the Arpeggiator is the same as that set for the metronome page EN 12 Use the following procedure when you want an arpeggio pattern to keep playing af...

Page 59: ...mory Performing this procedure also will delete protected sampled sound data page EN 25 It is recommended that you save important data to a memory card page EN 58 or your computer s hard disk page EN...

Page 60: ...y card when loading it or removing it from the Digital Piano While data is being stored to or recalled from a memory card never perform any other Digital Piano operation or remove the memory card Doin...

Page 61: ...ight need The memory card format performed by the Digital Piano is a quick format If you want to completely delete all of the data on the card format it on your computer or using some other device 1 I...

Page 62: ...n use and to change the character Pressing 7 EXIT will return to the screen that was displayed before you pressed 9 ENTER 6 Press the br 10 key 9 ENTER key This will save the data to the memory card I...

Page 63: ...the file in the memory card s MUSICDAT folder 1 On the Digital Piano select the data you want to load as described below 2 Insert the memory card that contains the data into the Digital Piano s card...

Page 64: ...al Piano s card slot 3 Hold down bq until the screen shown below appears on the display To cancel data delete press bq again 4 Use the br 10 key 4 U and 6 I keys to display one of the settings shown b...

Page 65: ...EN 58 directly from a memory card Whenever you copy a file to the memory card that you plan to play on the Digital Piano be sure to store the file in the memory card s MUSICDAT folder page EN 61 1 In...

Page 66: ...the Digital Piano and then start up your computer Do not start up the music software on your computer yet 2 After starting up your computer use a commercially available USB cable to connect it to the...

Page 67: ...o data to a computer The keyboard channel setting range is 01 to 16 1 Press ck FUNCTION and then use the br 10 key 4 U and 6 I keys to display MIDI page EN 7 2 Press br 10 key 9 ENTER key 3 Use the br...

Page 68: ...nging data with a computer when you may not want the Digital Piano to sound notes you play on its keyboard The local control setting lets you do just that 1 Press ck FUNCTION and then use the br 10 ke...

Page 69: ...able to find a link to Data Manager information on the product introduction page of this product If you cannot find such a link use the search form of the area site where you are located to enter the...

Page 70: ...xternal audio equipment lower the Digital Piano s volume setting Connection requires commercially available connecting cords supplied by you The connecting cords should have a stereo mini plug on one...

Page 71: ...hord page EN 38 Check and adjust the accompaniment volume setting page EN 41 If there is no user rhythm stored in memory Auto Accompaniment will not start when you press 7 while a rhythm in the range...

Page 72: ...15 Turn power off and then back on to initialize all Digital Piano settings page EN 10 Operation When I perform a skip forward or skip back operation the skip operation moves multiple song measures in...

Page 73: ...rd Book Function Chord Guide Registration 32 4 setups 8 banks Recorder Real time recording playback Keyboard Play 5 songs 6 tracks Playing Along with a Built in Songs 1 song L R LR Memory Capacity App...

Page 74: ...f fire electric shock and personal injury Weld Lines Lines may be visible on the exterior of the product These are weld lines that result from the plastic molding process They are not cracks or scratc...

Page 75: ...ge EN 18 user rhythms page EN 44 user songs page EN 29 2 There is not enough memory available for sampling or Auto Accompaniment editing Err No Card 1 The memory card is not set correctly in the card...

Page 76: ...E LAMB 052 LE CYGNE FROM LE CARNAVAL DES ANIMAUX 053 JE TE VEUX 054 SONATA op 13 PATH TIQUE 2nd Mov 055 HEIDENR SLEIN Song List SONG BANK 056 AIR FROM SUITE no 3 057 SPRING FROM THE FOUR SEASONS 058 H...

Page 77: ...ed as a fraction chord Unlike Fingered 1 2 and 3 Full Range Chord requires pressing of at least three keys to form a chord Fingering Guide Fingered 1 Fingered 2 Chords 1 With Fingered 2 interpreted as...

Page 78: ...Velocity O 9nH v 1 127 X 9nH v 0 8nH v O 9nH v 1 127 X 9nH v 0 Note ON Note OFF Mode Mode 3 X Mode 3 X Default Messages Altered 0 32 1 6 38 7 10 11 64 66 67 Bank select Modulation Data entry Volume P...

Page 79: ...allen into the apparatus the apparatus has been exposed to rain or moisture does not operate normally or has been dropped The apparatus shall not be exposed to dripping or splashing and that no object...

Page 80: ...nes de seguridad separadas Safety Precautions Before trying to use the Digital Piano be sure to read the separate Safety Precautions CDP235 ES 1A CDP 235R This recycle mark indicates that the packagin...

Reviews: