IOM-123-1+6 +S DIFF
5
15. Using "NEW" studs (41,42) and nuts (8)
(see
CAUTION D)
, thread one nut (8) onto each
stud (41,42) ap prox i mate ly 1.25" (32 mm).
Drop the studs (41,42) with nuts (8) through
holes in spring chamber (2). (This will assist
in keep ing the spring chamber (2) cen tered on
valve body (1) and prevent parts from moving
dur ing reassembly).
Using "match marks" made in Step B.4 as a
guide, replace spring chamber (2) onto body
(1). Thread lower nuts (8) onto studs (41,42)
and tight en by hand. Adjust length of studs
(41,42) by using the top nut (8) to allow at
least 3-4 threads protruding from the lower
nut (8).
Torque body flange hardware (7,8,30,41,42)
using small increments in a 180° alternating
pattern until flange mating sur fac es of body
(1) and spring cham ber (2) are metal to
metal. This creates a "fixed com pres sion"
on the di a phragm (12) and o-ring seal (32).
Rec om mend ed torque val ues are listed in
Table 2.
dif fer en tial setting, check seat leak age
at 40% below 15 psig (1.0 Barg); or 9
psig (.62 Barg). Seat leak age should
be min i mal (less than 20 SCFH).
See
SEC TION VII-5. TROU BLE SHOOT ING
GUIDE if seat leakage is excessive.
2. Proof test to check for ex ter nal leakage.
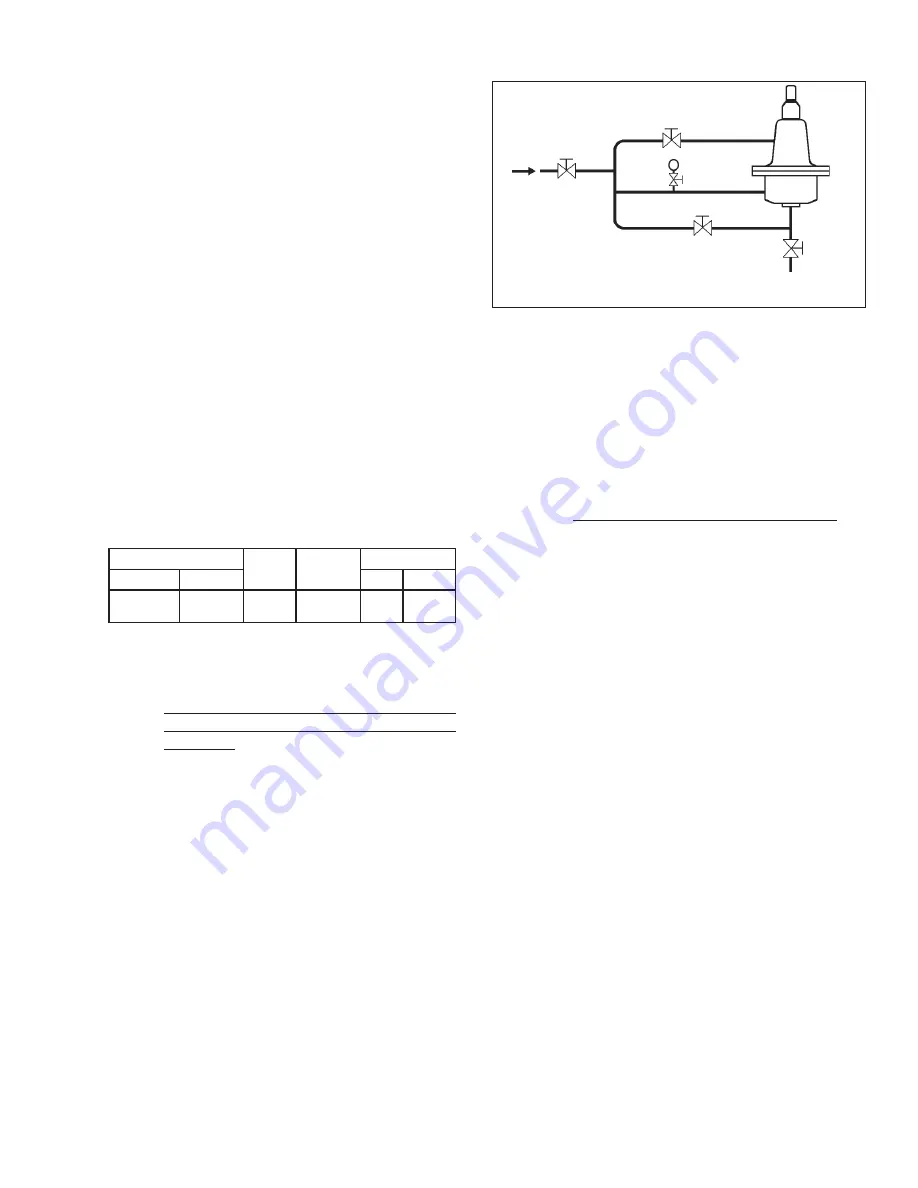
a. Close No. 1, No. 3, and No. 5 shut-off
valves. Open No. 2 and No. 4 shut-off
valves. Build inlet pressure to No. 1 shut-
off valve to 1-1/2 times maximum inlet
pressure, but not to exceed 1-1/2 times
Maximum Pres sure Rating (See Table 1).
b. Crack open No.1 shut-off valve and allow
a pressure buildup simultaneously in the
body (1) and spring chamber (2). Spray
the entire regulator with a liquid leak
de tec tor and visually inspect for external
leakage. Repair unit if leak is detected.
See SECTION VI MAINTENANCE.
c. Shut off line pressure to No. 1 shut-off
valve. Open No. 3 shut-off valve to
re lieve all pressure from the test valve
and all shut-off valves.
3. Return to Section II for Installation and
Sec tion IV for Startup.
TABLE 2
D. Bench test for suitable operation
(Test Fluid:
Air or compressed gas).
1. Check for desired differential spring set ting
and regulator performance (with no loading
pressure):
a. Close No. 1, No. 2, and No. 4 shut-off
valves. Open No. 3 and No. 5 shut-off
valves.
b. Apply inlet (P
1
) pressure to No. 1 shut-off
valve (10-15 psig (.69-1.0 Barg) above
desired differential spring setting). Crack
open No. 1 shut-off valve and check
for valve opening at desired differential
set ting. Refer to SECTION IV-2. if range
spring (18) adjustment is required.
c. Check for performance.
NOTE:
A
metal seat will experience a slight
seat leak age). Seat leakage should be
quantified at 40% deviation from setpoint.
For ex am ple: For a 15 psid (1.0 Bard)
No. 1
Shut-off
Valve
No. 2
Shut-off
Valve
Pressure
Gauge
No. 3
Shut-off
Valve
Inlet P
1
Pressure
Outlet P
2
Pressure
No. 5 Isolation Valve
No. 4
Shut-off
Valve
Figure 2:
Recommended Bench Test
Piping Schematic for 123-1+6+S
BODY SIZE
ITEM
NO.
THREAD
SIZE
TORQUE VALUE
in
(DN)
Ft-lbs
(N-m)
1/2" - 1-1/2"
(15-40)
7, 8, 30,
41, 42
7/16-20
32-36
(43-49)


