3 - CONTROLS/INSTRUMENTS
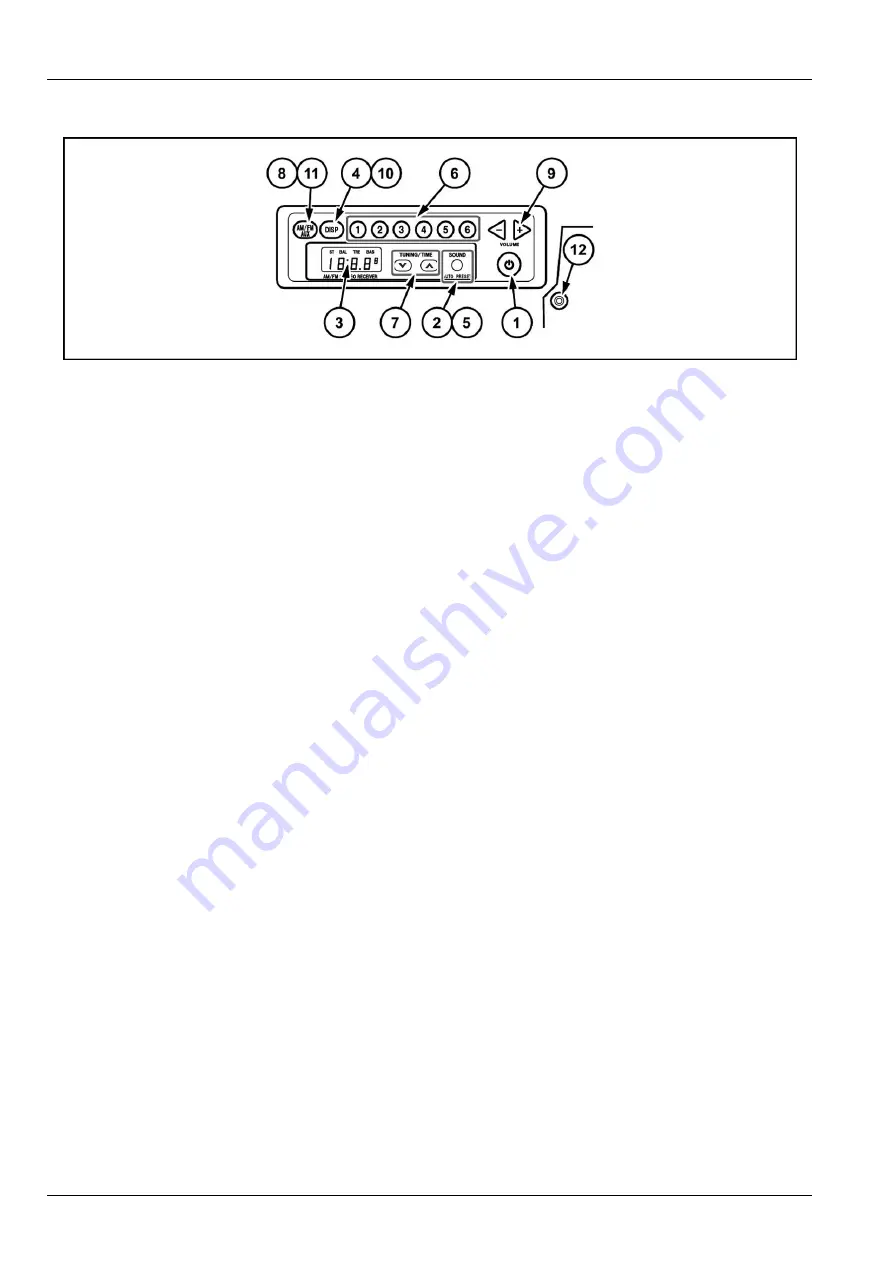
Cab radio
L7XJ42-001A
1
1. Power button
(Power)
Pressing
Power
button turns
ON
the power. The band
name is displayed followed by the frequency. Pressing
it again turns
OFF
the power. Clock is displayed.
2. Sound adjustment
(SOUND)
Pressing this button switches between
BAL
and
TRE
and
BAS
.
Pressing the button with
BAS
selected cancels the
sound adjustment.
• Pressing the tuning buttons with
BAL
(balance) se-
lected allows you to make adjustments. Pressing the
up button
(7)
raises the output level of the right speaker.
Pressing the down button
(7)
lower the output level of
the left speaker. (Output levels of both speakers go up
to 7).
• Pressing the tuning buttons with
TRE
(treble) selected
allows you to make adjustments. Pressing the up but-
ton
(7)
raises the level by one step. Pressing down
button
(7)
lowers the level by one step. (The levels go
up and down up to 7).
• Pressing the tuning buttons with
BAS
(bass) selected
allows you to make adjustments. Pressing the up
(7)
button raises the level by one step. Pressing down but-
ton
(7)
lowers the level by one step.
3. Display unit
The clock, radio frequency, and operation mode are
displayed.
4. Clock/Frequency button
(DISP)
Pressing this button switches the display to the clock.
Pressing it again displays the band.
If you leave the display alone, it returns to the fre-
quency display after 1.5 seconds.
5. Auto store
(SOUND/AUTO PRESET)
When this button is held down for at least 2 seconds,
receivable broadcast stations can be memorized for
preset buttons 1 through 6.
6. Preset buttons 1 through 6 (Preset station)
One
FM1
, one
FM2
, and one
AM
station can be
preset for each button.
If you long push the desired number of the preset keys
(1 to 6) with the radio
ON
, the receiving frequency is
registered with the number selected.
The preset display flashes 3 times and then the fre-
quency display lights up.
7. Tuning button
(TUNE)
When
TUNE
button is held down for at least one sec-
ond, the radio begins to search automatically for a re-
ceivable station and stops when it finds a station. To
stop this search midway, press this button again.
Pressing the up button increases the frequency.
Pressing the down button lowers the frequency.
Holding down either button changes the frequency
continuously.
8. Band button
(AM/FM, AUX)
Pressing this button switches the band between
FM1,
FM2
and
AM
. The reception band is displayed on the
display.
9. Volume adjustment buttons
(VOLUME-, )
Pressing
VOLUME-
button lower the volume. Press-
ing the
button raises the volume.
Holding down either button changes the volume con-
tinuously.
10. Clock adjustment
(DISP)
Pressing
DISP
button for at least one second with
the clock display selected allows you to adjust the
clock. Pressing the
DISP
button switches between
hours and minutes adjustments.
Pressing this button again cancels the clock adjust-
ment.
• Hours adjustment
Pressing the tuning buttons while hours section is flash-
ing allows you to make adjustments.
Pressing the up button
(7)
moves the time forwards.
Pressing down button
(7)
moves the time backwards.
• Minutes adjustment
Pressing the tuning buttons while minutes section is
flashing allows you to make adjustments.
Pressing the up button
(7)
moves the time forwards.
Pressing down button
(7)
moves the time backwards.
3-60
Summary of Contents for CX145C SR
Page 6: ......
Page 18: ...1 GENERAL INFORMATION 1 12 ...
Page 29: ...2 SAFETY INFORMATION E5054225_TU 4 2 11 ...
Page 132: ...3 CONTROLS INSTRUMENTS 3 82 ...
Page 160: ...4 OPERATING INSTRUCTIONS 4 Operate the arm control to unhook the tool KKZVLU 024A 14 4 28 ...
Page 180: ...4 OPERATING INSTRUCTIONS 4 48 ...
Page 206: ...6 MAINTENANCE Offset boom pin 10 07C803C9 17 6 16 ...
Page 207: ...6 MAINTENANCE Arm backhoe bucket 375EFD72 18 AB1F527A 19 6 17 ...
Page 298: ...8 SPECIFICATIONS Offset maximum left EACB5F36 6 See next page for the value 8 14 ...
Page 300: ...8 SPECIFICATIONS 8 16 ...


