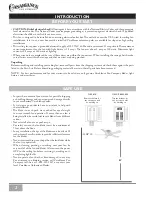
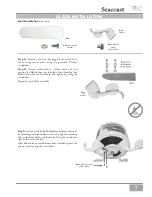
Casablanca Seacoast Owner'S Manual Download Page 2

2

CIRCUIT BREAKER

Trip the breaker for 

the circuit you will 

be working on

FUSE BOX

Remove the fuse for 

the circuit you will 

be working on

SAFE USE

•  Inspect the contents of your carton for possible shipping 

or handling damage and report any such damage directly 

to your authorized Casablanca dealer.

•  It is always a good idea to have an assistant to help with 

the installation.

•  Th e blades in each pack are matched for equal weight 

to assure smooth fan operation. If more than one fan is 

being installed, be careful not to mix blades from diff erent 

cartons.

•  Never install a fan over a pool or spa. 

•  For safety reasons, the fan blades must be a minimum of 

7 feet above the fl oor. 

•  In any installation, the tips of the blades must be at least 18 

inches from the wall in order to provide suffi  cient clearance 

for the blades.

•  Never insert anything into the path of the fan blades while 

the fan is in operation.

•  When cleaning, painting, or working near your fan, be 

very careful of the fan and blades. Always turn the power 

OFF to the ceiling fan before servicing it, working on it, 

or replacing lightbulbs. 

•  Never operate a fan that has been damaged in any way. 

For assistance in obtaining service, call Casablanca Fan 

Company toll-free at 1-888-335-5247 or contact your 

local Casablanca Authorized Dealer.

BEFORE YOU START

•  CAUTION:  Risk of electrical shock! 

All wiring must be in accordance with the National Electric Codes and the appropriate 

local electrical codes. Th e National Codes require proper grounding as a precaution against electrical shock. A qualifi ed 

electrician should be consulted if you are unsure.

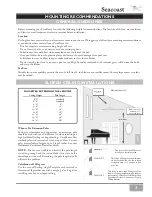
•  Th is fan is designed to be installed on an existing electrical outlet box. Th e outlet box must be UL Listed for ceiling fan 

installations, if it is not, a new box must be installed. Casablanca extension poles are available for sloped or high ceiling 

installations.

• 

Th is ceiling fan requires a grounded electrical supply of 120 VAC, 60 Hz and a minimum 15 amp circuit. Th e maximum 

current requirement for the fan with light fi xture is 3.8 amps. Th e fan uses about 1 amp or 100 watts. Maximum light 

current is 2.8 amps or 340 watts of lighting.

  Where wire nuts are employed, be sure all bare wires are within the connectors. When installing the canopy hatch, make 

sure all wires are within the canopy and that no wires are being pinched.
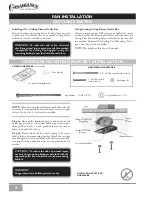
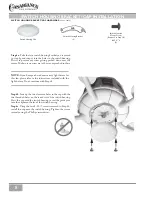
Unpacking

Before assembling and installing your ceiling fan, remove all parts from the shipping cartons and check them against the parts 

listed in the Parts List. Before discarding packaging material, be certain that all parts have been removed.
NOTE:  For best performance and for your warranty to be valid, use only genuine Casablanca Fan Company blades, light 

fi xtures, and accessories.

INTRODUCTION

18

ʺ

84

ʺ

Summary of Contents for Seacoast

Page 1: ...You Start 2 Before You Start 2 Before You Start 2 Before You Start 2 Before You Start 2 Before You Start 2 Before You Start 2 Before You Start 2 Before You Start 2 Before You Start 2 Before You Start...

Page 2: ...ablanca Authorized Dealer BEFOREYOU START CAUTION Riskofelectricalshock All wiring must be in accordance with the National Electric Codes and the appropriate local electrical codes The National Codes...

Page 3: ...lling your fan on a sloped ceiling Blades must be a minimum of 7 above the oor Extension Pole Maximum Angle 32 This slope is less than 32 degrees It is okay to install your fan SLOPED CEILING INSTALLA...

Page 4: ...side down Ridge side down NOTE After removing the old xture check the outlet box to ensure it is supported by a joist or beam across its upper surface If not a 2 x 4 stud must be installed Step 1a Rem...

Page 5: ...outlet box wires through canopy opening through canopy opening Canopy Lock Washer 4 Canopy Screw 4 NOTE We recommend that the ceiling box be of su cient capacity to support the weight of the fan and...

Page 6: ...a Place the motor cover on the downrod as shown Step 4b Route the wires from the motor through the Perma Lock downrod and ball assembly Tip The downrod has a tapered thread that is designed to lock co...

Page 7: ...es and tightening using the screwdriver Repeat for each blade assembly Blade Screw and Washers 4 per blade Blade Blade BLADE INSTALLATION Step5c Attach each blade bladeholder assembly to the motor by...

Page 8: ...NOTE If you have purchased an accessory light xture for this fan please refer to the instructions included with the light xture If not continue with Step 6b Switch Housing Mount Screw Removed in Step...

Page 9: ...by pulling on the wire nut Connect in this order GREEN leads from mounting plate and downrod assembly of fan to GROUND conductor of power source Secure with wire nut WHITE wire from fan to white NEUT...

Page 10: ...l Installation Stepa Locate a 2x4 wall stud in a convenient location Step b Orient the control bracket as shown over the 2x4 stud Step C Use the 1 wood screws in either the inner or outer mounting hol...

Page 11: ...within 20 seconds 4 The fan should now function properly You will only have to change the dip switch settings in the remote if you are using more than one fan in the same area and want to control them...

Page 12: ...ts inside the canopy and switch housing are not touching the metal parts and that they have not fallen o the wire splices Tighten as necessary Tighten the blade holders to the ywheel or direct drive m...

Page 13: ...that to which the receiver is connected Consult the dealer or an experienced radio TV technician for help NOTE Any changes or modi cations to the transmitter or receiver not expressly approved by Casa...

Page 14: ...40 OWTS COLORADO SPRINGS 80903 HOME LIGHTING INC 719 471 3520 OWTS FORT COLLINS 80525 THE LIGHT CENTER 970 226 3430 OWTS LONGMONT 80501 LUMENAREA COM INC 303 485 8600 OWTS CONNECTICUT NEW HARTFORD 060...

Page 15: ...RN MONTANA LTG SPY 406 543 7166 ISO NEBRASKA OMAHA 68104 D L ELECTRONICS 402 571 5233 GRAND ISLAND 68803 QUALITY SEW VAC 308 382 7310 ISO OMAHA 68144 OAK HILLS ELECTRIC INC 402 691 4567 NORFOLK 68701...

Page 16: ...CEILING FAN SERVICE CTR 210 804 1362 AUSTIN 78757 KLOCK ELECTRIC 512 837 4704 GIDDINGS 78942 ORSAG S INC 409 542 3167 LUBBOCK 79413 ORECK VACUUMS 806 792 2821 ARLINGTON 76001 P M QUALITY CONT 817 478...

Reviews: