Casablanca Seacoast Owner'S Manual Download Page 12

12

Please refer to this guide before requesting service or contacting your dealer for assistance.

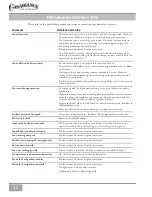
TROUBLESHOOTING TIPS

PROBLEM 

POSSIBLE REMEDIES 

Fan will not start


•  Check the main circuit fuses, circuit breakers, and wall switch position. Check all 

Fan will not start

Fan will not start

wire connections. Make sure the power is turned off  during this inspection.


•  Th e 9-pin connector is not making good contact. Check the 9-pin connector in 

the receiver mounted in the switch housing (see receiver diagram on page 11).


•  Th e battery is weak. Install a fresh battery.


•  Th e fan receiver is defective. Replace fan receiver.


•  Check the frequency setting:  Turn the power off  at the circuit breaker, only for 

the fan that is not functioning. Check that the jumper switches match in both the 

receiver and the transmitter.

Fan wobbles or shakes excessively


•  Be sure the canopy pin is set properly into the slot on the ball.

Fan wobbles or shakes excessively

Fan wobbles or shakes excessively


•  Check that the bladeholders have not been bent during installation and the blades 

are balanced.


•  Th e hanger bracket and/or ceiling outlet are attached too loosely.  Make sure 

the hanger bracket is attached tightly to the ceiling outlet box and the downrod 

assembly is secured fi rmly. 


•  Th e downrod is attached to downrod base too loosely. Make sure all the screws are 

securely tightened.

Fan is noisy during operation


•  Check and tighten the light fi xture retaining screws, glass shade screws, and/or 

lightbulb(s).


•  Tighten the canopy screws and mounting plate assembly. Make sure the wire nuts 

inside the canopy and switch housing are not touching the metal parts and that 

they have not fallen off  the wire splices. Tighten as necessary.


•  Tighten the blade holders to the fl ywheel (or direct drive motor) and the blades to 

the bladeholder screws.


•  Make sure all screws in the motor housing are snug but not overly tight.

Fan does not run on low speed


•  If fan is new, it may need to be “broken in.” Run at high speed for several days.

Battery life is short


•  Replace with alkaline batteries.

Battery life is short

Battery life is short

Light works, but fan does not work


•  Th e 9-pin connector is not making good contact. Check the 9-pin connector 

Light works, but fan does not work

Light works, but fan does not work

receiver mounted in the switch housing (see receiver diagram on page 11).

Fan and light run only on full speed


•  Th e fan receiver is defective. Replace fan receiver.

Fan is missing one speed


•  Th e fan receiver is defective. Replace fan receiver.

Fan does not change speed, but light works


•  Th e fan receiver is defective. Replace fan receiver.

Reverse does not work


•  Th e fan receiver is defective. Replace fan receiver.

Reverse does not work

Reverse does not work

Fan starts working by itself 


•  Th ere is frequency interference. Change frequency as described on Page 11.

Fan operates only when transmitter is close


•  Check that antenna wire is not touching metal plate.

Fan works, but light does not dim


•  Th e fan receiver is defective. Replace fan receiver.

Fan works, but light does not work


•  Th e fan receiver is defective. Replace fan receiver. 

Fan works, but light does not work

Fan works, but light does not work


•  Th e light socket is broken. Replace socket.


•  A lightbulb is defective. Replace lightbulb.

Summary of Contents for Seacoast

Page 1: ...You Start 2 Before You Start 2 Before You Start 2 Before You Start 2 Before You Start 2 Before You Start 2 Before You Start 2 Before You Start 2 Before You Start 2 Before You Start 2 Before You Start...

Page 2: ...ablanca Authorized Dealer BEFOREYOU START CAUTION Riskofelectricalshock All wiring must be in accordance with the National Electric Codes and the appropriate local electrical codes The National Codes...

Page 3: ...lling your fan on a sloped ceiling Blades must be a minimum of 7 above the oor Extension Pole Maximum Angle 32 This slope is less than 32 degrees It is okay to install your fan SLOPED CEILING INSTALLA...

Page 4: ...side down Ridge side down NOTE After removing the old xture check the outlet box to ensure it is supported by a joist or beam across its upper surface If not a 2 x 4 stud must be installed Step 1a Rem...

Page 5: ...outlet box wires through canopy opening through canopy opening Canopy Lock Washer 4 Canopy Screw 4 NOTE We recommend that the ceiling box be of su cient capacity to support the weight of the fan and...

Page 6: ...a Place the motor cover on the downrod as shown Step 4b Route the wires from the motor through the Perma Lock downrod and ball assembly Tip The downrod has a tapered thread that is designed to lock co...

Page 7: ...es and tightening using the screwdriver Repeat for each blade assembly Blade Screw and Washers 4 per blade Blade Blade BLADE INSTALLATION Step5c Attach each blade bladeholder assembly to the motor by...

Page 8: ...NOTE If you have purchased an accessory light xture for this fan please refer to the instructions included with the light xture If not continue with Step 6b Switch Housing Mount Screw Removed in Step...

Page 9: ...by pulling on the wire nut Connect in this order GREEN leads from mounting plate and downrod assembly of fan to GROUND conductor of power source Secure with wire nut WHITE wire from fan to white NEUT...

Page 10: ...l Installation Stepa Locate a 2x4 wall stud in a convenient location Step b Orient the control bracket as shown over the 2x4 stud Step C Use the 1 wood screws in either the inner or outer mounting hol...

Page 11: ...within 20 seconds 4 The fan should now function properly You will only have to change the dip switch settings in the remote if you are using more than one fan in the same area and want to control them...

Page 12: ...ts inside the canopy and switch housing are not touching the metal parts and that they have not fallen o the wire splices Tighten as necessary Tighten the blade holders to the ywheel or direct drive m...

Page 13: ...that to which the receiver is connected Consult the dealer or an experienced radio TV technician for help NOTE Any changes or modi cations to the transmitter or receiver not expressly approved by Casa...

Page 14: ...40 OWTS COLORADO SPRINGS 80903 HOME LIGHTING INC 719 471 3520 OWTS FORT COLLINS 80525 THE LIGHT CENTER 970 226 3430 OWTS LONGMONT 80501 LUMENAREA COM INC 303 485 8600 OWTS CONNECTICUT NEW HARTFORD 060...

Page 15: ...RN MONTANA LTG SPY 406 543 7166 ISO NEBRASKA OMAHA 68104 D L ELECTRONICS 402 571 5233 GRAND ISLAND 68803 QUALITY SEW VAC 308 382 7310 ISO OMAHA 68144 OAK HILLS ELECTRIC INC 402 691 4567 NORFOLK 68701...

Page 16: ...CEILING FAN SERVICE CTR 210 804 1362 AUSTIN 78757 KLOCK ELECTRIC 512 837 4704 GIDDINGS 78942 ORSAG S INC 409 542 3167 LUBBOCK 79413 ORECK VACUUMS 806 792 2821 ARLINGTON 76001 P M QUALITY CONT 817 478...

Reviews: