Cary Audio Design DVD 8 Owner'S Manual Download Page 17

GETTING STARTED 


 16 

SWITCHING ON


After making sure that everything is connected properly and that the player is plugged in, press 
the POWER button on the front panel to turn the player on. Turn on your TV and make sure that 

it is set to the correct input for the DVD 8. The video display should be ON first if you are using 

the HDMI connection so that the HDCP copy protection “handshake” happens with the DVD 8. 


The front panel POWER button switches the player ON and OFF. When the player is OFF, it can 

be turned ON using the front panel button or the ON button on the remote control. When the 
player is ON, you can put it into STANDBY using the POWER button on the remote control 

handset or the front panel button. 


USING THE ON-SCREEN DISPLAYS 
 

For ease of use, this player makes extensive use of 

graphical on-screen displays (OSDs). 


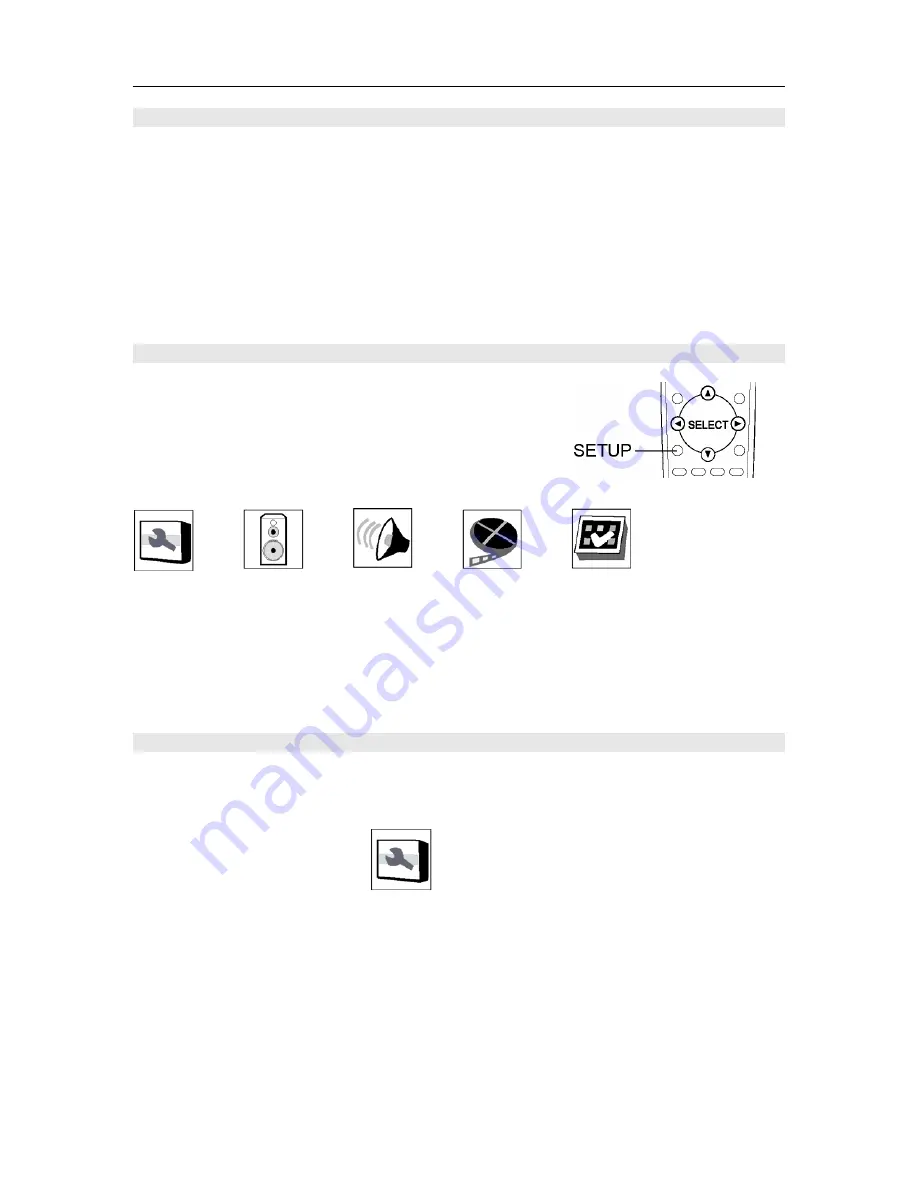
To access the On-Screen Displays, press the SETUP 

button on the remote control.  


The SETUP menu screens are navigated in a similar way, using the cursor buttons to change the 

highlighted item and pressing ENTER to select it. The icons above are located across the top of 

the SETUP screen. See “Choose the Setup Menu” under “Changing the Default Settings” for more 

information on each of these icons. Familiarize yourself with how these work as you'll need to use 

them when setting up the player, or when using some of the playback features and making more 
advanced settings for audio and video. 


CHANGING SETTINGS TO MATCH YOUR TV 

 
Using the SETUP menu, you can determine the settings that best fit your TV and system. Press 
the SETUP button. Use the UP

,


DOWN

,


LEFT

, and RIGHT

cursors buttons to select 

the desired setting. 

1.


Select GENERAL SETUP.  


2.


Select TV DISPLAY. 

If you have a widescreen or 16x9 TV, select the Wide setting. Widescreen DVD software 
is shown using the full screen area. When playing software recorded in conventional (FS 

or full screen, 4x3) format, the settings on your TV will determine how the material is 

presented. See the manual that came with your TV for details on what options are 

available. 

 
If you have a conventional or 4x3 TV, select either LetterBox or Pan/Scan. In Letterbox 

mode, widescreen software is shown with black bars at the top and bottom of the 

Summary of Contents for DVD 8

Page 1: ...o o o o o o o o o o o o o o o o o o o o o o o o o o o o o o o o o o o o o o o o o o DVD 8 All Format Disk Player NOTE Before installing your new DVD 8 player please read this manual carefully as it w...

Page 2: ...Controls Displays Front Panel 12 Rear Panel 13 Remote Control 15 Getting Started Switching On 16 Using the On Screen Displays 16 Changing Settings to Match your TV 16 Changing the Default Settings Ch...

Page 3: ...mended by the manufacturer 9 VENTILATION Slots and openings in the cabinet are provided for ventilation to ensure reliable operation of the unit and to protect it from overheating These openings must...

Page 4: ...heat 23 IMPORTANT SAFETY NOTE Before connecting a new component such as the DVD 8 to your audio or home theater system it is always good practice to make certain that all components are turned off and...

Page 5: ...quipment and receiver Connect the equipment into an outlet on a circuit different from where the receiver is connected 27 OUTDOOR ANTENNA INSTALLATION SAFE ANTENNA AND CABLE CONNECTION If an outside a...

Page 6: ...DVD 8 is an amazing all format disk player The excellent sound quality is matched with a great picture It will scale video signal outputs to as high as 720p or 1080i offering both stereo and 5 1 analo...

Page 7: ...player make sure the following accessories are included You should find the following items Power Cable Remote Control batteries already installed Owner s Manual Warranty Card Warranty Card If you are...

Page 8: ...Lines DVD Signal Format System PAL NTSC Composite Video Output 1 0 volt peak to peak 75 Ohm Sync Negative S Video Luminance Signal 1 volt peak to peak 75 Ohm load Color Signal 0 286 volt peak to peak...

Page 9: ...40 Volts AC Power Consumption 20 watts Operation 3 watts Standby Video Output Modes Component Video 480i 480p 720p 1080i HDMI with HDCP 480i 480p 720p 1080i Composite Video S Video 480i Chassis Black...

Page 10: ...creen setup menu Note Be sure to match the colors of the plugs on the cable with the corresponding jacks on the DVD 8 player and the TV yellow for composite video red for R right audio and white for L...

Page 11: ...er E g Y R Y B Y or Y CB CR Component video cables are typically designated with red R blue B and green G color bands to show how to correctly connect them to the player and the TV The rear panel plug...

Page 12: ...igital Connections Make digital connections from the DVD player to an AV component that features digital input capability or one or more multi channel audio decoders to realize the full cinematic expe...

Page 13: ...will light 2 DISC LOADER TRAY Load discs here 3 OPEN Press this button to open and close the disc loader tray 4 PLAY Press this button to start playback 5 STOP Press this button to stop playback 6 AL...

Page 14: ...Left and Right Center and Sub Woofer outputs for the multi channel playback of movies DVD Audio or SACD disks 5 S VIDEO OUTPUT Use this analog video output for a video display that has an S Video conn...

Page 15: ...l RCA digital output This connection offers the digital audio signal to your associated surround sound component 9 OPTICAL DIGITAL AUDIO JACK Connect this to your compatible surround sound preamplifie...

Page 16: ...P Stop playback 14 REV Fast reverse playback 15 FWD Fast forward playback 16 PREV Skip previous track or title 17 NEXT Skip next track or title 18 OSD Show hide On Screen Display 19 KEYBOARD Show hide...

Page 17: ...the highlighted item and pressing ENTER to select it The icons above are located across the top of the SETUP screen See Choose the Setup Menu under Changing the Default Settings for more information o...

Page 18: ...the display is 4 3 Widescreen image is displayed in letterbox format with black borders on top and bottom 16 9 Wide Choose when the display is 16 9 16 9 materials will be displayed in its native aspe...

Page 19: ...election and press ENTER The options for that setting will appear on the right Use the RIGHT UP and DOWN cursor buttons to make your selection Press the LEFT arrow to return to the list of options wit...

Page 20: ...to select which font you want to use for the Subtitles The options are Font 1 Font 2 Font 3 default SPEAKER SETUP Choose SPEAKER Setup and press ENTER Use the UP DOWN LEFT and RIGHT cursor buttons to...

Page 21: ...se this to set the sound filtering control for the center speaker The options are Large Choose if the center speaker is large Full frequency range sound is passed to the center speaker Small default C...

Page 22: ...t 00 Use this to synchronize the audio and video signal Adjust the audio delay by 10 100 ms to correct synchronization issues with some discs Press the LEFT RIGHT arrow buttons to increase or decrease...

Page 23: ...Logic II processing Auto Pro Logic II processing is on only when Dolby Pro Logic II encoded content is detected B Mode To set the processing mode of Pro Logic II The options are Music Sound from all s...

Page 24: ...M above This setting will convert the digital signal from the disk to LPCM and offer that digital output signal to the associated receiver or preamplifier Off This setting will offer digital video out...

Page 25: ...best color space based on capability information collected from the TV display This is the preferred setting YCbCr 4 4 4 Forces YCbCr 4 4 4 color space If you select this option please make sure that...

Page 26: ...the speakers ENGLISH default Select if you want the sound in English FRENCH Select if you want the sound in French SPANISH Select if you want the sound in Spanish GERMAN Select if you want the sound i...

Page 27: ...button to confirm the selection You will be asked for the parental control password Enter the password Default password 7890 and press the SELECT button Use the Parental Disc Setting to restrict play...

Page 28: ...ed for unsupervised children under the age of 17 NC 17 No One Under 17 These movies contain content which most parents feel is inappropriate for their children under 17 to view Content can consist of...

Page 29: ...for video CDs Instead use the number buttons to select the desired item 7 Press the ENTER button The desired item is selected and playback starts You can return to the menu screen by pressing the MEN...

Page 30: ...ressed during menu playback on a video CD SKIPPING TO THE BEGINNING OF CHAPTERS OR TRACKS Cueing using the SKIP button During playback press one of the skip buttons on the main unit or the remote cont...

Page 31: ...number RA from the Customer Service Department Cary Audio Design will assume no responsibility if the shipping company refuses to pay for damage due to your improper packing or lack of insurance shou...

Page 32: ...of the problem 4 Deliver the product to Cary Audio Design or the nearest authorized service facility or ship with all freight and insurance charges prepaid in its original packing container or equiva...

Page 33: ...C 27539 phone 919 355 0010 fax 919 355 0013 www caryaudio com o o o o o o o o o o o o o o o o o o o o o o o o o o o o o o o o o o o o o o o o o o o o o o o o o o o o o o o o o o o o o o o o o o o o o...

Reviews: