CARVIN
®
DIAMOND SERIES OVAL POOL | USER MANUAL
5
PREPARING THE SITE
Be aware that the installation diagrams are based on a
15x24 oval pool, if you have a di
ff
erent size pool you will
fi
nd that your pool has more/fewer uprights sections
to install.
Be aware that STEP 1 Through STEP 3 will be more time
consuming and labor intensive than the rest of the steps,
since the foundation of your oval pool must be done
right in order to increase the longevity of your pool.
The permissible tolerance of the soil in the straight metal
structure and the round ends must be a maximum of
± 1/8 in (3,18 mm) across the whole pool. If the general
level tolerance of the pool is not respected this could
void the warranty.
STEP 1
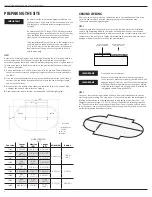
Refer to the ‘’Marking Diagram’’ and ‘’Marking Dimension Table’’. Once you have the
measurements and have the pool location, you will mark the soil with bright
colored spray paint that will not wear o
ff
while working the ground. All pools require
to have extra space to be able to work. Also, the pool buried foot beam will extend
12’’ past the pool wall.
1.
Drive a stake at point A and Point B at least 6’’ in the ground. This will de
fi
ne the
centers of round sections and align the straight sections at measure speci
fi
ed in
the
table.
2.
Tie a rope that will be attached to a spray can be able to draw the 2x half round
sections. Use the Radius inscribed in the table to tie the can at the right length
and spray the 2 halves.
3.
Measure from the middle of the stakes to draw a line to Join the 2 halves with
a straight line on each side to form an Oblong.
4.
Draw the outside trench corridor as speci
fi
ed on the Marking Diagram.
IMPORTANT
Radius
D4
D1
D2
D3
A
CL
CL
B
Radius
Pool wall
23 cm (9’’)
Both sides
Working area
outline
MARKING DIMENSIONS
M (FT)
Pool size
Center
(D1)
Sideline
(D2)
Lenght
(D3)
Width (D4)
Radius
12x15’
0.19 (3’0’’
¼
)
1.18 (3’11’’)
4.72 (15’6’’)
3.96 m (13’)
1.98 m
(6’6’’)
12x18’
1.83
(6’0’’
7/16
)
2.10 (6’11’’)
5.65 (18’7’’)
12x21’
2.76 (9’0’
⅝
)
3 (9’11’’)
6.55 (21’6’’)
12x24’
3.68
(12’0’’
⅞
)
3.93
(12’11’’)
7.49 (24’7’’)
15x21’
1.83
(6’0’’7/16)
2.10 (6’11’’)
6.55 (21’6’’)
4.87 (16’)
2.43 (8’)
15x24’
2.76 (9’0’’
⅝
)
3 (9’11’’)
7.49 (24’7’’)
15x30’
4.60
(15’1’’
⅛
)
4.85
(15’11’’)
9.32 (30’7’’)
18x33’
4.60
(15’1’’
⅛
)
4.85
(15’11’’)
10.24
(33’7’’)
5.79 (19’)
2.89 (9’6’’)
18x39’
6.44 (21’1
½
)
6.70 (22’)
12,07
(39’8’’)
GROUND LEVELING
After the site is properly marked, remove the sod in the installation surface area.
You will need to remove any tree stumps growing in the installation area.
These could cause damage your pool.
STEP 1
The best way to level the ground is to start at the lowest point of the installation
surface. Dig everything down to that point, ensuring that the pool is installed on
hard soil. It is not recommended to add loose soil on top to level since that soil will
compact once the pool is full of water will destabilize the pool level and can cause
damage, which will not be covered by the pool warranty.
STEP 2
Once your removed sod and cleared all debris from your installation site you can
start the ground levelling. This step is one of the most important, the initial ground
levelling will determine the straightness and the longevity of your Oval Pool. The
Straighter the level is (max +/- 0.125’’ (3.18 mm)) the easier the following steps will
be. The best tool to level the ground will be a Transit level. If you do no have access
to a transit level, use a long plank (and make sure the plank is
fi
rm (2x4 or 2x6) and
perfectly straight) and a carpenter’s level.
Make sure that there are no electrical wires, sceptic
tanks, cesspool, wells, roots (stumps), buried debris, and
negative slopes 6’ from the pool. There should always be
a positive slope driving water away of your pool. Always
install the swimming pool on high ground. If installed on
low ground the warranty will be void.
Do not add dirt to low areas.
IMPORTANT
IMPORTANT
Remove soil and
grass to this level.
Remove grass only
from low level.


