CARVIN
®
DIAMOND SERIES OVAL POOL | USER MANUAL
15
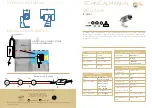
INSTALLING THE TOP PLATES - STRAIGHT SECTIONS
Insert the top plate screwing detail inside the buttress post make sure that the rail is
inside the rear plate channel. Before screwing make sure that the plate is sitting
fl
at
on the post. Assemble one screw (14433700) and washer (14073852) on each side.
There are additional screwing options on the post and in case of plate damage.
INSTALLING THE POSTS COVERS
STEP 1
Insert the Post cover by lining the top of it underneath the top plate (1) and rotate
the bottom of the cover towards the pool wall (2).
STEP 2
Line up the post cover top holes with the top plate inward holes set. Assemble 4x
screw per plate.
P3 - PHILLIPS DRIVE
P/N 14455032
Max torque 4 N·m (35 in·lbf)
Screw at low speed
P3 - PHILLIPS DRIVE
P/N 14433700
Max torque 3 N·m (27 in·lbf)
Screw at low speed
P/N 14073852
1
2
STEP 3
At the bottom of the posts there are 1 hole on each side, assemble with the buttress
post 1x screw and washer on each sides.
P3 - PHILLIPS DRIVE
P/N 14455032
Max torque 4 N·m (35 in·lbf)
Screw at low speed
P/N 14073852
INSTALLING THE LEDGES
STEP 1
Position all top ledges around the pool structure.
STEP 2
Center the top ledges to the top plates and uprights.
Screwing the top ledges will solidify the verticality of the uprights.
Make sure the uprights are straight before screwing top ledges.
Use the corrugation (fold lines) of the steel wall to guide you on straightness
of the uprights.
Do not use an impact driver.
IMPORTANT
Do not use an impact driver.
IMPORTANT


