background image

GB - 8

42PQV...

X

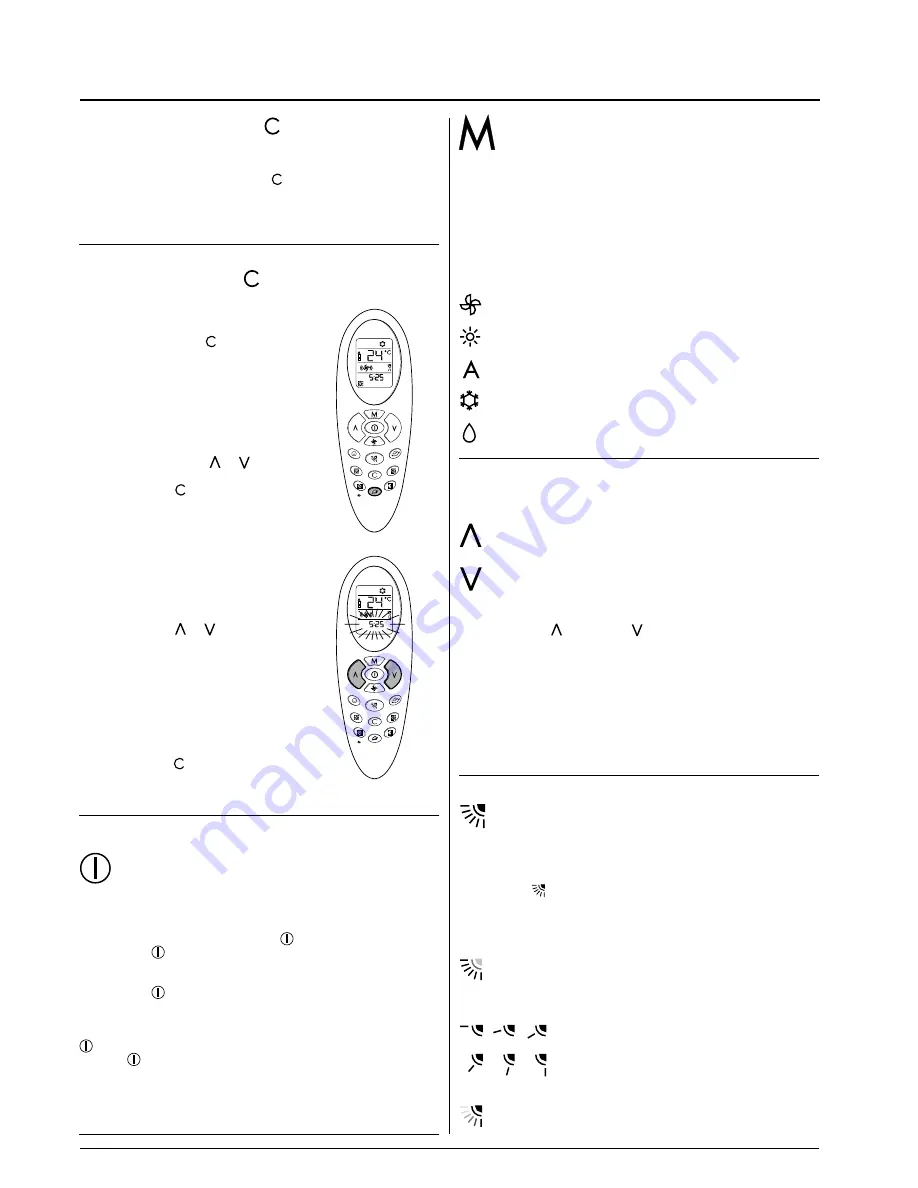
Current time adjusting 

 and reset buttons

(buttons K and O)

Press current time adjusting button   for more than 5 seconds to
adjust the current time.
Press reset button “O” with a sharp object if the remote control is
not operating properly or after replacing the batteries.

Setting current time 

 (button K)

1.

With the remote control ON or
OFF, press botton   for at least
5 seconds.

2.

The current hour figure flashes.
Press either button 

 or 

to set the current hour.
Press button   to move to
minutes and set them.

3.


 For this setting always use

either button 

 or 

 .

4.


Once the current time is set,

press button  .to confirm it.

Start / Stop
(button B)

When the air conditioner is not in operation, the remote control
readout will display the time of day only (in case other symbols are
lit, turn control off by pressing button 

).

Press button 

 to start the air conditioner.

All selected and memorized functions will light up and appear; the
unit will operate according to the functions selected.
Press button 

 to stop the air conditioner.

All indicators on the unit will go out, and the control will display
only the current time.
If the unit does not stop, turn the control on (by pressing button

) and repeat the operation.

If button 

 (air conditioner starting) is pressed too soon after a

stop, the compressor will not start for 3/5 minutes due to the
inherent protection against frequent compressor cycling.
The unit will only emit a “beep”, when the signals are received
correctly.

PM

A

B

1

2

A

B

1

2

Selection of the operating mode
(button A)

With this button the operating mode of the air conditioner can be
selected.
By repeatedly pressing this button the available modes will be
selected in sequence.
The choosen mode is shown as follows, while the unit will
acknowledge signal receipt with a confirming beep.

Indicated Symbol

Ventilation (fan only).

Heating.


Automatic.

Cooling with dehumidification.


Dehumidification only.

Temperature setting

UP
(button C)

DOWN
(button D)

Pressing the UP 

 and DOWN 

 buttons will increase or

decrease the temperature from the previously set value.
The unit will confirm signal receipt with a beep, and the value of
the set temperature on the display will change accordingly.
The temperature can be set between 17°C (63°F) and 32°C (90°F)
at 1 degree intervals.
In cooling mode, if the temperature selected is higher than the
room temperature the unit will not start; the same applies for the
heating mode, if the selected temperature is lower than the room
temperature.

Selecting direction of air flow louver
(button H)

The air flow direction can be adjusted to optimize air distribution in
the room.
Press button 

 repeatedly to choose one of the following louver

positions:

Symbol on display

Air direction will be set automatically.
Louver will be set to the preset position according to the
operation mode.

6 positions can be chosen.
The louver can be set to one of 6 different air
flow directions.

The louver will continuously swing up and down. "Swing"
always assures optimal even air distribution

Use of the remote control

Summary of Contents for 42PQV...X

Page 1: ...OWNER S MANUAL 42PQV X ...

Page 2: ... are contained in the relevant manuals The installation instructions for both the indoor and the outdoor unit are given in the manuals for each unit Contents Page General information 2 System description 2 Unit LEDs and controls 3 Periodical checks 3 Air cleaning system 4 Optimum comfort and minimum power consumption 4 Correct cleaning 4 5 Before a long shutdown period 5 Display of the selected fu...

Page 3: ...e control to avoid possible damage In case of malfunction contact a qualified service engineer This unit contains moving parts Ensure that these parts are kept out of the reach of children Maintain the room temperature at general comfort conditions especially when children elderly or handicapped persons are present In order to ensure correct use the air conditioner must operate within the temperat...

Page 4: ...gnal is received by the remote control the unit operates accordingly For a good operation of the air conditioner it is recommended to carry out checks and maintenance as indicated Recommended maintenance intervals may vary depending on the installation environment e g dusty zones etc 1 Increase frequency in dusty zones 2 Operations to be carried out by qualified service personnel Refer also to Ins...

Page 5: ...ontrol should only be cleaned with a dry cloth Occasionally clean the area around the outdoor leaves etc to avoid reduced air circulation Air cleaning system optimum comfort and lowest consumption correct cleaning Air cleaning system Standard air filters they eliminate dust and lint Electrostatic filter this effectively eliminates microscopic dust Active carbon filters they are particular effectiv...

Page 6: ...rts Switch the electric mains supply off Take the batteries out of the controller Clean indoor and outdoor units Filter cleaning Clean filters in accordance with the actual operating conditions and times Lift the front panel and pull the air filters downward Standard filter cleaning Vacuum clean or rinse under running water after using a month Put the filters back in the correct position Cleaning ...

Page 7: ...mer active 14 DAILY timer active Everyday 15 ON timer OFF timer and current time 16 OFF timer selected 17 Ionizer active WARNING During heat pump operation the unit will undergo several defrost cycles to remove ice that might collect on the outdoor unit in very low ambient temperatures In these cycles the indoor fan will be automatically off and cannot operate until defrost cycle is completed Tabl...

Page 8: ...st be directed toward the unit receiver when pressing the buttons of the desired functions An acoustical acknowledgement sound beep will indicate that signal has been received A B D E G H J K M N C F I L O A AM PM A B 1 2 F A AM PM A B 1 2 F The remote control operates with two 1 5 V non re chargeable batteries When the symbol appears in the display this indicates that the batteries are exhausted ...

Page 9: ...it a beep when the signals are received correctly PM A B 1 2 A B 1 2 Selection of the operating mode button A With this button the operating mode of the air conditioner can be selected By repeatedly pressing this button the available modes will be selected in sequence The choosen mode is shown as follows while the unit will acknowledge signal receipt with a confirming beep Indicated Symbol Ventila...

Page 10: ... for confirmation The icon will stop flashing 7 Louvre positioning Now this icon is flashing Use button to select desired position Press button for confirmation Now all icons are fixed on display If you want to cancel selections up to here inserted push button if you want to cancel all options once timer has been set push button and then About the ON timer When the ON Timer function is operating t...

Page 11: ...f the two timers ON or OFF is active Use of the remote control PM PM PM AM PM PM PM Sleep timer procedure night button M Press this button to set the SLEEP timer with remote control on The icon will appear on the display This procedure permits setting the remaining unit operating time 1 1 hr will be displayed together with the icon 2 Press button temperature increase The display will show the foll...

Page 12: ...to the unit receiver turn the remote control OFF and repeat the operation pointing the remote control in the correct direction There are obstacles curtains partitions etc between the remote control and the unit repeat the operation after having removed the obstacles The receiver on unit or the remote control is exposed to intense sun radiation avoid direct sunlight on the unit draw curtains or shu...

Page 13: ...Via R Sanzio 9 20058 Villasanta MI Italy Tel 039 3636 1 The manufacturer reserves the right to change any product specifications without notice April 2006 Printed in Korea 42DH8C54020 R ...

Reviews: