background image

MAINTENANCE

Before performing recommended maintenance, be sure
unit main power is off. Failure to do so may result in
electrical shock or injury from rotating fan blades.

Lubrication

FAN-MOTOR BEARINGS — Oiling holes are provided at
each end of the condenser-fan motor. Remove fan motor and
lubricate motor with 32 drops (16 drops per hole) of SAE-10
(Society of Automotive Engineers) non-detergent oil at in-
tervals described below:
• Annually, when environment is very dirty, ambient tem-

perature is higher than 105 F, and average unit operating
time exceeds 15 hours a day, or

• Every three years, when environment is reasonably clean,

ambient temperature is less than 105 F, and unit operating
time averages 8 to 15 hours per day, or

• Every 5 years when environment is clean, ambient tem-

perature is less than 105 F, and unit operating time aver-
ages less than 8 hours per day.

COMPRESSOR — Compressor contains factory oil charges;
replace oil when lost. See Table 1 for oil recharge and refer
to Carrier Standard Service Techniques Manual, Chapter 1,
pages 1 to 21 for oil recharging procedure. See Table 6 for
recommended compressor oils.

Cleaning Coils

— Coil should be washed out with wa-

ter or blown out with compressed air. Note that the blow-
thru design causes dirt and debris to build up on the inside
of the coils.

Clean coil annually or as required by location and outdoor

air conditions. Inspect coil monthly and clean as required.
Fins are NOT continuous through coil sections. Dirt and de-
bris may pass through the first section, become trapped be-
tween the rows of fins, and restrict condenser airflow. Use a
flashlight to determine if dirt or debris has collected between
coil sections. Clean coil as follows:
1. Turn off unit power.
2. Use a garden hose or other suitable equipment to flush

coil from the outside to remove dirt. Be sure to flush all
dirt and debris from drain holes in the base of unit. Fan
motors are waterproof.

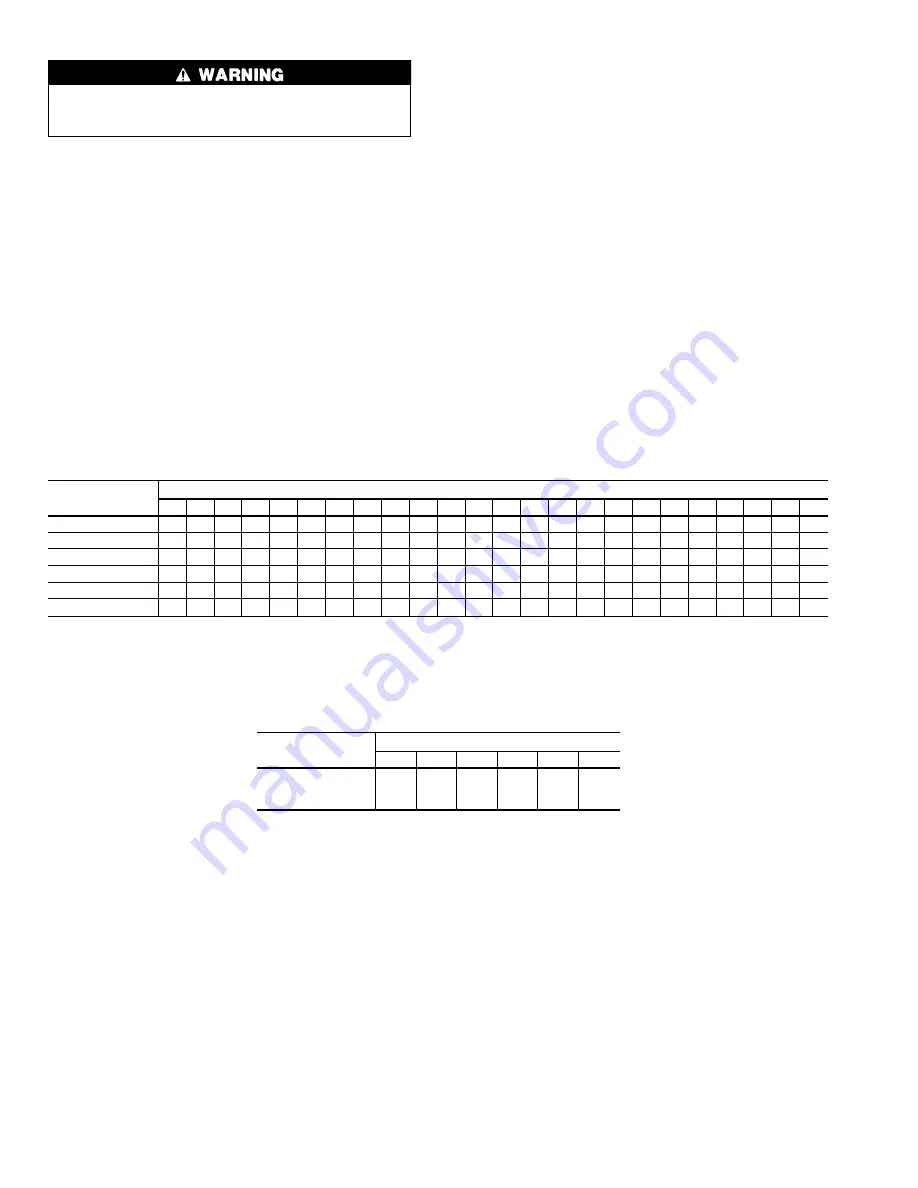
Table 5 — Required Liquid Line Temperature (F) (At Service Valve)

REQUIRED

SUBCOOLING (F)

LIQUID PRESSURE AT SERVICE VALVE (PSIG)

134 141 148 156 163 171 179 187 196 205 214 223 233 243 253 264 274 285 297 309 321 331 346 359

0

76

79

82

85

88

91

94

97 100 103 106 109 112 115 118 121 124 127 130 133 136 139 142 145

5

71

74

77

80

83

86

89

92

95

98 101 104 107 110 113 116 119 122 125 128 131 134 137 140

10

66

69

72

75

78

81

84

87

90

93

96

99 102 105 108 111 117 120 123 126 129 129 132 135

15

61

64

67

70

73

76

79

82

85

88

91

94

97 100 103 106 109 112 115 118 121 124 127 130

20

56

59

62

65

68

71

74

77

80

83

86

89

92

95

98 101 104 107 110 113 116 119 122 125

25

51

54

57

60

63

66

69

72

75

78

81

84

87

90

93

96

99 102 105 108 111 114 117 120

Table 6 — Recommended Compressor Oils

RECOMMENDED

OIL

UNIT 38HDL

018

024

030

036

048

060

3GS

Calumet RO-15

Sontex 200LT


10

Summary of Contents for 38HDL018

Page 1: ... for brazing operations Have a fire extinguisher available Read these instructions thor oughly Consult local building codes and National Electrical Code NEC for special installation requirements INSTALLATION Before installing or servicing system always turn off main power to system There may be more than one dis connect switch Turn off accessory heater power if applicable Electrical shock can caus...

Page 2: ...185 83 9 048 3 13 16 944 6 3 89 16 1131 9 1 51 16 433 4 1 67 16 468 3 2 61 2 774 7 1 75 8 498 5 2 55 8 752 5 2 83 16 817 6 1 17 8 352 4 0 81 4 209 5 0 4 406 4 0 07 8 22 22 222 100 5 060 3 13 16 944 6 3 89 16 1131 9 1 51 16 433 4 1 67 16 468 3 2 61 2 774 7 1 75 8 498 5 2 55 8 752 5 2 83 16 817 6 1 111 16 347 7 0 81 8 206 4 0 37 8 403 2 0 07 8 22 22 249 112 9 UNIT SIZE 38HDL MINIMUM MOUNTING PAD DIM...

Page 3: ...tes it must be evacuated to 1000 microns to eliminate contamination and moisture in the system Run refrigerant tubes as directly as possible avoiding un necessary turns and bends Suspend refrigerant tubes so they do not damage insulation on vapor tube and do not transmit vibration to the structure Also when passing refrigerant tubes through the wall seal opening so that vibration is not trans mitt...

Page 4: ...d wiring must be in compliance with NEC and applicable local codes Use mini mum 60 C wire for field power connection Route power wires through opening in the unit side panel and connect in unit control box as shown on unit label dia gram and Fig 5 and 6 Unit must be grounded CONTROL CIRCUIT WIRING Control voltage is 24 v See Fig 5 and unit label diagram for field supplied wiring details Route cont...

Page 5: ...7KC PFV Oil oz Initial Recharge 25 21 25 21 38 34 54 50 42 38 56 52 OUTDOOR FAN Propeller Type Direct Drive Horizontal Rpm 850 850 850 850 850 850 Diameter in No of Blades 18 3 18 3 18 3 18 3 24 3 24 3 Fan Pitch Deg 25 27 27 31 24 24 Motor Hp 1 8 1 8 1 8 1 8 1 4 1 4 Nominal Airflow Cfm 1720 1720 1720 1720 3900 3900 OUTDOOR COIL Copper Tube Aluminum Plate Fin Face Area sq ft No of Rows 6 1 1 6 1 1 ...

Page 6: ... unit on heating cooling applications If accessory IFR is required for cooling only applic tions locate IFR in fan coil NOTE Refer to unit wiring label for wire colors BRN to BLU and C to Y connections Fig 5 Typical Control Circuit Connections Fig 6 Line Power Connections LEGEND NEC National Electrical Code TB Terminal Board TB Connections Field Wiring Factory Wiring 6 ...

Page 7: ...may result in electrical shock or injury from rotating fan blade Outdoor Fan A reinforced wire mount holds the out door fan assembly in place See Fig 7 for proper mounting positions High Pressure Relief Valve Valve is located in compressor Relief valve opens at a pressure differential of approximately 450 50 psig between suction low side and discharge high side to allow pressure equalization Inter...

Page 8: ...nt AccuRaterT Bypass Type Device See Fig 4 for bypass type AccuRater device components The piston has a refrigerant metering hole through it The retainer forms a stop for the piston in the refrigerant bypass mode and a sealing surface for liquid line flare connection To check clean or replace piston 1 Shut off power to unit 2 Pump down using Pumpdown Procedure section on page 7 3 Remove liquid lin...

Page 9: ... 65 6 10 13 16 19 21 24 27 30 33 36 38 41 70 7 10 13 16 19 21 24 27 30 33 36 39 75 6 9 12 15 18 21 24 28 31 34 37 80 5 8 12 15 18 21 25 28 31 35 85 8 11 15 19 22 26 30 33 90 5 9 13 16 20 24 27 31 95 6 10 14 18 22 25 29 100 8 12 15 20 23 27 105 5 9 13 17 22 26 110 6 11 15 20 25 115 8 14 18 23 LEGEND WB Wet Bulb Do not attempt to charge system under these conditions or refrig erant slugging may occu...

Page 10: ... of the coils Clean coil annually or as required by location and outdoor air conditions Inspect coil monthly and clean as required Fins are NOT continuous through coil sections Dirt and de bris may pass through the first section become trapped be tween the rows of fins and restrict condenser airflow Use a flashlight to determine if dirt or debris has collected between coil sections Clean coil as f...

Page 11: ...TROUBLESHOOTING TROUBLESHOOTING CHART COOLING CYCLE 11 ...

Page 12: ...turer reserves the right to discontinue or change at any time specifications or designs without notice and without incurring obligations Book 1 4 Tab 3a 2a PC 111 Catalog No 563 885 Printed in U S A Form 38HDL 2SI Pg 12 1 99 Replaces 38HDL 1SI ...

Reviews: