background image

Safety Devices —

Chillers contain many safety

devices and protection logic built into electronic control. Fol-
lowing is a brief summary of major safeties. For complete
details, refer to Controls and Troubleshooting literature.

COMPRESSOR PROTECTION

Circuit Breaker — One manual reset calibrated-trip mag-
netic circuit breaker for each compressor protects against over-
current. Do not bypass or increase size of a breaker to
correct problems. Determine cause for trouble and correct
before resetting breaker. Circuit breaker must-trip amps (MTA)
are listed on individual circuit breakers, and on unit label
diagrams.

30GT080-110 AND 230B-315B Compressor Protection
Board (CPCS) — The CPCS is used to control and protect
compressors and crankcase heaters. Board provides follow-
ing features:

• Compressor contactor control
• Crankcase heater control
• Ground current protection
• Status communication to processor board
• High-pressure protection

One large relay is located on CPCS board that controls

crankcase heater and compressor contactor. In addition, re-
lay provides a set of contacts that microprocessor monitors
to determine operating status of compressor. If processor board
determines that compressor is not operating properly through
signal contacts, control locks compressor off.

The CPCS contains logic that can detect if current-to-

ground of any winding exceeds 2.5 amps; if so, compressor
shuts down.

A high-pressure switch with a trip pressure of 426

± 7 psig (2,936 ± 48 kPa) is mounted on each compressor;
switch setting is shown in Table 18. Switch is wired in series
with the CPCS. If switch opens, CPCS relay opens, proces-
sor detects it through signal contacts and compressor locks
off.

If any of these switches open during operation, the com-

pressor stops and the failure is detected by processor when
signal contacts open. If lead compressor in either circuit is
shut down by high pressure switch, ground current protec-
tor, loss of charge switch, or oil pressure switch, all com-
pressors in the circuit are locked off.

Table 18 — Pressure Switch Settings, psig

(kPa)

SWITCH

CUTOUT

CUT-IN

High Pressure

426 ± 7

(2936 ± 48)

320 ± 20

(2205 ± 138)

Loss-of-Charge

7 (48.2)

22 (151.6)

30GT130-210, 230A-315A, AND 330A/B-420A/B — A con-
trol relay in conjunction with a ground fault module replaces
the function of the CPCS. To reset, press the push-button
switch on the module.

LOW OIL PRESSURE PROTECTION — Lead compressor
in each circuit is equipped with a switch to detect low oil
pressure. Switch is connected directly to processor board.
Switch is set to open at approximately 5 psig (35 kPa) and
to close at 9 psig (62 kPa) maximum. If switch opens
when compressor is running, processor board stops all com-
pressors in circuit. During start-up, switch is bypassed for
2 minutes.

CRANKCASE HEATERS — Each compressor has a 180-w
crankcase heater to prevent absorption of liquid refrigerant
by oil in crankcase when compressor is not running. Heater
power source is auxiliary control power, independent of main
unit power. This assures compressor protection even when
main unit power disconnect switch is off.

IMPORTANT: Never open any switch or disconnect
that deenergizes crankcase heaters unless unit is being
serviced or is to be shut down for a prolonged period.
After a prolonged shutdown or a service job, energize
crankcase heaters for 24 hours before starting unit.

COOLER PROTECTION

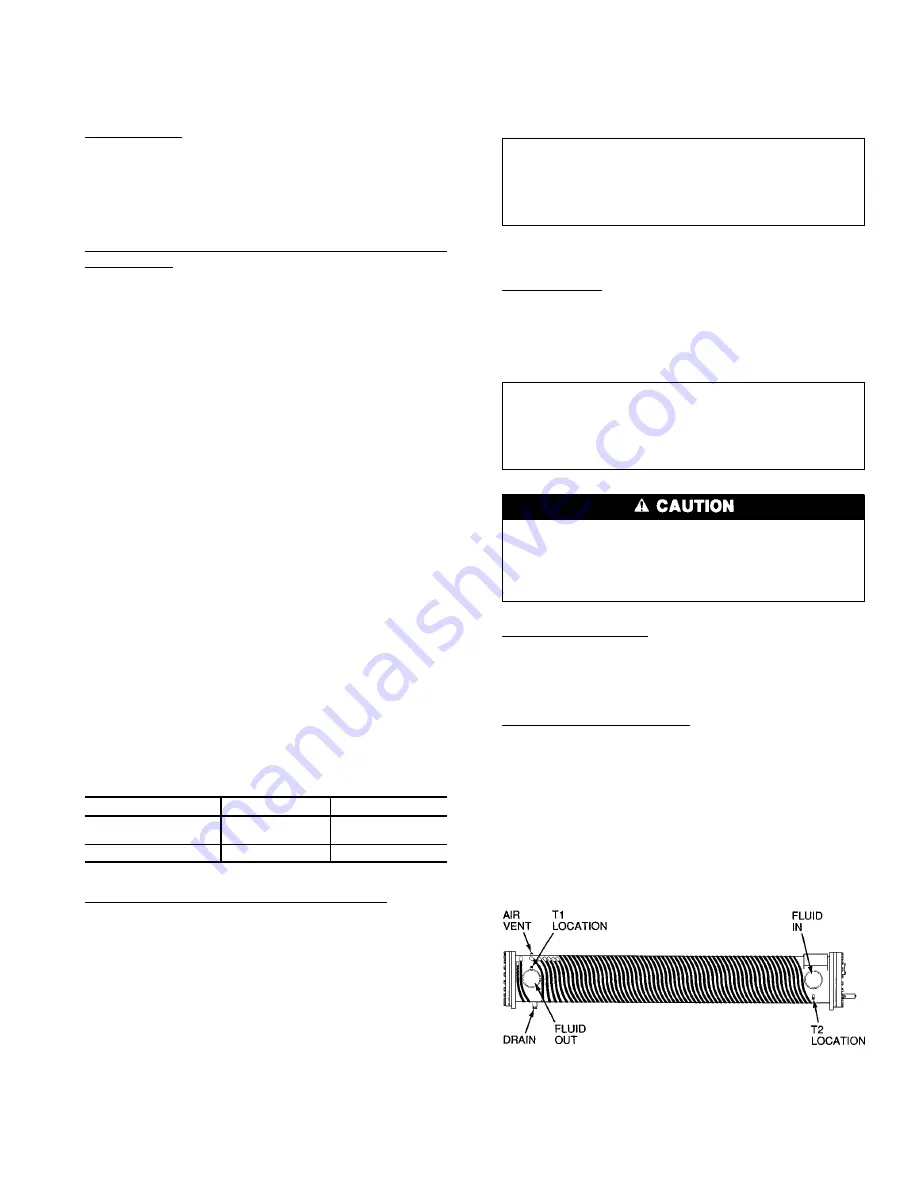
Freeze Protection — Cooler can be wrapped with heater cables
as shown in Fig. 33, which are wired through an ambient
temperature switch set at 36 F (2 C). Entire cooler is cov-
ered with closed-cell insulation, applied over heater cables.
Heaters plus insulation protect cooler against low ambient
temperature freeze-up to 0° F (−18 C).

IMPORTANT: If unit is installed in an area where am-
bient temperatures fall below 32 F (0° C), it is rec-
ommended that inhibited ethylene glycol or other suit-
able corrosion-inhibitive antifreeze solution be used in
chilled-liquid circuit.

If coolers are equipped with heaters and the coolers are
drained during the non-cooling season, the cooler heat-
ers MUST be disconnected by removing fuse no. 1. With-
out fluid in the cooler, the heater could reach a tempera-
ture that damages the cooler insulation.

Low Fluid Temperature — Microprocessor is programmed
to shut chiller down if leaving fluid temperature drops be-
low 35 F (1.7 C). When fluid temperature rises to 6° F
(3.3° C ) above leaving fluid set point, safety resets and chiller
restarts.

Loss of Fluid Flow Protection — Microprocessor contains
internal logic that protects cooler against loss of cooler flow.
Entering and leaving fluid temperature sensors in cooler
detect a no-flow condition. Leaving sensor is located in leav-
ing fluid nozzle and entering sensor is located in first cooler
baffle space in close proximity to cooler tubes, as shown in
Fig. 23. When there is no cooler flow and the compressors
start, leaving fluid temperature does not change. However,
entering fluid temperature drops rapidly as refrigerant enters
cooler through EXV. Entering sensor detects this tempera-
ture drop and when entering temperature is 5° F (2.8° C)
below leaving temperature, unit stops and is locked off.

T — Thermistor

Fig. 33 — Cooler Heater Cables

67

Summary of Contents for 30GT080-420

Page 1: ...Step 3 Check Compressor Mounting 27 Step 4 Cooler Fluid and Drain Piping Connections 27 PREPARATION FOR YEAR ROUND OPERATION PREPARATION FOR WINTER SHUTDOWN Step 5 Make Electrical Connections 28 FIEL...

Page 2: ...30A 315A and 330A B 420A B will have fus ible plugs with 3 8 in SAE Society of Automotive Engi neers U S A flares if required by local codes Table 1 Unit Sizes and Modular Combinations UNIT MODEL 30GT...

Page 3: ...rs are used a perimeter support channel between the unit and the isolators is recommended 4 Dimensions in are in millimeters 5 Thru the door handles for non fused disconnect op tion on 380 415 v and 4...

Page 4: ...d for spring iso lator location 3 If spring isolators are used a perimeter support channel between the unit and the isolators is recommended 4 Dimensions in are in millimeters 5 Thru the door handles...

Page 5: ...ator location 3 If spring isolators are used a perimeter support channel between the unit and the isolators is recommended 4 Dimensions in are in millimeters Fig 3 Dimensions 30GT130 170 230A 270A 330...

Page 6: ...816 2 Fig 4 Dimensions 30GT190 210 290A 315A 360A 50 Hz 360A B 60 Hz 390A B 420A B NOTES 1 Unit must have clearances for airflow from solid sur faces as follows Top Do not restrict in any way Ends 5 f...

Page 7: ...NON FUSED DISCONNECT OPTION Fig 5 Location of Optional Non Fused Disconnect 130 210 and 230A 315A 330A B 420A B Units 130 170 230A 270A 330A B 360B 50 Hz Shown 7...

Page 8: ...50 1730 1680 1660 750 786 764 755 C C 1830 1910 1863 1842 832 868 847 837 090 245B C AL 1833 1864 1724 1714 833 847 784 779 C C 2014 2040 1907 1899 915 927 867 863 100 255B 270B C AL 2222 2222 2133 21...

Page 9: ...83 433 728 707 754 737 150 230A 255A C AL 420 710 527 379 653 625 794 653 C C 478 768 585 436 285 711 880 740 170 270A 330A B C AL 437 787 605 392 680 740 825 664 C C 495 845 663 450 767 826 912 751 1...

Page 10: ...436 740 711 888 743 150 230A 255A C AL 430 723 527 379 653 625 831 682 C C 486 781 585 437 740 711 918 769 170 270A 330A B 360B C AL 437 792 612 397 694 760 840 666 C C 495 850 670 454 780 847 927 75...

Page 11: ...20 000 High Static Fan Speed rpm 1750 1750 1750 1750 1740 1740 1740 1740 1740 No Blades Diameter in 12 30 12 30 12 30 12 30 12 30 12 30 12 30 12 30 12 30 No Fans Total kW 6 22 2 6 22 2 8 29 6 8 29 6 1...

Page 12: ...76 000 100 000 76 000 176 000 High Static Fan Speed rpm 1740 1750 1740 1750 1740 1750 1740 1750 No Blades Diameter in 12 30 12 30 12 30 12 30 12 30 12 30 12 30 12 30 No Fans Total kW 10 37 0 6 22 2 16...

Page 13: ...000 76 000 196 000 120 000 76 000 196 000 100 000 100 000 200 000 120 000 120 000 240 000 High Static Fan Speed rpm 1740 1750 1740 1750 1740 1740 1740 1740 No Blades Diameter in 12 30 12 30 12 30 12 3...

Page 14: ...igh Static Fan Speed rpm 1740 1740 1740 1740 No Blades Diameter in 12 30 12 30 12 30 12 30 No Fans Total kW 12 44 4 12 44 4 24 88 8 12 44 4 12 44 4 24 88 8 Total Airflow cfm 120 000 120 000 240 000 12...

Page 15: ...0 56 630 56 630 High Static Fan Speed r s 29 29 29 29 29 29 29 29 29 No Blades Diameter mm 12 762 12 762 12 762 12 762 12 762 12 762 12 762 12 762 12 762 No Fans Total kW 6 22 2 6 22 2 8 29 6 8 29 6 1...

Page 16: ...4 47 190 35 864 83 054 High Static Fan Speed r s 29 29 29 29 29 29 29 29 No Blades Diameter mm 12 762 12 762 12 762 12 762 12 762 12 762 12 762 12 762 No Fans Total kW 10 37 0 6 22 2 16 59 2 10 37 0 6...

Page 17: ...56 630 35 864 92 494 56 630 35 864 92 494 47 190 47 190 94 380 56 630 56 630 113 260 High Static Fan Speed r s 29 29 29 29 29 29 29 29 No Blades Diameter mm 12 762 12 762 12 762 12 762 12 762 12 762 1...

Page 18: ...gh Static Fan Speed r s 29 29 29 29 No Blades Diameter mm 12 762 12 762 12 762 12 762 No Fans Total kW 12 44 4 12 44 4 24 88 8 12 44 4 12 44 4 24 88 8 Total Airflow L s 56 630 56 630 113 260 56 630 56...

Page 19: ...an Speed rpm 1445 1445 1445 1445 1445 1445 1445 1445 1445 No Blades Diameter in 12 30 12 30 12 30 12 30 12 30 12 30 12 30 12 30 12 30 No Fans Total kW 6 22 2 6 22 2 8 29 6 8 29 6 10 37 0 10 37 0 10 37...

Page 20: ...100 000 76 000 176 000 High Static Fan Speed rpm 1445 1445 1445 1445 1445 1445 1445 1750 No Blades Diameter in 12 30 12 30 12 30 12 30 12 30 12 30 12 30 12 30 No Fans Total kW 10 37 0 6 22 2 16 59 2...

Page 21: ...0 000 220 000 High Static Fan Speed rpm 1445 1445 1445 1445 1445 1445 1445 1445 No Blades Diameter in 12 30 12 30 12 30 12 30 12 30 12 30 12 30 12 30 No Fans Total kW 12 44 4 8 29 6 20 74 0 12 44 4 8...

Page 22: ...No Blades Diameter in 12 30 12 30 12 30 12 30 No Fans Total kW 12 44 4 12 44 4 24 88 8 12 44 4 12 44 4 24 88 8 Total Airflow cfm 120 000 120 000 240 000 120 000 120 000 240 000 CONDENSER COILS Type Ve...

Page 23: ...56 630 High Static Fan Speed r s 24 24 24 24 24 24 24 24 24 No Blades Diameter mm 12 762 12 762 12 762 12 762 12 762 12 762 12 762 12 762 12 762 No Fans Total kW 6 22 2 6 22 2 8 29 6 8 29 6 10 37 0 10...

Page 24: ...864 83 054 47 190 35 864 83 054 High Static Fan Speed r s 24 24 24 24 24 24 24 24 No Blades Diameter mm 12 762 12 762 12 762 12 762 12 762 12 762 12 762 12 762 No Fans Total kW 10 37 0 6 22 2 16 59 2...

Page 25: ...94 380 56 630 47 190 103 820 High Static Fan Speed r s 24 24 24 24 24 24 24 24 No Blades Diameter mm 12 762 12 762 12 762 12 762 12 762 12 762 12 762 12 762 No Fans Total kW 12 44 4 8 29 6 20 74 0 12...

Page 26: ...atic Fan Speed r s 24 24 24 24 No Blades Diameter mm 12 762 12 762 12 762 12 762 No Fans Total kW 12 44 4 12 44 4 24 88 8 12 44 4 12 44 4 24 88 8 Total Airflow L s 56 630 56 630 113 260 56 630 56 630...

Page 27: ...cing Field supplied shut off valves should also be in stalled to facilitate servicing and flow balancing Locate valves in return and supply cooler fluid lines as close to the chiller as possible Locat...

Page 28: ...ing should be to the non fused dis connect rather than the terminal blocks 30GT080 110 and 230B 315B Units All field power en ters the unit through the control box at the left end when facing the comp...

Page 29: ...ing area All units have a single location for power connection one per module on 230 420 units to simplify field power wiring The maximum acceptable wire size for the terminal block is 500 kcmil Copp...

Page 30: ...onal power supply is re quired If a separate power source is required follow these instructions and disconnect the wires between the control and power terminal blocks For 30GT080 110 and 230B 315B Uni...

Page 31: ...ided between terminals TB6 3 and TB6 4 for field use To use this circuit remove the fac tory jumper and install the switches LEGEND AND NOTES FOR WIRING DIAGRAMS Fig 16 and 17 LEGEND A Alarm CWFS Chil...

Page 32: ...350 300 300 577 8 424 8 380 415 50 342 440 244 1 300 250 250 497 0 363 5 267 2 300 300 300 522 8 389 3 100 208 230 60 187 253 470 1 500 500 500 835 2 633 2 535 6 600 600 600 908 6 706 6 460 60 414 50...

Page 33: ...8 633 362 5 400 400 400 531 1 435 1 384 1 400 400 400 552 7 456 7 380 60 342 418 479 3 500 500 500 761 0 609 0 521 3 600 600 600 803 0 651 0 230 50 207 253 796 2 800 800 800 1206 6 988 3 865 8 1000 80...

Page 34: ...497 0 500 600 600 760 1 622 1 315 208 230 60 187 253 890 4 1000 1000 1000 1391 3 1115 3 1000 0 1000 1200 1200 1501 3 1225 3 460 60 414 506 413 1 450 450 450 676 3 538 3 451 1 450 500 500 714 3 576 3 5...

Page 35: ...344 9 350 350 400 599 6 467 6 315 208 230 60 187 253 521 4 600 600 600 1019 2 743 2 587 2 600 600 700 1092 6 816 6 460 60 414 506 248 9 300 250 300 500 8 367 3 273 8 300 300 300 529 4 395 9 575 60 518...

Page 36: ...5 247 346 50 44 9 247 79 5 382 44 9 247 53 8 280 380 415 50 43 6 223 65 4 345 43 6 223 46 8 280 090 PW 208 230 60 89 7 268 67 9 207 89 7 268 89 7 268 460 60 44 9 134 33 3 104 44 9 134 44 9 134 575 60...

Page 37: ...07 7 304 107 7 304 460 60 46 8 152 46 8 152 46 8 152 46 8 152 46 8 152 46 8 152 575 60 41 7 106 41 7 106 41 7 106 41 7 106 41 7 106 41 7 106 380 60 55 8 168 55 8 168 55 8 168 55 8 168 55 8 168 55 8 16...

Page 38: ...400 380 415 50 65 5 345 65 5 345 65 5 345 65 5 345 65 5 345 255 PW 208 230 60 89 8 268 89 8 268 89 8 268 151 3 414 151 3 414 460 60 44 9 134 44 9 134 44 9 134 65 4 207 65 4 207 575 60 36 6 99 36 6 99...

Page 39: ...5 247 52 6 280 45 5 247 52 6 280 346 50 44 9 247 79 5 382 44 9 247 79 5 382 380 415 50 43 6 223 65 4 345 43 6 223 65 4 345 255 PW 208 230 60 89 7 268 106 4 304 89 7 268 106 4 304 460 60 44 9 134 48 7...

Page 40: ...80 2 400 55 8 294 80 2 400 80 2 400 230 50 87 9 366 87 9 366 107 7 545 87 9 366 107 7 545 107 7 545 380 415 50 46 8 253 46 8 253 65 5 345 46 8 253 65 5 345 65 5 345 330 PW 208 230 60 107 7 304 107 7 3...

Page 41: ...345 330 PW 208 230 60 107 7 304 107 7 304 107 7 304 107 7 304 107 7 304 107 7 304 460 60 46 8 152 46 8 152 46 8 152 46 8 152 46 8 152 46 8 152 575 60 41 7 106 41 7 106 41 7 106 41 7 106 41 7 106 41 7...

Page 42: ...80 2 240 80 2 240 230 50 77 0 206 77 0 206 107 7 327 107 7 327 107 7 327 107 7 327 107 7 327 380 415 50 44 9 134 44 9 134 65 5 207 65 5 207 65 5 207 65 5 207 65 5 207 30GT UNIT SIZE NAMEPLATE V Hz 3...

Page 43: ...ng types of temperature reset Return fluid temperature reset Space temperature reset requires accessory thermistor Outdoor air temperature reset requires accessory thermistor Chilled fluid flow switch...

Page 44: ...t and output signals of microprocessor control prior to unit start up This check ensures that all con trol options thermistors and status switches are in proper working order To initiate the quick tes...

Page 45: ...ter Fluid Temperature TP Test Pin Fig 19 Center of Flotronic Control System 080 110 and 230B 315B Shown NOTES 1 Refer to Controls and Troubleshooting literature for details 2 Processor board is rotate...

Page 46: ...and quick test display codes C QUICK TEST STEPS 31 42 OUTPUT RELAYS These quick test steps allow microprocessor to check output signals from relay boards in unit control system In addition operation...

Page 47: ...8 Brine EXV Configuration Header 6 TXV 50 Hz Configuration Header 7 60 Hz External Reset DIP Switch 1 Return Fluid Reset Reset Disabled DIP Switch 2 Reset Enabled Pulldown Disabled DIP Switch 3 Pulld...

Page 48: ...or Not Used Thermistor OK T7 Compressor Thermistor Circuit A EXV Units Thermistor Faulty or Not Used Thermistor OK T8 Compressor Thermistor Circuit B EXV Units Thermistor Faulty or Not Used Thermisto...

Page 49: ...rgize Compressor B1 OFM2 080 110 Energize Compressor B1 OFM6 and OFM8 all other unit sizes K5 No Action 080 Energize Compressor B2 all other unit sizes K6 No Action 080 150 K7 Energize Compressor B3 1...

Page 50: ...ls and Troubleshooting literature for details 4 Start chilled fluid pump 5 Turn ON OFF switch to ON position The display will read During this time the machine checks all po tentiometers and thermisto...

Page 51: ...low could subject tubes to frost pinching in tube sheet resulting in failure of cooler Consult application data and job design requirements to determine flow rate requirements for particular installat...

Page 52: ...fluid temperature is being reset display shows when the display button is pressed HEAD PRESSURE CONTROL Units with EXV Microprocessor controls EXV to maintain a superheat of 30 F 16 7 C entering comp...

Page 53: ...0 A1 B1 5 63 A1 A2 B1 63 A1 B1 B2 6 70 A1 A2 B1 70 A1 B1 B2 7 93 A1 A2 B1 B2 93 A1 A2 B1 B2 8 100 A1 A2 B1 B2 100 A1 A2 B1 B2 110 290B 315B 60 Hz A1 B1 1 14 A1 14 B1 2 29 A1 B1 29 A1 B1 3 36 A1 B1 36...

Page 54: ...B1 28 A1 B1 4 33 A1 B1 33 A1 B1 5 44 A1 A2 B1 44 A1 B1 B2 6 50 A1 A2 B1 50 A1 B1 B2 7 61 A1 A2 B1 B2 61 A1 A2 B1 B2 8 67 A1 A2 B1 B2 67 A1 A2 B1 B2 9 78 A1 A2 A3 B1 B2 78 A1 A2 B1 B2 B3 10 83 A1 A2 A3...

Page 55: ...7 A1 A2 B1 B2 67 A1 A2 B1 B2 5 83 A1 A2 A3 B1 B2 83 A1 A2 B1 B2 B3 6 100 A1 A2 A3 B1 B2 B3 100 A1 A2 A3 B1 B2 B3 190 290A 360A 390B 50 Hz A1 1 11 A1 11 A1 2 17 A1 17 A1 3 28 A1 B1 28 A1 B1 4 33 A1 B1...

Page 56: ...ctronic Expansion Valve T Thermistor TXV Thermostatic Expansion Valve Fig 21 Typical Thermistor Locations SIZE 080 110 SIZE 130 210 And associated modular units see Table 1 Fig 22 Thermistor T3 and T4...

Page 57: ...ec tronic control system that normally does not require service For details on controls refer to Controls and Troubleshoot ing literature 30GT080 110 AND 230B 315B UNIT CONTROL BOX Viewed facing compr...

Page 58: ...30A 315A and 330A B 420A B only 3 Open the air vent at the top of the cooler and open the drain on the bottom of the cooler near the leaving fluid outlet to drain the cooler Both the drain and the air...

Page 59: ...7 Close the air vent at the top of the cooler and close the drain on the bottom of the cooler near the leaving fluid outlet Both the drain and the air vent are located on the leaving fluid end of the...

Page 60: ...erant leaks with soap solution or Halide device 6 Replace cooler insulation Condenser Coils COIL CLEANING Clean coils with a vacuum cleaner fresh water compressed air or a bristle brush not wire Units...

Page 61: ...oad ing the compressor This is commonly referred to as MOP maximum operating pressure If it appears that EXV is not properly controlling operat ing suction pressure or superheat there are a number of...

Page 62: ...on processor board and that thermistor probes are located in proper position in refrigerant circuit Fig 21 and 23 When above checks have been completed actual opera tion of EXV can be checked by usin...

Page 63: ...859 3 906 88 1 832 3 814 89 1 805 3 726 90 1 778 3 640 91 1 751 3 556 92 1 725 3 474 93 1 699 3 395 94 1 673 3 318 95 1 647 3 243 96 1 622 3 170 97 1 597 3 099 98 1 572 3 031 99 1 548 2 964 100 1 523...

Page 64: ...9 5 1 912 4086 30 0 1 887 4000 30 5 1 862 3915 31 0 1 837 3832 31 5 1 813 3752 32 0 1 789 3674 32 5 1 764 3597 33 0 1 741 3523 33 5 1 717 3450 34 0 1 693 3379 34 5 1 670 3310 35 0 1 647 3243 35 5 1 62...

Page 65: ...ooler by controlling flow of refrigerant into cooler Superheat can be reset but should be reset only if absolutely necessary When optional TXVs are used thermistors T5 T6 T7 and T8 are eliminated see...

Page 66: ...awn from coupling for service TO REPLACE THERMISTORS T1 T5 T6 T7 AND T8 Add a small amount of thermal conductive grease to ther mistor well Thermistors are friction fit thermistors which must be slipp...

Page 67: ...ly to processor board Switch is set to open at approximately 5 psig 35 kPa and to close at 9 psig 62 kPa maximum If switch opens when compressor is running processor board stops all com pressors in ci...

Page 68: ...ON A device is located on suc tion line designed to relieve pressure on a temperature rise to approximately 170 F 77 C PRESSURE RELIEF VALVES Where relief valves are installed there is one in each cir...

Reviews: