8
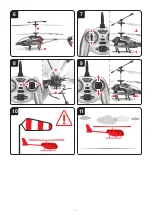
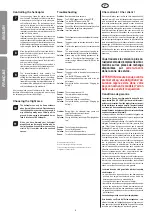
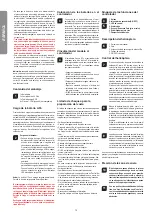
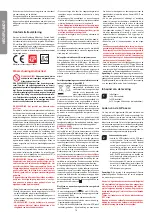
Controlling the helicopter
7
In case you don´t know the control functions of
your Carrera RC helicopter yet, please take some
minutes before the first flight in or to make your-
self familiar with them. The descriptions left or
right refer to the view out of the cockpit (pilote´s
view). Push the throttle up to increase the rota-
tional speed of the main rotor blades. Increase the
rotational speed of the main rotor blades and the
model will start to ascend.
If you push down the throttle and thus reduce the
rotational speed of the main rotor blades the heli-
copter will descend. When the model has lifted off
the ground you can get it into stationary hovering
without abrupt ascending or descending by care-
fully moving the throttle upwards and downwards.
8
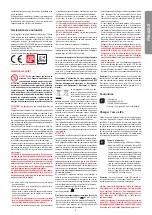
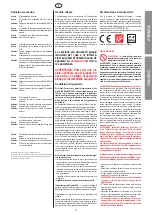
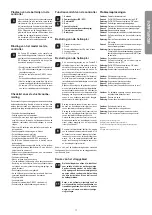
Move the right lever (tail) to the left and the heli-
copter’s nose turns (yaws) round the main rotor’s
axis in a circle to the left.
Move the right lever (tail) to the right and the heli-
copter’s nose turns (yaws) round the main rotor’s
axis in a circle to the right.
Use the trimmer for tail until you have reached a
stable neutral position of the helicopter when hov-
ering, without moving the right lever (tail).
9
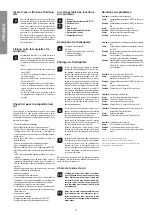
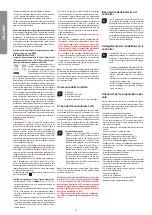
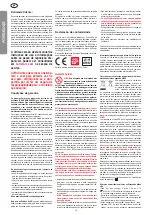
The forward-/backward lever controls the
helicopter´s pitch forward and backward. When
shifting the lever forward the nose of the helicop-
ter will move downwards and the helicopter will fly
forward. When shifting the forward-/backward le-
ver backward the helicopter will move backwards
and the helicopter will fly backward.
After having made yourself familiar with the main control
functions and having chosen an appropriate area for flying
the helicopter, you can start the first flight.
Choosing the flight area
10
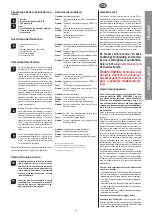
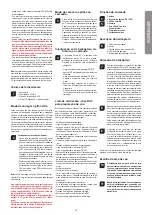
The helicopter can only be flown outdoors
when there is little or no wind. Please be aware
that, although it may be calm on the ground, it
may still be very windy even a little way off the
ground. If this warning is disregarded, it may
lead to total loss of the helicopter.
11
When you have trimmed your helicopter
properly and are thoroughly familiar with its
controls and how it can perform, you can then
start to fly it in smaller and more confined
spaces.
Troubleshooting
Problem:
Remote control does not work.
Cause:
The ON/OFF-power switch is turned “OFF”.
Solution:
Turn the ON/OFF-power switch “ON”.
Cause:
The batteries have been wrongly inserted.
Solution:
Check if the batteries have been correctly inserted.
Cause:
The batteries do not have enough power.
Solution:
Insert new batteries.
Problem:
The helicopter cannot be controlled with the remo-
te control
Cause:
The power switch on the reomote control is turned
“OFF”.
Solution:
First turn the power switch on the remote control
“ON”.
Cause:
The remote control is possibly not correctly fre-
quency bound with the receiver on the helicopter.
Solution:
Please carry out the binding procedure as de-
scribed in „Checklist for flight preparation“, if ne-
cessary using a different channel (A/B/C) on the
controller.
Problem:
The rotor blades do not rotate.
Cause:
The power switch on the model or the controller is
at “OFF”
Solution:
Turn the ON/OFF-power switch “ON”.
Cause:
The rechargeable battery is too weak or has run
out of power.
Solution:
Charge the battery (see chapter “Charging the
battery”).
Problem:
The helicopter does not lift.
Cause:
The rotor blades rotate too slowly.
Solution:
Push the throttle up.
Cause:
The battery´s power is not sufficient.
Solution:
Charge the battery (see chapter “Charging the
battery”).
Problem:
During flight, the helicopter loses speed and
height without any obvious reason.
Cause:
The battery is too weak.
Solution:
Charge the battery (see chapter “Charging the bat-
tery”).
Problem:
The helicopter lands too quickly.
Cause:
Loss of throttle control.
Solution:
Push the throttle down slowly.
Cause:
Throttle has been pushed down too quickly.
Errors and changes excepted
Colours / final design – changes excepted
Technical changes and design-related changes excepted
Pictograms = symbolic photos
Chère cliente ! Cher client !
Nous vous félicitons pour l‘achat de votre maquette d‘héli-
coptère Carrera RC qui a été fabriqué selon le niveau actuel
de la technique. Nous avons toujours pour ambition d’amé-
liorer et de perfectionner nos produits et nous réservons la
possibilité de réaliser des modifications techniques relatives
à la présentation et design de nos produits. Les divergences
de faible importance du produit, que vous avez acheté, par
rapport aux données et illustrations de ces instructions de
montage et d’utilisation ne sauraient donner lieu à des récla-
mations de ce fait. Ces instructions de montage et d’utilisa-
tion forment partie intégrale du produit. Le fabricant décline
toute responsabilité en cas d’inobservation des instructions
de montage et d’utilisation et des consignes de sécurité y
figurant. Veuillez conserver ces instructions de montage et
d’utilisation, afin que vous puissiez les consulter ultérieure-
ment et et les remettre à tout utilisateur de ce véhicule si
besoin est.
Vous trouverez la version la plus ac-
tuelle de ce mode d‘emploi et les infor-
mations sur les pièces de rechange
disponibles sur
carrera-rc.com
dans la zone de service.
ATTENTION! Assurez-vous avant le
premier vol qu‘une obligation d‘as-
surance légale existe dans votre
pays concernant le modèle d‘avion
dont vous avez fait l‘acquisition.
Conditions de garantie
Les produits Carrera sont des produits de qualité tech-
nique élevée (PAS DE JOUET) qui devraient être mani-
pulés avec précaution. Veuillez impérativement respec-
ter les indications du mode d’emploi. Tous les éléments
sont soumis à des contrôles approfondis (sous réserve
de modifications techniques et des véhicules destinées
au perfectionnement du produit).
La responsabilité du fabricant est cependant engagée aux
termes des conditions de garantie ci-après à supposer que
le produit présente des défauts :
La société Stadlbauer Mar Vertrieb GmbH (ci-après
désignée „Fabricant“) garantit au client final (ci-après dési-
gné „Client“) selon les clauses suivantes que la maquette
d’hélicoptère Carrera RC livré au client (ci-après désigné
„Produit“) sera exempt de vices de matériel ou de fabrication
durant une période de deux ans à partir de la date d’achat
(délai de garantie). Le fabricant éliminera de tels vices selon
sa propre appréciation à ses frais en les réparant ou en
livrant des pièces neuves ou ayant subi une révision géné-
rale. La garantie ne s’étend pas aux pièces d’usure (par
exemple la batterie, les pales de rotor, le recouvrement de
cabine, la roue dentée), aux dommages dus à un traitement/
utilisation non conforme ou à des interventions externes.
D’autres revendications du client, en particulier de dom-
mages et intérêts, contre le fabricant sont exclus.
Les droits contractuels ou légaux du client (exécution ulté-
rieure, résiliation du contrat, réduction du prix, dommages et
intérêts) vis-à-vis du vendeur correspondant, droits existant
si le produit n’était pas exempt de vices lors du transfert du
risque, ne sont pas concernés par cette garantie.
Les droits issus de cette garantie du fabricant spéciale
n‘existent que si
• le vice réclamé ne repose pas dans des dommages qui
résultent d‘un emploi non conforme ou non dapté aux
directives prescrites dans le mode d‘emploi,
• il ne s‘agit pas de signes d‘usure dus à l‘emploi,
• le produit ne présente aucun signe qui permette de consta-
ter que des réparations ou d‘autres interventions ont été
effectuées par des ateliers non autorisés par le fabricant,
• le produit n‘a été utilisé qu‘avec des accessoires autorisés
par le fabricant.
Les cartes de garantie ne sont pas remplaçables.
Avis destinés aux États de l’Union européenne :
nous
attirons l’attention sur l’obligation de garantie légale du ven-
deur, pour autant que cette obligation de garantie ne soit pas
restreinte par les conditions de la présente garantie.
FR
A
N
ÇA
IS
EN
G
LI
S
H


